

Happy New Year! Now that it is the winter time, you will need to bundle up! Let's enjoy learning about animals and people that live in cold climates!
Cold weather means wearing boots outside! It's nice to see colorful, fluffy winter boots!
Paper Winter Boots!

Supplies: Construction Paper, Fabric, 2 Pom Poms, String, hole puncher, scissors, crayons/markers, glue/tape.
Instructions:
1. Cut out a boot shape from construction paper. Decorate the paper boot with paper shapes and pieces of fabric. Feel free to draw a design on the book with crayons or markers.
2. Punch one hole with the hole puncher on the top side of the boot in the front of the boot. Place a string through the hole and tie a knot so that the string stays in place and there are 2 loose ends dangling. Attach a pom pom on each end of the string. Now the boot has a fluffy pom pom decoration.
Enjoy the paper boots below designed by the children at the library!


It feels nice to walk in the snow with new boots! Now the sun is out! There was a snowman created that is now melting in the sun!
Melting Snowman 3D Craft!

Supplies: Dark paper, white paper, white fabric, small piece of orange fabric, crayons/markers, glue/tape, scissors and a small cardboard tube.
Instructions:
1. Wrap a small cardboard tube in white paper. Draw a face on it. Attach a small piece of orange fabric in the shape of a carrot onto the center of the face for the carrot nose. If you don't have orange fabric, then feel free to draw your own nose.
2. Cut out a paper hat shape and attach onto the top of the tube face. Now you have the head of the snowman.
3. Cut out 2 twig shapes from brown or dark paper and attach each twig shape to the side of the face.
4. Cut out a white paper circle that is bigger in size than the snowman's head and attach onto the back of the head.
5. Cut out a square like shape from white fabric and attach onto the back of the white circle. And then attach the entire pile onto a dark piece of paper. The dark paper should resemble the ground and now it should look as if the snowman is melting into the ground.
Enjoy the melting snow figures below created by the children at the library!


I'm wondering about the animals hibernating in the winter!

Supplies: One paper plate, one cut out of a bear, brown paper, cotton balls, white paper, fabric, glitter glue, glue/tape, crayons/markers, scissors, green paper, red paper, and one small fake feather.
Instructions:
1. Cut out a tree shape from brown paper and attach onto the plate. Attach it onto the plate with only the bottom sticking onto the plate so that it looks as if the tree is standing up.
2. Cut out a semi-circle from brown paper and attach it partially onto the bottom of the tree. Make sure the semi-circle is a flap you can lift up and down to reveal the sleeping bear inside the cave.
3. Color in a paper bear and attach under the semi-circle flap onto the bottom of the tree. Cut out a small square shape from fabric and attach near the bear. Now the bear has a blanket.
4. Cut out a cardinal shape from red paper and attach onto the top of the tree. Feel free to attach a fake feather onto the cardinal for more decoration.
5. Rip up some cotton balls in half to make more pieces of cotton and attach all over the plate and tree. Now you have snow!
6. Cut out a triangle shape from green paper and attach onto the plate. This will be a winter pine tree. Attach cotton on it for a snowy effect.
7. Draw a blue pond onto the plate and attach a white paper circle over it to make it seem as if it's frozen.
8. Decorate the plate and pond and trees with glitter glue to create a snowy, sparkling winter affect.
Enjoy the hibernating bear dioramas below created by the children at the library!


Seeing all that snow makes me wonder about snowflakes and the patterns on them!


Polar bears are a highly studies animal in the winter time! They live in cold climates!
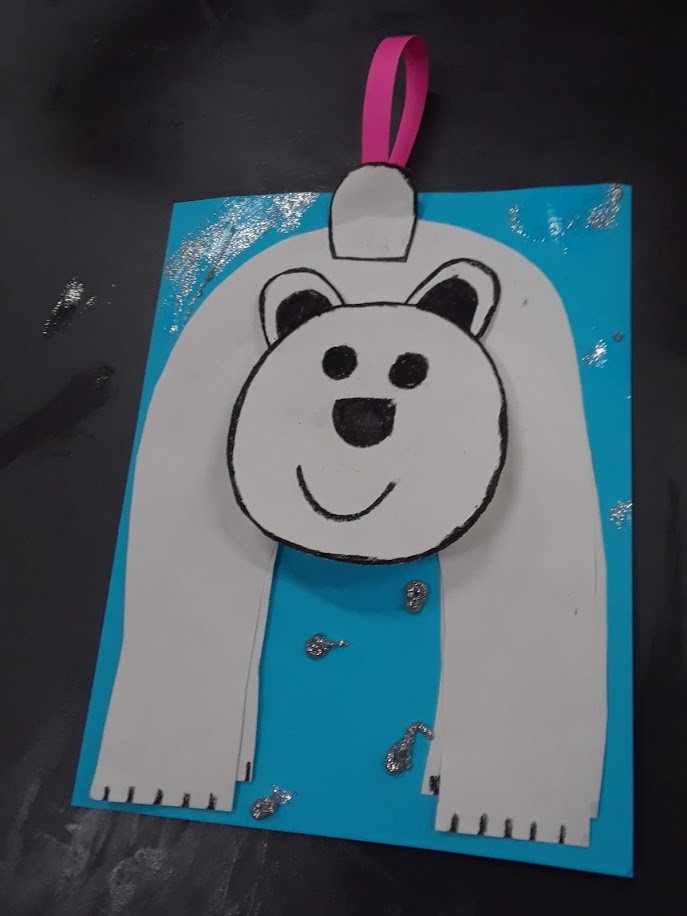
Bobble Head Polar Bear!

Supplies: One sheet of construction paper of any bright color, white paper, one thin strips of card stock or thick paper, glue/tape, black crayons/markers, and glitter glue or glitter and glue.
Instructions:
1. Cut out 2 big arch shapes from white paper. One arch should be slightly bigger than the other.
2. Paste the arches together onto the sheet of paper. The smaller arch should be in front of the larger arch. Now you have the body of the polar bear with the 4 paws on the bottom.
3. Take 2 strips of paper and fold them over each other in a lanyard pattern until you get a paper spring. Attach the paper spring on the top center of the smaller front arch.
4. Cut out a circle from white paper. The circle should be sizable, but not too big. Using black crayon or marker, draw a polar bear like face on the circle and attach the face onto the top of the spring. Now the face/head of the polar bear will bobble and wobble.
5. Cut out 3 semicircles from white paper. Attach 2 on top of the head for the ears and one onto the top of the big arch for the tail.
6. Adorn the background of the polar bear with glitter glue or glitter. If you wish, you may decorate the polar bear with glitter itself.
Enjoy the bobble head polar bears below created by the children at the library!


Penguins and polar bears slide down snow hills. Perhaps we can imagine them sliding down together on a sled!
Penguin and Bear on Sled!

Supplies: One thick, long strip of card stock, an image of a polar bear, an image of a penguin, 2 smaller pieces of card stock, 2 long narrow strips of cardboard, crayons/markers, glue/tape and string.
Instructions:
1. Fold up and curl both ends of the long, thick strip of card stock to resemble a sled.
2. Attach the 2 thin strips of cardboard under the sled. Make sure they are sticking out in the front to resemble the skis of the sled.
3. Color in and decorate an image of a polar bear. Do the same thing to the image of the penguin.
4. Attach each animal to a smaller strip of card stock and fold the bottom of each strip of card stock so that each strip of card stock is in an "L" shape.
5. Attach each animal on the card stock onto the sled. Attach each one from the folded bottom part of the "L" shape so that they stand up on the sled or sit up on the sled. One animal should be behind the other and each facing the front of the sled.
6. Attach a string on the front of the sled by each end. Now the sled can be pulled with the polar bear and penguin on it.
Enjoy the arctic sleds below created by the children at the library!


Watching polar animals play in the snow and ice makes me want to play in the snow outside and make snow angels!
Paper Plate Snow Angels!

Supplies: One paper plate, light colored card stock, fabric, glitter, one small pom pom, glue, scissors, crayons/markers and snow flake stickers or foam shapes.
Directions:
1. Using scissors, cut out a snow angel shape from card stock of a light pale blue color or any pale color.
2. Attach the snow angel shape onto the center of the paper plate.
3. Cut out 4 strips of fabric. These will be the arms and legs of the child making the snow angel. Cut out a square shape from fabric for the jacket and a hat shape from fabric. Cut out 2 sock or shoe shapes from fabric.
4. Attach each strip of fabric, arms and legs inside the parts of the snow angel. Cut a small V on top of the square shaped fabric so that it looks like a jacket or heavy vest. Attach onto the center of the snow angel. Attach the sock shapes onto the bottom of each fabric leg.
5. Cut out a small circle from paper and drawer a face on it. Attach onto the top of the snow angel. Attach the hat shaped fabric on top of the head and a small pom pom on top of the hat.
6. Adorn the snow angel and the background with glitter and snow flake stickers.
Enjoy the snow angels below created by the children at the library!


Penguins are widely studied in the winter time!
It's fun to see them waddle! Penguins rock and roll!
Rock and Roll Penguins!

Supplies: One paper plate, black paper, white paper, small pieces of paper in a bright color, google eyes, crayons/markers, glue/tape and star stickers.
Directions:
1. Cut out a penguin shape from black paper. Cut out a belly shape and face outline for the penguin from white paper. Attach the white belly onto the front center of the penguin's body. Attach the white face outline onto the bottom center head of the penguin.
2. Attach the google eyes onto the penguin's face and color in a beak and other facial features on the penguin.
3. Cut out feet for the penguin from paper of bright color. Attach the feet onto the bottom of the penguin.
4. Cut out a guitar shape from brightly colored paper. Attach the guitar in a slanted position onto the middle of the penguin in front of the belly and between the wings/flippers. Fold the tips of the flippers or wings inward to make it seem as if the penguin is holding the guitar.
5. If you wish, draw strings on the guitar and attach a star sticker on the guitar for decoration.
6. Cut out the center of a paper plate and discard the paper plate edges. Now you have a circle. Fold the paper plate circle in half and stand it up along the edges so that it rocks side by side.
7. Attach the penguin on one side of the folded paper plate center. And now if you rock the circle, the penguin will appear to waddle and rock and roll with the guitar.
Enjoy the rock and roll penguins below created by the children at the library!


3D Penguin!

Supplies: Dark card stock, white construction paper, yellow paper, scissors, glitter glue, glue/tape, google eye and anything else you wish to use for decoration.
Instructions:
1. Cut out a penguin shape from dark card stock
2. Cut out a pear shape from white construction paper and attach onto the front of the penguin shape.
3. Cut out 4 medium circles from white paper. The circles should be 3-4 inches in height and width.
4. Fold the circles in half. Attach the circles together by gluing one side of each circle to the other side of the next circle. Once all the circles are attached, then attach to the belly of the penguin.
5. Cut out 2 feet from orange or yellow paper. Attach the feet onto the bottom of the penguin.
6. Cut out a small triangle shape from the orange or yellow paper and attach onto the beak of the penguin.
7. Attach a google eye onto the face near the beak.
8. Adorn the penguin with stickers and glitter glue.
Enjoy the 3D penguins below created by the children at the library!


Seeing penguins waddle in the snow makes me want to go snowboarding!
Snowman on Snowboard!


Supplies: One paper plate, white paper, card stock, pipe cleaner, one ice cream stick, crayons/markers, glue/tape, glitter glue or glitter and scissors.
Instructions:
1. Cut a line in the lower center of the paper plate using scissors.
2. Using crayons/markers and glitter glue, drawer a background onto the plate, (ex. sky, trees, sun, sparkles, etc.)
3. Cut out a snowman shape from white paper.
4. Draw a face onto the snowman and decorate the snowman with a paper hat, stickers and a fabric scarf. Attach a piece of pipe cleaner onto the back center of the snowman in a horizontal direction. Make sure the two ends of the pipe cleaner are sticking out. Now you have the arms for the snowman.
5. Cut out a snowboard shape from card stock and attach the snowboard onto the bottom of the snowman to make it seem as if the snowman is riding on the snowboard.
6. Attach the snowman with the snowboard onto the top of an ice cream stick. Now you have the full snowman on snowboard puppet.
7. Place the puppet upwards through the slit in the plate and move the puppet around and back and forth in front of the background.
Enjoy the snowmen on snowboards below created by the children at the library.


You need a nice and warm winter hat for snowboarding!
Hall of Hats!


Supplies: Construction Paper, Fabric, Pom Poms, Scissors, Glue/Tape, Crayons/Markers and Stickers.
Instructions:
1. Cut out 2 hat shapes together from construction paper and make sure the 2 hats are connected at one end so that they open into a book form.
2. Decorate the hats with fabric, pom poms, stickers, etc. Draw designs, etc.
3. If you wish, cut out 2 smaller hat shapes and attach onto each bigger hat and decorate with pom poms and fabric and stickers.
Enjoy the halls of hats below created by the children at the library!


You'll need mittens to wear along with a winter hat!
Circle of Mittens!

Supplies: Card stock or regular construction paper, Scissors, Crayons/Markers, Glue/Tape, String and Stickers.
Instructions:
1. Using scissors, cut out 8-9 mitten shapes from card stock or construction paper.
2. Draw designs on the paper mittens and decorate them with stickers.
3. Cut out a loop or open circle from paper or the center of a paper plate.
4. Attach the bottoms of mittens along the loop/circle so that the mittens are in a circular formation.
5. Attach a string onto the back of one of the mittens so that you can hang up the circle of mittens onto something or just dangle it from the string.
Enjoy the circles of mittens below created by the children at the library.


Now that we are all bundled up in our winter gear, it's a nice time to visit the winter lodge and ski and ice skate!
Winter House

Supplies Used: Card Stock, white paper, one cotton ball, scissors, glitter, glue, crayons/markers and anything else of your preference.
Instructions:
1. Fold a letter-sized sheet of card stock in half. Stand it up so that the top and bottom edges are on a flat surface.
2. Using scissors, cut out a slant on each of the top sides so that it looks like a house with a roof.
3. Cut out a rectangular opening on the bottom but not all the way. This should be a flap that can open and close like a door.
4. Cut out square or round shapes from white paper. Draw curtains and bars on them and attach onto the front of the card stock. These will be the windows.
5. Color in a brick design on a piece of white paper in the shape of a small rectangle. Attach onto the top side of the house. Attach a cotton ball onto the top of the rectangle and now you have a chimney with smoke coming out.
6. If you wish, cut out a strip of white paper and cut a swirly shape around the edges and attach to the roof to make it seem as if there is snow on the roof.
7. Make an icicle design with glue on or near the roof and the tops of windows. Pour glitter over the glue. Shake and let dry. Now you have sparkly icicles dripping down the roof and windows!
Enjoy the winter homes below created by the children at the library!


Let's skate on the pond!
Ice Skates Craft!

Supplies Used: White construction paper, 2 big Popsicle sticks, 2 long pieces of string, 2 large pop poms, glue/tape, glitter glue or glitter, hole puncher and crayons/markers (optional).
Instructions:
1. Cut out 2 skate shapes from white construction paper.
2. Punch a few holes in each paper skate where the laces would go through.
3. Cut out 2 shoe sole or heel shapes from white paper. Attach them onto the bottom of each skate.
4. Attach each Popsicle stick into the bottom of each soul/heal on each skate.
5. Lace a long piece of string through the holes of each skate and then tie both strings together when the lacing is done so that the skates can be tied together.
6. Attach a pom pom onto each skate if you wish.
7. Decorate the skates by drawing designs on them using glitter glue, glitter or crayons/markers.
8. Allow the glitter glue to dry.
Enjoy the pairs of ice skates below designed by the children at the library!


I see people skiing down the hill so fast. They look like squirrels on skis!
Squirrels on Skis!

Supplies: One printout of a squirrel, 2 Popsicle sticks, one small cardboard tube, white paper, paper plate, cotton balls, card stock, scissors, glue/tape, crayons/markers and glitter glue.
Instructions:
1. Wrap a small cardboard tube in white paper. Attach the white wrapped tube onto the center of the paper plate. This will be the ski slope or hill.
2. Color in an image of a squirrel. Attach a piece of card stock onto the back of the squirrel image. The card stock should be cut into a similar shape as the squirrel.
3. Bend the bottom of the squirrel and the bend should be half an inch. Attach 2 Popsicle sticks to the bottom of the squirrel. It's easier to attach the sticks to the squirrel if there is a bend at the bottom.
4. Attach the squirrel with the sticks onto the top of the white cardboard tube. Now it looks as if the squirrel is on skis and skiing down a hill.
5. Cut out a small house or ski shack from card stock or paper. Cut out a pine tree shape. Color a design on the shack and tree. Attach them onto the plate. You may have to bend the bottom a little to secure them onto the plate.
6. Embellish the scenery with cotton balls for snow and glitter glue for winter sparkle.
Enjoy the squirrels on skis below created by the children at the library!


Snow Plow!

Happy Chinese New Year! It's the year of the rooster!
Rocking Rooster!


Supplies: Construction paper, 2 big googly eyes (self adhesive), feathers, crayons/markers and glue/tape.
Instructions:
1. Cut out a double rooster shape from construction paper but make sure that the top ends are still connected together. Once the rooster shape is cut, it should stand up on it's own.
2. After deciding which end is the head and which is the tail, cut out a comb shape and attach onto the top of the head. Cut a small triangle from paper and attach onto the front of the head for the beak.
3. Attach a googly eye onto each side of the head/face.
4. Draw a design on the rooster on both sides.
5. Attach feathers onto the sides and tail of the rooster on both sides.
Enjoy the roosters below designed by the children at the library!


I hear a party going on! Welcome to the Polar Party!
Polar Party Plate!

Supplies Used: One paper plate, tissue paper, cut-outs of arctic animals, an Eskimo, igloo, etc., crayons/markers, glue/tape, ribbon, party stickers and scissors.
Instructions:
1. Cover the front of a paper plate with tissue paper. Blue, purple or any color of your choice is fine.
2. Download from online and cut out pictures of arctic creatures, such as a polar bear, penguin, arctic fox, beluga whale, walrus, Eskimo, igloo, etc. Color in the pictures or you can use pictures from old books or magazines that are scanned.
3. Glue/tape the pictures of the arctic creatures onto the front side of the plate covered in tissue paper.
4. Adorn the plate with ribbons and colorful party stickers.
Enjoy the polar parties created by the children at the library!


Wow, I wonder if we an make snowmen or snow women from all the snow and ice at the polar party. Perhaps we can make "Snow Bots".
"Snow Bots" - A cross between a robot and snowman!

Supplies Used: One small cardboard tube, white paper, 4 small strips of paper (any color), glue/tape, crayons/markers, scissors, pipe cleaner, cotton balls, googly eyes and stickers.
Instructions:
1. Wrap a small cardboard tube in white paper.
2. Cut 4 smaller strips of paper (any color) and bend the strips in different zigzag directions. These will be the bouncy arms and legs for the snow bot. Attach 2 of the strips onto the sides of the tube halfway between the top and bottom of the tube (one strip on each side). Now the snow bot has arms.
3. Attach the other 2 strips onto the bottom of the tube and now the snow bot has legs.
4. Draw a face and any other design onto the front of the tube. If you wish, use googly eyes for the eyes.
5. Bend a small piece of pipe cleaner into a "V" shape and attach onto the top of the tube. Using glue/tape, attach a small cotton ball at the top ends of the "V" shape. The snow bot now has antennas.
6. Attach a small cotton ball onto the ends of the arms and legs.
Enjoy the snow bots below created by the children at the library!


There is delicious hot chocolate being served at the polar party. Drinking hot chocolate in a cold climate is a nice feeling!
Hot Cocoas Design!

Supplies Used: One sheet of card stock, 2 smaller pieces of card stock, brown paper, white pom poms, one small piece of fabric, 2 ribbons tied in bows, crayons/markers, glue/tape, glitter heart foam stickers and snowflake foam stickers.
Instructions:
1. Cut out 2 mug shapes from card stock. Cut out 2 smaller arc shapes from card stock.
2. Attach one arc shape onto the side of each mug shape so that each mug has a handle.
3. Attach the mug shapes with the handles onto a sheet of card stock.
4. Cut out 2 long oval shapes from brown paper. Make sure each brown oval is the same length as the top of each paper mug.
5. Attach each brown oval shape onto the top of each mug to make it seem as if the mugs have hot chocolate in them.
6. Using glue/tape, attach 2-3 small white pom poms or cotton balls to resemble marshmallows in the hot cocoa.
7. Rip apart a cotton ball into small pieces and attach each piece above each mug to make it seem as if there is steam from the hot cocoas.
8. If you wish to decorate your mugs, attach foam stickers and ribbons onto the mugs. You may also draw shapes and designs on the mugs if you wish.
9. Fold a small piece of fabric and attach it anywhere onto the card stock near the mugs. This will be your napkin.
10. Using crayons/markers, draw a spoon. Attach foam snowflakes around the mugs for a winter effect. Or else, you may draw them in too.
Enjoy the mugs of hot cocoa below designed by the children at the library!


I see some kittens snuggling in some mittens!
Kitten in a Mitten!

Supplies Used: Card stock, fabric, glitter foam stickers, ribbon, crayons/markers and glue/tape.
Instructions:
1. Cut out an outline of a kitten face from card stock.
2. Draw a face and whiskers onto the kitten face. Feel free to adorn the kitten's eyes, ears or nose with glitter foam stickers.
3. Cut out a mitten shape from fabric.
4. Attach the mitten onto the bottom of the kittens face and make sure the mitten is upside down. It should look as if the kitten is inside the mitten with his/her head sticking out.
5. Adorn the mitten with a ribbon bow if you wish.
Enjoy the kittens in mittens below created by the children in the library!


There were some Eskimos at the party with very nice jackets, hoods and mittens. I would love to create a portrait of an Eskimo for art class!
Portraits of Eskimos

Supplies Needed: Card Stock or construction paper, Coffee Filter, Cotton, Half of a Pipe Cleaner, Fabric, Scissors, Glue/Tape, Pom Pom, pictures of the arctic (igloo) and Crayons/Markers.
Instructions:
1. Take a letter sized piece of card stock (preferably in a light blue shade) and lay it on a flat surface.
2. Cut out a circle from card stock or construction paper of a shade of color that would resemble a human complexion (white, beige, tan or brown).
3. Glue/Tape the circle onto a coffee filter. Draw a face onto the circle. Attach a pom pom onto the center of the circle for the nose if you wish. Attach cotton around the face to resemble the hood of the jacket.
4. Attach the face with the hood onto the card stock sheet.
5. Cut out a jacket and pants for the eskimo from card stock. Attach the outfit under the head. Cut out gloves and boots from fabric or card stock and attach them at the ends of the arms and legs.
6. If you wish, cut out a fish shape from card stock and a half of a pipe cleaner. Attach the fish to the pipe cleaner and then attach the fish and pipe cleaner to one of the hands to resemble the eskimo going fishing.
7. If you wish, you may further embellish the portrait by attaching pictures of igloos and anything else from the arctic.
Enjoy the portraits of eskimos below created by the children at the library!


Learning about penguins can be lots of fun!
Let's pretend they are pop star penguins!
Each penguin can play an instrument and have it's own name!
Pop Star Penguins!

Supplies Needed: A few cutouts of penguins, card stock, one paper plate, glitter foam sheet stickers, fabric, crayons/markers and glue/tape.
Instructions:
1. Fold a paper plate and stand up the folded paper plate. Make sure the inside of the plate is facing you and one side is vertical (up) and the other side is flat down on the table.
2. For the inside, top part of the plate, attach pieces of fabric on the edges for the stage curtains. Cut out a triangle shape from yellow card stock and attach it to the top of the plate to resemble a spotlight.
3. Cover the rest of the stage background using card stock, fabric, glitter foam stickers and anything else you wish to use for the scenery.
4. Download and cut out images of penguins. Color and decorate the penguins using crayons/markers, stickers, foam stickers and anything else of your choice.
5. After each penguin is decorated, attach each penguin to a small folded piece of card stock. The folded card stock should be folded into the shape of an "L". This will support each penguin standing on the plate.
6. Cut out shapes of musical instruments and a microphone from card stock and attach each instrument and microphone to a penguin. (For example, a keyboard can be made by cutting out a small rectangle and drawing lines across it to resemble piano keys.)
7. Once all of the penguins are decorated with their instruments, you may attach each penguin onto the bottom flat part of the plate. Attach the bottom of the "L" stand for each penguin onto the plate so that the penguins appear to be standing up and performing.
Enjoy the performances of the pop star penguins below created by the children at the library!


Let's read "The Mitten" folk tale by Jan Brett! We can create a mitten story too!
Let's take a walk outside and enjoy the snow!
Make sure your mittens stay on your hands!
Mitten Story
Supplies Needed: Construction Paper (Preferably White), Cotton, Crayons/Markers, Glue/Tape, Scissors and Pictures of the Animals in the "Mitten Story" and an Image of a Child Dressed in Winter Clothes.
Instructions:
1. Cut out 2 large mitten shapes from white or light colored construction paper.
2. Using a stapler or tape, attach the 2 paper mittens together by one edge to form a paper book.
3. Once the mittens are attached together in a book form, decorate the bottoms of the mitten book with cotton to resemble snow.
4. Download or draw pictures of the animals and the child character from the story.
5. Attach the pictures or draw the pictures onto the paper mitten book.
Enjoy the mitten stories below created by the children at the library!


Now let's walk into town and browse a winter clothes store!
Winter Clothes Store Design!


Winter Clothes Tube Pal
The winter is more bearable and enjoyable when you wear the right clothes and accessories!

Supplies Needed: One toilet paper tube, construction paper, fabric, a foam sticker sheet, pipe cleaner, 2 pom poms, glue/tape, crayons/markers and scissors.
Enjoy the winter clothes tub pals created by the children at the library!


Hot Chocolate Craft
Let's warm up with a nice cup of hot chocolate with marshmallows after playing in the snow!

Supplies Needed: Card Stock, Brown Construction Paper, White Construction Paper, White Pipe Cleaner, Stickers, Glue/Tape & Scissors.
Instructions:
1. Download or draw an outline of a mug of hot chocolate with the handle to the mug as well.
2. Using scissors, cut from card stock the shape of the mug with the handle. (You may cut the handle out separately from the mug and then glue/tape the handle onto the mug after you are done cutting out the shapes.
3. Cut an oval shape out of brown construction paper and glue/tape onto the top rim of the paper mug. Make sure that the shape fits the top of the mug so that it looks like hot cocoa in the mug.
4. Cut out a few small strips from white construction paper and roll those strips up into small flat blocks. Tape them up so that they stay rolled up and then glue/tape them onto the brown paper on the top of the mug. This should resemble marshmallows in the hot cocoa.
5. Take one piece of white or gray pipe cleaner and cut it in half. Take the halves of pipe cleaner and bend them to form curvy or swirly shapes. Glue/tape the straight bottom end of each pipe cleaner piece onto the brown paper cocoa with the marshmallows to resemble swirls of steam arising out of the hot cocoa.
6. Use stickers and anything else of your choice to decorate the mug! Enjoy the hot chocolate! Stay warm.
Enjoy the paper hot chocolates below created by the children at the library!


Now after warming up with some hot chocolate, it's time to go outside and explore in the arctic climate! Enjoy the March of the Penguins! Let's fish like an Eskimo and visit the penguins and polar bears.
March of the Penguins

Supplies: Card stock, Pictures of Penguins, Glue/Tape, Crayons/Markers, Scissors, Glitter and Stickers.
Directions:
1. Decorate a few paper penguins.
2. Attach each of them onto a piece of folded card stock.
3. Attach the penguins with the card stock onto a letter sized piece of card stock so that it looks as if they are standing up and waddling.
4. If you wish, you may cut out a piece of white construction paper and shape it into a sheet of snow and glue/tape it onto the card stock before you attach the penguins onto the card stock. The penguins will then look as if they are marching in snow.
5. If you wish, you may use glitter and stickers to adorn the penguins and snow.
Enjoy the marching penguins below created by the children at the library!


Arctic Scene

Supplies: Paper Plate, Card Stock, Popsicle Stick, String, Pictures of the Arctic, Glue/Tape, Scissors & Crayons/Markers.
Directions:
1. Download and cut out images of the arctic environment, such as an igloo, an Eskimo, a polar bear, a penguin and any other images you would like to use. You may use photographs too if you wish.
2. Fold a paper plate in half and position the plate so that one folded side is vertical. Using crayons or markers, color a picture of an igloo and then glue or tape it onto the vertical half of the plate to create an arctic background.
3. Color all other images of the arctic and glue or tape them on your plate and in front of the igloo too.
4. Tie a string to a Popsicle stick and then glue or tape the stick on one of the hands of the Eskimo to make it look like the Eskimo is fishing.
5. If you wish to make any of the pictures stand up on their own anywhere on the plate, you can attach a folded piece of card stock behind the picture and glue or tape the card stock with the picture onto the plate so that it looks like the animal or Eskimo is standing up on it's own.
Enjoy the arctic scenes below created by the children at the library!


Winter Treats Craft
Let's make a plate of cookies and hot chocolate. That's always a nice snack in the winter!


Supplies Needed: One paper plate, one half of a toilet paper tube, card stock paper, 1 small square of fabric, one small piece of pipe cleaner (any color of your choice), brown construction paper cut into small pieces, white construction paper, a cotton ball, crayons/markers and glue/tape.
1. Color your paper plate any way you like or you can leave it plain as you wish.
2. Cut out 3-4 pieces of card stock into any shapes of your choice to make paper cookies (circle, heart, donut, etc.)
*You may color designs on the card stock if you wish.
3. Cut out a piece of card stock into the shape of a spoon.
4. You may fold the piece of fabric in half or roll it up and tie with a pipe cleaner to simulate the look of a napkin.
5. Glue the paper cookies, napkin and spoon onto the plate in any way you like.
6. Wrap a half of a toilet paper tube in white construction paper (or any other light color) and glue/tape the ends together. This will be the mug.
7. You may color the tube using crayons/markers or leave it blank. You may also glue/tape a curved strip of card stock to resemble a handle for the mug.
8. Take one end of the mug and place glue around the edge and then firmly stick the mug onto the plate. *Make sure that when you apply the glue, it's on the end of the tube that you want to be the bottom of the mug.
9. Once the mug is glued onto the plate, stick some brown shreds of construction paper into the tube and glue a cotton ball on top to make it look like a mug of hot chocolate with a marshmellow on top.
10. Enjoy and have fun!


Figure Skater Doll
While we enjoy the treats, let's enjoy watching ice skating on television or perhaps we can ice skate ourselves at the rink or the frozen pond!

Supplies Needed: One paper plate, a paper stick figure (drawn or downloaded from the Internet), a piece of cardboard or a piece of a discarded old folder, card stock, pipe cleaners, crayons/markers and glue/tape.
1. Add color to the paper plate with crayons/markers. *Make sure the plate stays mostly white in the center to resemble and ice rink.
2. Take a paper stick figure and color an ice skating outfit onto it (costume dress or jacket/pants, etc.)
3. Cut out 2 small pieces of card stock into the shape of skates and glue the skates onto the feet of the stick figure.
4. Cut out 2 small pieces of pipe cleaner (prefereably silver, gold or gray) and glue/tape each piece onto the bottom of each skate.
5. Cut out a strip of cardboard or old folder material and bend it into an "L" form.
6. Attach the figure skater onto the vertical part of the "L" that stands up and then glue the bottom horizontal part of the "L" onto the middle of the plate and try to get the figure skater to stand as much as possible.
Enjoy the ice skating show!


Snowman Life Cycle
The more it snows, the more we can build a snowman and learn the life cycle of a snowman throughout the entire winter season!

Supplies Needed: One blue piece of construction paper, small pieces of white construction paper cut into circles, crayons/markers and glue/tape.
1. Fold the blue construction paper in half horizontally.
2. Unfold the paper and then on the top part, glue/tape the white circles of paper to build your snowman anyway you like. (For example, you can start with one circle for the bottom of the snowman, then next to that, glue 2 circles on top of each other for the body of the snowman, then 3 to complete the snowman.
3. Use crayons/markers to decorate your snowman, (eyes, nose, buttons, arms, lets, hat, scarf, etc.)
4. On the bottom half of the blue paper, glue on an entire snowman, then glue 2 pieces, then one, then none to make it appear as if it is melting.
5. Color in the weather, such as the sun, clouds, snowflakes as well as the water droplets dripping from the melting snowman, etc.
Enjoy the snowman life cycles below
created by the children!


Winter Blanket Design
After spending time in the outdoors on a cold day, it is now time to warm up at night in a nice comfortable bed with a thick, soft warm blanket!


Supplies Needed: Card Stock, Tissue Paper, Pieces of fabric, a cut out of a human stick figure, crayons/markers, glue/tape and stickers.
1. Cut out a piece of card stock in the shape of a bed.
2. Apply some glue/tape onto the card stock and wrap a piece of tissue paper around the card stock. Make sure that the tissue paper sticks to the glue/tape. (The tissue paper will resemble the sheet.)
3. Fold over the top part of the tissue paper for up to an inch to resemble a sheet folded at the top.
4. Glue/tape pieces of fabric on top of the tissue paper but not on the folded top part. Glue as many pieces as you would like to cover the tissue paper.
5. Eventually, the pieces of fabric that are glued/taped on will resemble a warm winter blanket or quilt.
6. Color a human stick figure cut out. After the coloring is complete, glue/tape the figure under the folded part of the sheet to make it resemble a person tucked under the covers.
7. If you wish, use extra scrap pieces of fabric to resemble pillows or any other designs of your preference.
8. Adorn with stickers if you wish.
Enjoy the bed spreads below that were designed by
the children at the library!


Starry Starry Night!
While getting ready for bed, perhaps it is time to enjoy the night sky full of stars!

Supplies Needed: Construction paper, tin foil, a stick-figure cut-out, glue/tape, crayons/markers and glitter.
Directions:
1. Take a letter sized white (or any light colored) sheet of construction paper and lay it flat on a table in a horizontal position.
2. Take a blue or black letter sized piece of construction paper and trim the outer edges off by a quarter of an inch on all four sides. (You can trim a wavy or fringed design if you wish).
3. Glue/tape the dark, trimmed piece of construction paper onto the white sheet of construction paper in a horizontal position and make certain you can see the edges of the white/light colored construction paper sticking out behind the dark colored paper. This will create a night sky background effect.
4. Cut out shapes of stars and a moon out of yellow construction paper and glue them on the night sky background.
5. Draw faces or any designs of your choice onto the stars and moon using crayons/markers if you wish.
6. Cut out a telescope shape out of construction paper (any color of your choice) and a little table shape as well. Glue those on the bottom of the sheets. (Preferably, the telescope should be on top of the table and angled facing the moon and stars.)
7. Glue a paper human stick figure or draw a human stick figure next to the table with the telecope and color the stick figure any way you wish.
8. Cut out small pieces of tin foil and glue/tape one small piece onto the head of the telescope to create a shiny effect. If you wish, you can use more pieces of tin foil to decorate the stars, moon or anything else in the picture/background.
9. If you wish for a more sparkling effect, you may create a design using glue in the background and pour glitter over the glue. After a few minutes, shake off the excess glitter and the night sky will be sparkling.
Enjoy the starry night skies below designed by the children at the library!


Well, soon it will be February and so let's prepare to celebrate Valentine's Day and President's Day!