

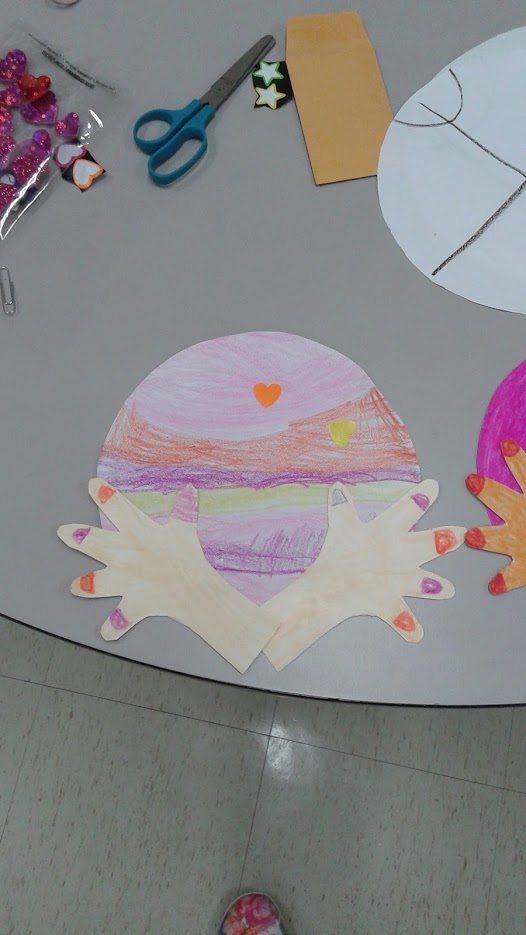
It's summer outside! After reading in the library, it's time to go outside and play ball. I caught a beach ball! I've got a beach ball in my hands! What kind of sports ball do you have in your hands?

Supplies Used: Light colored paper, scissors, crayons/markers, stickers and glue/tape.
Instructions:
1. Using scissors, cut out a round ball shape from light colored paper.
2. Using crayons/markers, color a design on the ball in any color of your preference.
3. Cut out 2 hand shapes from light colored paper. If you wish, you may color in the hands and color the tops of the fingers to resemble nail polish.
4. Attach the hands onto the bottom of the ball shape to make it seem as if the hands are holding the ball.
5. Adorn with stickers if you wish.
Enjoy the sports balls below created by the children at the library!


After playing with a ball outside, it's time to jump into a pool and swim laps.
Paper Pools!

Supplies Used: One letter-sized sheet of blue construction paper, smaller pieces of white, yellow and brown paper, crayons/markers, card stock in different colors, glue/tape, scissors, a ruler and stickers.
Instructions:
1. Draw six lines across the blue sheet of paper in a vertical direction. If you need to, use a ruler and draw each line against the ruler so that the lines are straight. You now have your lanes in the pool.
2. Cut out a few paper dolls for white paper or brown paper, yellow paper, etc. If you only have white paper, you may color in the dolls to make the doll appear darker skinned.
3. Cut out bathing suit shapes and attach onto each doll.
4. Draw hair on the doll and faces on some of them.
5. Attach a paper doll onto each lane of the pool.
6. Cut out a narrow white strip of paper and attach onto one end of the pool. That can be a finish line.
7. Cut out smaller strips of paper and fold them. Attach each bent piece of paper onto the opposite side of the finish line. These can be small diving stands where the swimmers dive off from to swim their laps. You may write a number onto each diving stand if you wish.
8. Embellish the pool with stickers if you wish. You may color in designs on the swim suits as well.
Enjoy the swimming pools below created by the children at the library!


Today is carnival day! There are fun games and prizes to win galore!
Paper Carnival!

Supplies Used: One letter-sized piece of card stock, smaller pieces of card stock, small pieces of construction paper, crayons/markers, glue/tape, scissors, two cut outs of people stick figures and stickers.
Instructions:
1. Lay a letter-sized piece of card stock on a flat surface. Fold both ends in and then let them go. There should be 2 creases and a center. Now the card stock should have 3 sections to it.
2. If you wish, using scissors, cut a slant on top of both end sessions and leave the center part straight.
3. Cut out game booth shapes from card stock or construction paper. Attach them onto each section.
4. Cut out some round shapes for ball toss or ring toss targets.
5. Cut out or draw stick figure humans and color them in. Attach them onto the game booths to make it seem as if they are playing the games.
6. Color in the games and use shapes and stickers to create the games you would like, such as a ring toss, ball toss, archery and anything else of your preference.
7. Draw or use animal stickers and attach them near or above the games to make it seem as if they are prizes.
8. Stand up the letter-sized card stock with the games on them so that it can stand up by itself.
Enjoy the carnival games below created by the children at the library!


Wow, between all of the swimming and games, I'm as hungry as a hippo!
Hungry Hippo Game!

Supplies Used: Paper plate, construction paper, string, scissors, googly eyes, crayons/markers and glue/tape.
Instructions:
1. Cover the center of a paper plate with blue paper. This will be the water. The blue paper should be in the shape of a circle.
2. Cut out four hippo shapes from paper. They should each be the following colors, green, pink, orange and yellow. The hippo shapes should resemble the hungry hippos in the game. If you wish to use other colors, that's fine too. *It may be easier to cut out the head with neck shapes first and then the body and attach them together.
3. Make sure that the hippos head is of 2 head shapes attached to each other so that the hippos look as if they can open their mouths to catch round objects.
4. Draw faces and a tail on top of each hippo. Use googly eyes for each hippo if you wish.
5. Attach each hippo around the edge of the plate and the hippos should be facing each other with their heads in the center of the plate.
6. Cut out small square pieces of white paper and attach 2 pieces into the mouth of each hippo. Make sure they stick out to resemble teeth.
7. Attach small pom poms onto the center of the plate to make it seem as if the hippo is trying to catch marbles.
8. Attach a string onto the top of each hippos face. This will allow you to lift up the top of each hippos mouth to make it seem as if they are going to catch pom poms.
Enjoy the hungry hippos below created by the children at the library!


After playing a game of Hungry Hippos, it's nice to relax and watch some rabbits racing!
Rabbit Race!


Supplies Used: Construction paper, card stock, fake grass, cotton, fabric, crayons/markers, scissors, glue and tape.
Instructions:
1. Cut out an oval shape from letter sized construction paper.
2. Cut out 4 bunny shapes from card stock.
3. Cut out a smaller oval shape from construction paper.
4. Attach the smaller oval shape in the middle of the big oval shape. This will be the race track.
5. Attach fake grass along the edge of the smaller oval. If you wish, you may attach grass among the edges of the larger oval too.
6. Draw faces on each of the bunnies. Cut out 4 small circles of fabric and attach each fabric circle onto the belly of each bunny.
7. Cut out 8 small strips of fabric and attach each small strip onto the front of each rabbit ear.
8. Attach a small cotton ball onto the back of each rabbit. Now the bunnies feel soft to the touch.
9. Attach each bunny onto the larger oval around the smaller oval. You may bend part of the bottoms of each bunny in a flat position and then attach the bent bottom part with glue or tape so that the rabbits can be in standing positions.
10. Cut out a few strips of paper and bend them. Attach the bent strips of paper in between the bunnies to resemble an obstacle course!
Enjoy the rabbit races below created by the children at the library!


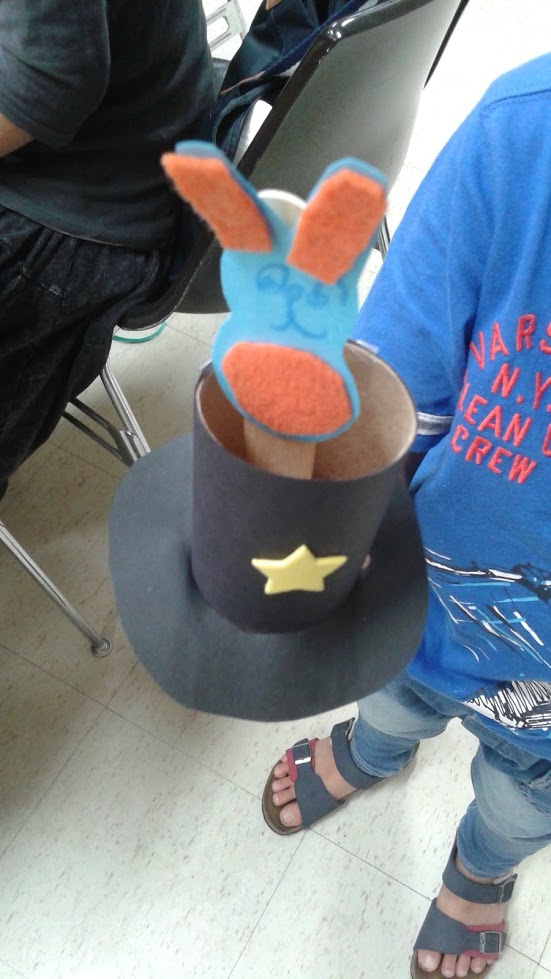
The rabbits seem so magical in their races. It would be fun to make one jump out of a hat!
Magic Rabbit Out of Hat!

Supplies: One small cardboard tube, black or dark blue paper, one popsicle stick, card stock paper, fabric, ribbon, one straw, glitter foam stickers, glue/tape, crayons/markers and scissors.
Instructions:
1. Wrap a small cardboard tube in black or dark colored paper.
2. Cut out a circle from the dark paper and cut a whole in the center large enough to fit over the edge of the tube. Place the circle with the whole over the top of the tube and pull down about an inch or half an inch. This will be the magic hat with a brim.
3. Decorate the hat with glitter foam stickers and tie a ribbon around the hat under the brim.
4. Cut out a small bunny shape from card stock. Make sure it can fit through the tube hat.
5. Draw a face on the bunny and attach small pieces of fabric on the ears and belly to make the bunny feel soft.
6. Attach the bunny onto one end of a wooden popsicle stick. Now you can stick the bunny up and down the tube hat from the bottom so that it looks as if the bunny is jumping in and out of the hat.
7. Take a straw and cut off the end of the straw that bends.
8. Attach small glitter foam stickers at the ends of the straw. You now have a magic wand.
Enjoy the bunnies jumping out of the hats below created by the children at the library!


After all of the games we watched and played, we all deserve a medal! Let's make medals for the Rio Olympics 2016!
Olympic Medal


Wow, we played and watched so many games! We won a medal! Now it's time to celebrate the end of summer with a nice ride down the water slide!
Paper Water Slide


Olympic Medal

Supplies: Card stock, scissors, hole puncher, ribbon, stickers, glue, glitter and crayons/markers and an Olympic Rings image.
Instructions:
1. Cut out a circle shape from card stock. Punch a hole near the edge and that'll be the top of the medal where the ribbon goes through.
2. Cut out and color an image of the Olympic rings and attach onto the front of the paper medal.
3. Adorn the medal with stickers and glitter.
4. Lace a ribbon through the hole and tie a knot with both ends of the ribbon or tape the two ends together. Now you can where your paper medal!
Enjoy the paper medals below created by the children at the East Flushing library!


Wow, we played and watched so many games! We won a medal! Now it's time to celebrate the end of summer with a nice ride down the water slide!
Paper Water Slide


Supplies Used: Card stock, blue card stock, tissue paper, crayons/markers, glue/tape and scissors.
Directions:
1. Cut out a rectangular piece of blue card stock. It should be almost letter-sized. Make sure that one of the ends of the card stock is rounded in shape. This will be the pool.
2. Cut out a strip of card stock in any color. Bend it into an arch shape. Attach each end of the arch onto the blue card stock. This will be the water slide.
3. Using crayon/marker, draw horizontal lines along one part of the arch to resemble a ladder for climbing up to the top of the slide.
4. Cut out 2 paper doll shapes from paper or card stock. Color hair and faces on them.
5. Cut out bathing suit shapes from card stock and attach a paper bathing suit onto each doll.
6. Place the paper dolls onto the slide or you can place one doll along the ladder and the other going down the slide.
7. Embellish the water slide and pool with tissue paper and drawings.
8. You may draw water drops or other splash marks if you wish.
Enjoy the paper water slides below created by the children at the library!


