

Now that we are in the month of May, let's enjoy some time outdoors. There are picnics, gardens, amusement parks, museums, houses being built, farms, camp sites and petting zoos! There are Cinco De Mayo and Mother's Day to celebrate as well!
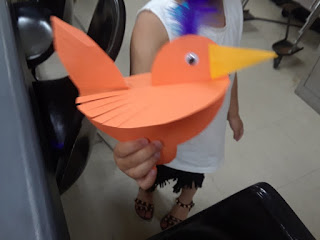
I see some birds flying around. They are colorful with feathers!
Paper Bird


I see some butterflies flying around!
Welcome to Butterfly World!


There are May flowers from April showers. Let's give mothers or female caregivers a flower for Mother's Day!
Mother's Day Flower with Pocket!


I see some butterflies! It seems that just yesterday, they were caterpillars! Now they've grown into beautiful butterflies fluttering around!
Butterfly Pop-Up Card


Spring is colorful! It's a nice time to visit the Parrot Paradise!


Ladybug 3D Books


Mother's Day Vase Card!


Sometimes, mothers like to go camping with the family! Let's go camping and gaze at the stars!


There are so many insects around the tent. There are some pretty insects, such as ladybugs and butterflies!
The Look of Bugs!


Now that we're back in town, let's join the crazy hat parade!


Let's build a magic tree house!


After catching some fish or relaxing at the pond, perhaps it's time to travel to the beach with sand!

Let's visit the botanical gardens! The flowers are pretty and you may seem some live creatures in the gardens, such as earthworms and frogs!
Botanical Gardens!


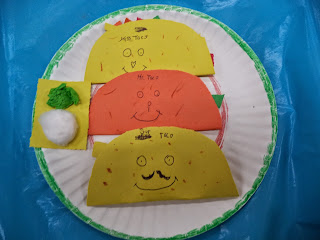
Happy Cinco De Mayo! After all the planting and gardening, it's time to enjoy some tacos!
Paper Tacos!


Paper Maracas


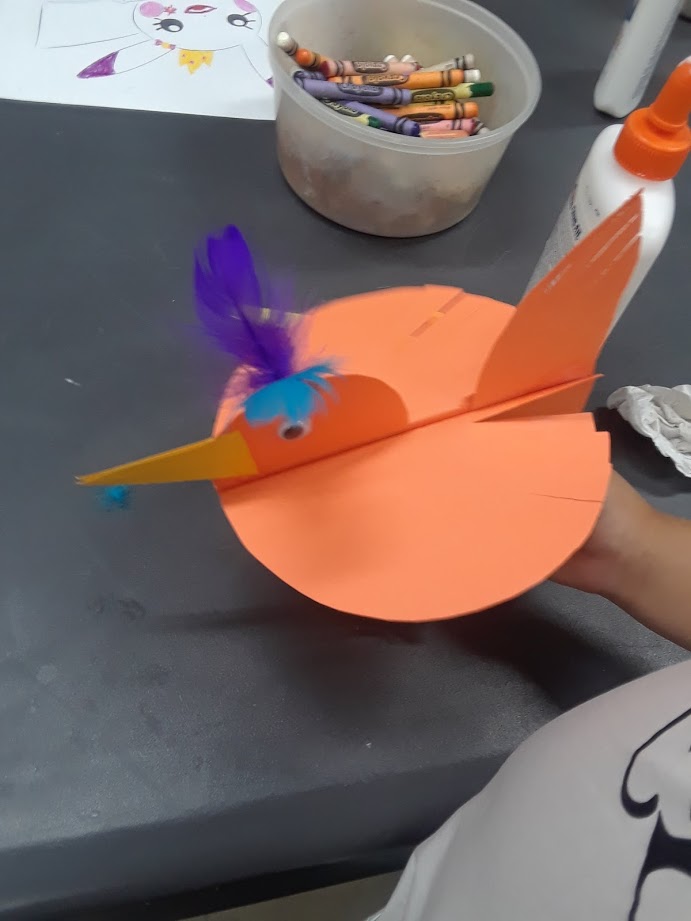
I see some birds flying around. They are colorful with feathers!
Paper Bird

Supplies: Construction paper, google eyes, a few fake feathers, scissors, crayons/markers, glue/tape and anything else you wish to use.
Instructions:
1. Cut out 2 large circles from construction paper. Fold each in half.
2. Attach the 2 circles together by each of the bottom half. The other half of each circle should be flapping outward and pointing out to each side. This will be the body of the bird with the wings.
3. Cut out a smaller circle. Insert the bottom part of the smaller circle in between the 2 attached larger circles at one end. This will be the head.
4. Cut out a tail shape and attach the bottom part in between the bigger circles at the other end.
5. Cut out a small narrow triangle and attach onto the front of the head. This is the beak.
6. Attach a google eye onto each side of the head.
7. Cut a fringe design into the wings and tail using scissors.
8. Cut out 2 small bird's feet shape and attach onto the bottom of the bird on each side.
9. Decorate the bird with fake feathers and if you wish, draw a design on the bird.
Enjoy the paper birds below created by the children at the library!


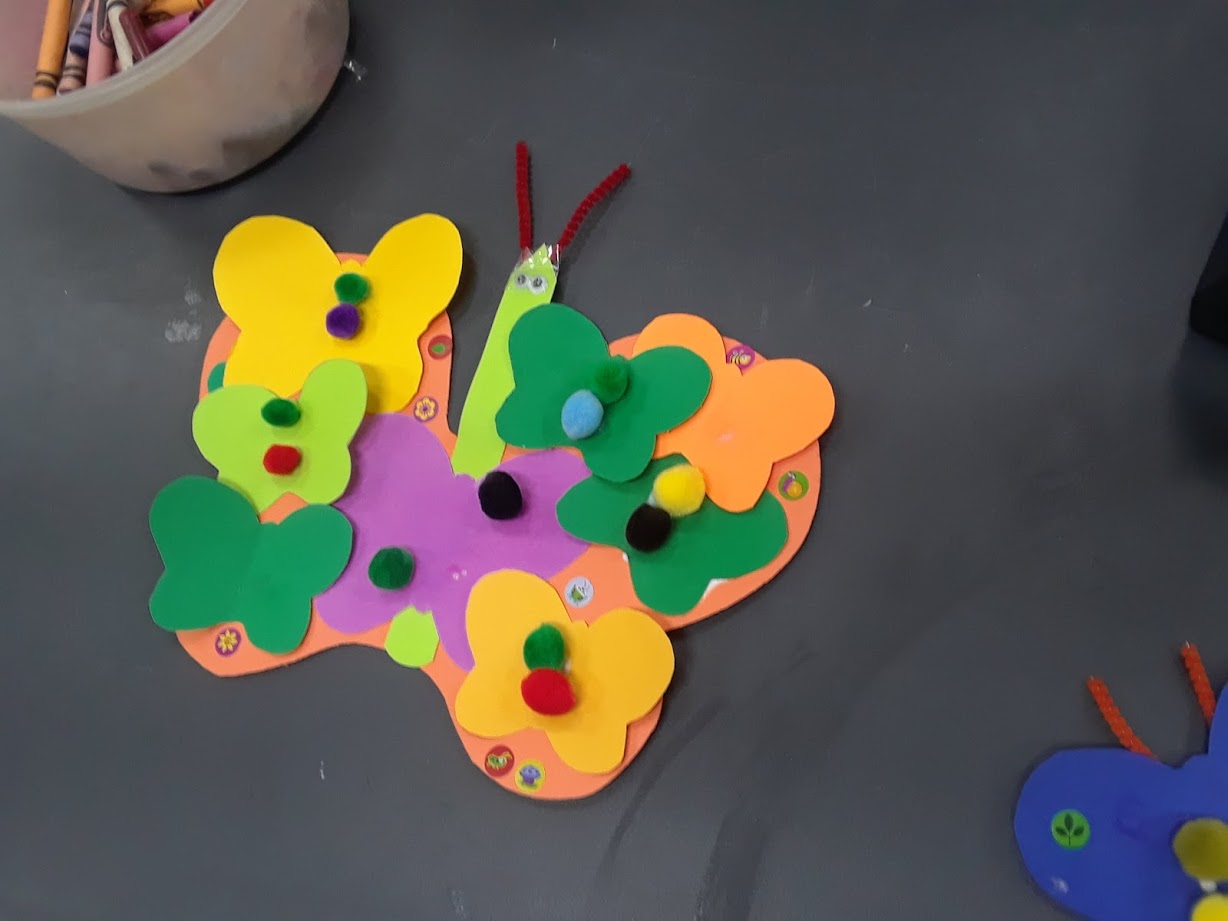
I see some butterflies flying around!
Welcome to Butterfly World!


Supplies Used: Card Stock, Pipe Cleaner, Google Eyes, Small Pom Poms, Stickers, Crayon/Markers, Glue/Tape and Scissors.
Instructions:
1. Using scissors, cut out one large butterfly shape from card stock and eight smaller ones from card stock of different colors.
2. Color in designs onto the smaller butterfly shapes. Attach stickers onto them as well.
3. For a 3D effect, fold each of the smaller butterfly shapes in half and then attach all of them onto both sides of the big butterfly shape. One side of each smaller butterfly will be attached and other other side will be loose. You may attach both sides flat if you wish.
4. Cut out a narrow strip of card stock and make one end of it pointy. Attach the strip with the pointy side on the bottom in the middle of the large butterfly shape so that the large butterfly has a body in the middle. Attach google eyes onto the top of the strip. Fold a small piece of pipe cleaner in a "V" shape and attach onto the top of the strip or body of the butterfly for the antennae.
5. Decorate the smaller butterflies by drawing in faces and bodies and attach pom poms for a fuzzy effect.
Enjoy the butterfly worlds below created by the children at the library!


There are May flowers from April showers. Let's give mothers or female caregivers a flower for Mother's Day!
Mother's Day Flower with Pocket!

Supplies: Card stock, Scissors, Glue/Tape and one large Pom Pom. You may use crayons/markers/pens if you wish to write a message or draw a decoration on the flower or leaves pocket.
Instructions:
1. Cut out 2 circle shapes from green card stock. Each circle should be 3 inches in height and width. Fold both circles in half.
2. Place both folded circles next to each other with the round parts facing each other. Attach the bottom of one round side of one of the circles inside the bottom of the other round side of the other circle so that when the 2 folded circles are joined, it makes a "V" or heart shape. You now have your leaves pocket.
3. Cut a small strip of green card stock and attach at the top back of the pocket. This is your stem.
4. Cut out a small circle of card stock of any color. Cut out 4 small heart shapes of any color and attach each heart along the back edge of the circle. The hearts should form a frame around the circle and the hearts should resemble the petals.
5. Attach a big pom pom onto the circle. You now have your flower with a soft, fuzzy center. Attach the flower onto the stem. You now have a flower with a pocket for Mother's Day and you can place something small in the pocket, such as a piece of candy or note.
Enjoy the Mother's Day flowers created below by the children at the library!


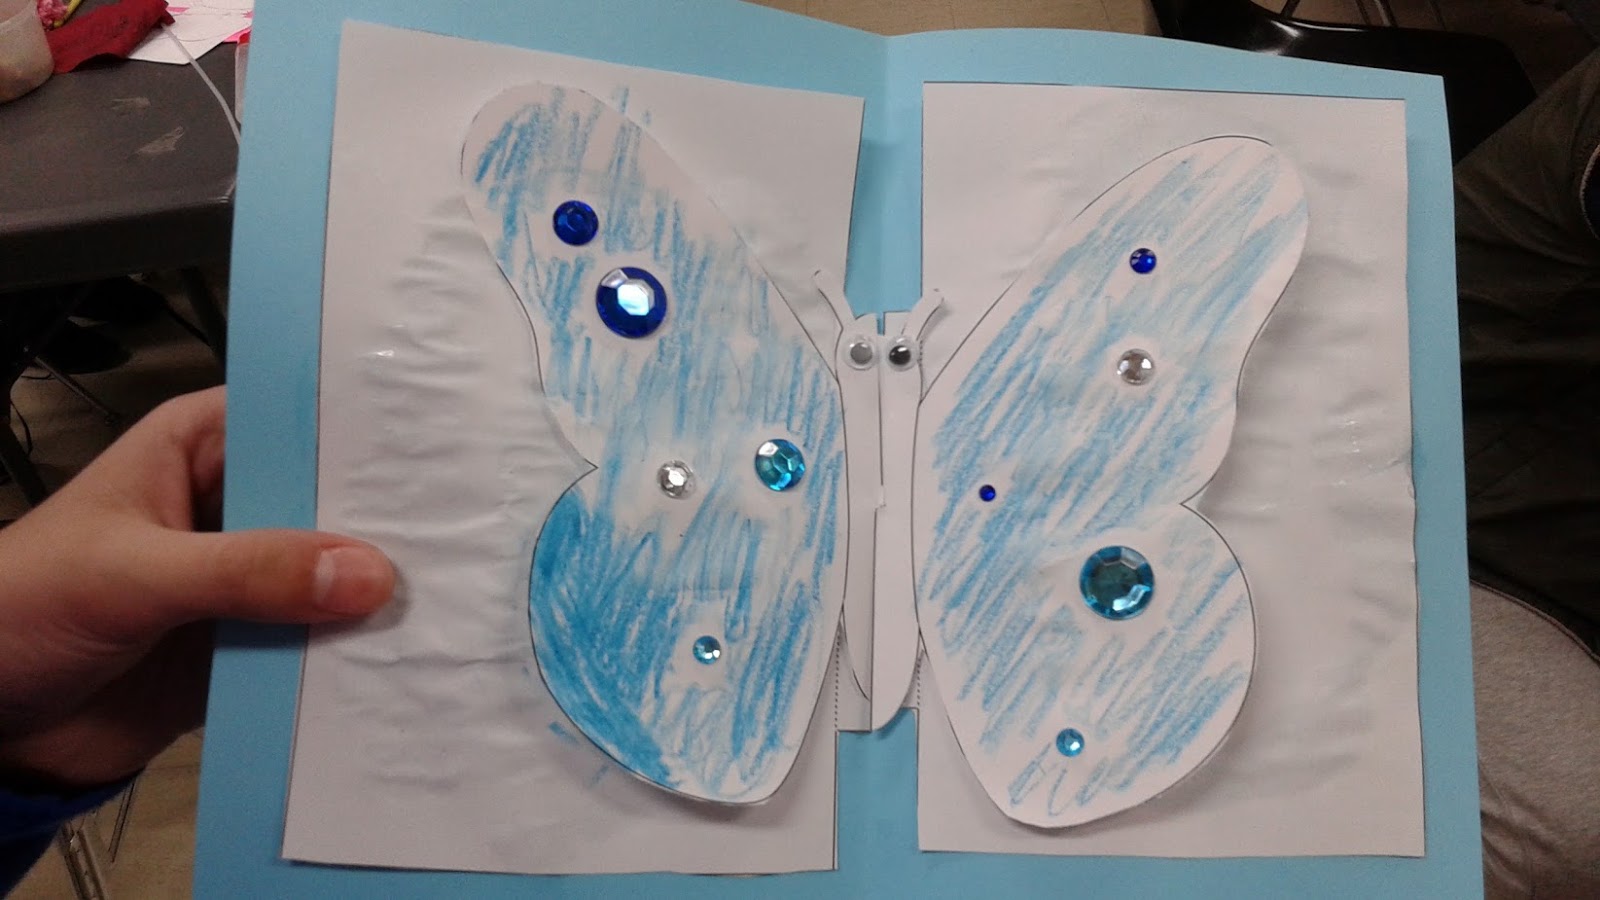
I see some butterflies! It seems that just yesterday, they were caterpillars! Now they've grown into beautiful butterflies fluttering around!
Butterfly Pop-Up Card


Supplies: One letter-sized sheet of card stock in a bright Spring color, crayons/markers, glue/tape, googly eyes, other decorations and stickers of your preference and the following butterfly pop-up template:
http://www.easypeasyandfun.com/butterfly-pop-up-card/
Instructions:
1. Take a letter-sized piece of card stock (the card stock should be in a nice bright color) and lay it down on a flat surface.
2. Download the butterfly template above and follow the directions online that go with the template.
Enjoy the pop-up butterfly cards below created by the children at the library!


Spring is colorful! It's a nice time to visit the Parrot Paradise!

Supplies: Card stock in a bright color, small pieces of white paper, crayons/markers, glue/tape, one piece of string, one googly eye and sparkling stickers.
Instructions:
1. Cut out a parrot shape outline from card stock paper.
2. Draw a design on the parrot shape. Cut out a tear drop shape from a piece of small white or light colored paper and draw a design on it. This will be the wing for the bird. Attach it onto the bird.
3. Cut out a parrot tail shape from card stock of the same or similar color and attach it to the bottom rear of the bird.
4. Cut out a bird's comb shape for the top of the head from paper of a bright color and attach onto the top of the head.
5. Cut out small feet or claw shapes from small pieces of paper and attach onto the bottom of the bird.
6. Cut out a branch shape from paper and attach under the feet. Now it looks as if the parrot is perched on a branch.
7. Adorn the parrot with a feather, googly eyes, gem stickers or anything of your preference.
8. Attach a piece of string onto the top of the parrot's head so that you can hold the parrot with a string.
Enjoy the parrots below designed by the children at the library!


Fly Guy Dolls!

Supplies: One small cardboard tube, brown or pink construction paper, white paper, 3 pieces of pipe cleaner, crayons/markers, glue/tape and anything else you wish to use.
Instructions for Fly Guy:
1. Wrap a small cardboard tube in brown paper.
2. Draw a nose and mouth on the tube to resemble the face of "Fly Guy".
3. Cut out 2 big circles from white paper and draw a black dot in the center of each one. These will be the eyes. Attach the eyes next to each other at the top of the tube above the nose and mouth.
4. Cut out 4 wing shapes from white paper and draw designs on them. Divide the wing shapes into groups of 2. Attach each group of 2 wings together. Attach each pair of wing shapes on the side of the tube with the design facing front.
5. Punch 2 holes on the bottom sides of the tube and lace a pipe cleaner through the holes with the ends sticking out. This will be the legs of Fly Guy.
6. Punch 2 holes above the middle of the tube on each side. Lace another pipe cleaner through the holes. Now you have the arms for Fly Guy.
7. Bend a small piece of pipe cleaner into a "V" and attach onto the top of the tube. Now Fly Guy has his antennae.
Instructions for Fly Girl:
1. Wrap a small cardboard tube in pink or purple paper.
2. Follow the same instructions above as you would for Fly Guy. Embellish the eyes with purple color for the eye shadow and draw eye lashes on.
3. Attach a paper bow onto one of the antennae to make Fly Girl seem more girly.
Enjoy the Fly Guy and Fly Girl tubes below!


Besides the fly guys and fly girls, I see some ladybugs!


 |


Supplies: Construction paper of different colors of the rainbow, black paper, crayons/markers, card stock, stickers, glue/tape and anything else of your preference.
Instructions:
1. Fold a letter-sized piece of green construction paper into a book form. Leave it open on a flat surface. This will be the green book cover.
2. Cut out 2 smaller black circles from black paper and attach each one onto the top of each page of the green book. Make sure it's on the inside of each green page. Attach a black V shape of paper onto the top of each circle. This will be the head and antennae of the ladybug.
3. Cut out circle shaped paper books from paper of each color of the rainbow. Attach the book circle shapes together under the lady bug heads. Follow the instructions in the link below which are similar to what is done in this craft.
http://twitchetts.com/construction-paper-3d-rainbow-heart-card-video/?utm_medium=social&utm_source=pinterest&utm_campaign=tailwind_tribes&utm_content=tribes
4. Adorn the ladybug book with flower shapes from paper or card stock, stickers and any other designs you want to draw in.
5. Draw designs on the pages of the ladybugs.
Enjoy the 3D ladybug book cards below designed by the children at the library!


Mother's Day Vase Card!


Supplies: Card Stock, Scissors, Green Pipe Cleaner, Crayons/Markers, Tissue Paper, Glue/Tape and anything else of your preference.
Instructions:
1. Fold a letter-sized sheet of card stock in half. The card stock can be in any color you would want.
2. Cut out an outline of a vase from both sides of the folded card stock and make sure the two vase shapes stay attached together on one end. If you can, stand up the vase shape and it should stand up like a card.
3. Cut out flower shapes from card stock. Cut out pieces of green pipe cleaner. Attach each flower shape on one end of a green pipe cleaner. Cut out leaf shapes from green card stock and attach leaves onto each pipe cleaner below each flower shape. You now have flowers.
4. Attach the flowers onto the top inside of the vase card. The flowers should look as if they are blooming from the vase.
5. You may decorate your vase and flowers with stickers and pieces of tissue paper.
6. If you wish, open the card and write a Mother's Day message.
Enjoy the Mother's Day cards below created by the children at the library!


Sometimes, mothers like to go camping with the family! Let's go camping and gaze at the stars!

Supplies: One letter-sized sheet of dark blue construction paper, green paper, yellow paper, white paper, another piece of paper in any color for the tent, small brown strips of paper, tissue paper (red, orange, yellow), star stickers, smiley face stickers, one piece of fabric, one piece of string, crayons/markers and glue/tape.
Instructions:
1. Use the dark blue sheet of construction paper as your sky and background.
2. Using scissors, cut out a circle shape from white or yellow construction paper and attach onto the top of the dark blue sheet of paper. This will be the moon in the sky.
3. Attach some star stickers around the moon. If you do not have star stickers, you may cut out and color in star shapes from paper and attach those around the moon.
4. Cut out a triangle or pyramid shape from paper of any color. This will be your tent. Cut out a small triangle or rectangle flap at the bottom center of the tent. You should be able to lift the flap up and down to open or close it.
5. Attach the tent onto the bottom of the blue sheet below the moon and stars. If you wish to make your tent look as if it's lit up inside, attach a small piece of white or yellow paper under the flap.
6. Cut out a small piece of fabric and roll it up. Tie it in the middle with a string and attach onto the bottom of the tent. You now have a sleeping bag.
7. Cut out a pine tree shape from green paper and attach near the tent. You now have a pine tree.
8. Cut out a few small strips of brown paper and attach them next to the tent in a pile Attach pieces of yellow, orange and red tissue paper onto the brown strips of paper. You now have logs with a fire.
9. Draw grass or dirt underneath the tent, fire and tree.
10. Draw stick figures of people camping. You may draw the faces or use smiley face stickers for the faces if you wish. You may attach a small white piece of paper onto the tip of a brown strip of paper to make it seem as if someone is roasting a marshmallow.
* If you wish, draw outlines of bats on the moon and anything else you wish to add to the campsite.
Enjoy the campsites below created by the children at the library!


There are so many insects around the tent. There are some pretty insects, such as ladybugs and butterflies!
The Look of Bugs!

Supplies: Card stock or construction paper, crayons/markers, glue/tape, scissors, glitter foam sheet and cotton.
Instructions:
1. Take a letter sized light blue piece of card stock and lay it down onto a flat surface in a horizontal way.
2. Cut out a strip of green paper with a swirly pattern on top and glue the green paper onto the bottom of the blue card stock. This will be your grass and the rest of the blue paper is the sky.
3. Cut out a sun shape from yellow/orange paper and attach onto the upper left hand corner.
4. Attach a piece of cotton onto the upper right corner for the cloud.
5. Cut out 2 butterfly shapes. Attach a small strip of paper onto the center of each butterfly. Draw a face on top of each strip. Cut out 2 "V" shapes from paper and attach above the face of each butterfly. Glue/tape each butterfly onto the light blue background.
6. Cut out a red circle for a ladybug and a yellow circle for a bee. Cut out 2 small black circles and 2 black "V" shapes. Attach the "V" onto each black circle shape. These will be the head and antennas for the ladybug and bee. Attach a head onto the yellow circle and the red circle.
7. Cut out 6 strips of black paper and attach 3 strips onto the bottom of each bug (ladybug and the bee). The ends of the strips should stick out from the bottom of the insects on both sides to make it seem as if each bug has six legs. If you wish, draw faces onto the black circle of each bug with a light colored marker or crayon.
8. Draw black circles onto the ladybug and black strips onto the bee. If you wish, cut out white paper wings and attach onto the bee.
9. Attach the ladybug and the bee onto the green paper. Now you have a ladybug crawling around and a bee landing onto the grass.
10. Cut out an ant shape from red or pink paper. Attach a "V" shape for the antennas onto the head and attach 3 strips of paper under the body so that the ant can have six legs. Draw a face onto the ant if you wish. Attach the ant onto the paper grass.
11. Cut out small pieces of glitter foam stickers and attach onto the ends of the antennas to give the insects some sparkle.
12. If you wish to add anything else to the insects, feel free to do so.
Enjoy the looks of the bugs below created by the children at the library!


Now that we're back in town, let's join the crazy hat parade!

Supplies: White construction paper, yellow construction paper, crayons/markers, scissors, stickers, glue/tape and anything else of your preference.
Instructions:
1. Cut out a few hat shapes from white paper.
2. Color and decorate the hat shapes using crayons/markers, stickers and anything else of your preference.
3. Cut out some circles from yellow paper.
4. Draw a face on each circle.
5. Attach a decorated hat onto each circle with a face.
6. Attach the faces with the hats together from the backs of the faces using strips of paper.
Enjoy the crazy hat parades below created by the children at the library!


Let's build a magic tree house!

Supplies: One rectangular box, blue tissue paper, green tissue paper, brown construction paper, a cardboard square, string, one small strip of card stock, crayons/markers, glue/tape, scissors, 2 images or stick figures of children (one boy/one girl) and a small print out of the words, "Magic Tree House."
Directions:
1. Cover the inside of the box with blue tissue paper. This will be your background of the sky.
2. Cut out a square piece of card board into the shape of a tree house and cover it with brown construction paper. Draw any design that you wish on the tree house.
3. Attach the tree house shape into the top of the box.
4. Cut out small strips of brown construction paper and glue/tape pieces of green tissue paper onto the brown strips. This will be the tree branches with the leaves.
5. Attach the tree branches onto and around the tree house to make it seem as if there are tree branches around the tree house.
6. Cut out a rectangle out of brown construction paper and color a ladder design on it. Attach one end of the rectangle at the bottom of the tree house and the other end at the bottom of the box to make it seem as if there is a step ladder to climb up to the tree house.
7. Cut out a small piece of string. Cut out a strip of card stock and attach the ends of the card stock together so that a circle is formed. Tie one end of the string onto the circle and then attach the other end of the string onto the bottom of the tree house so that it looks like a hanging tire swing.
8. Download or draw 2 stick figures resembling children and attach them onto the top and/or bottom of the tree house to make it seem as if they are playing in or around the tree house.
Enjoy the magic tree houses pictured below created by the children in the library!


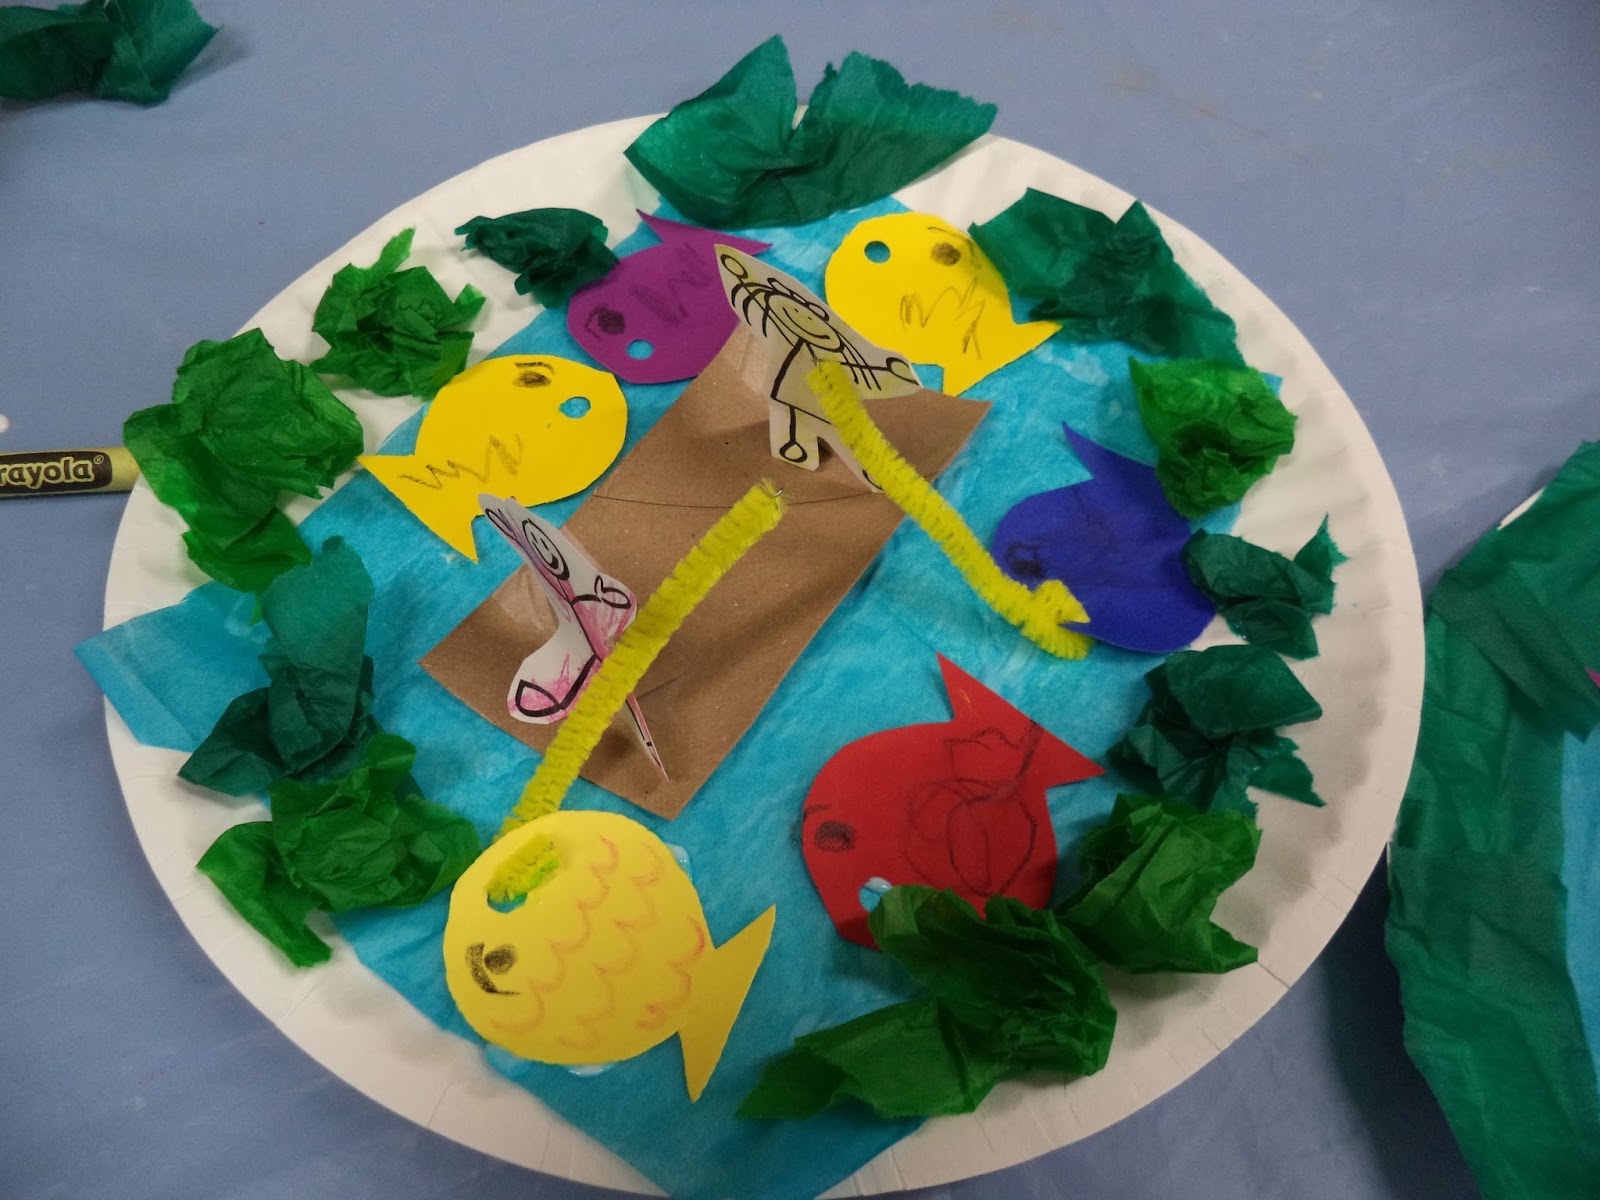
Wow, the tree house came out nice! It feels like a magic tree house! There is a nice view of the pond from the tree house! Let's go fishing and swimming!
Fishing in a Pond Craft!


Supplies: One paper plate, blue tissue paper, green tissue paper, card stock, one small piece of pipe cleaner, cardboard, 2 stick figure people images, glue/tape, scissors, one hole puncher and crayons/markers.
Instructions:
1. Glue/tape blue tissue paper in the middle of the plate. Make sure the blue tissue paper covers most of the center of the plate. This will resemble your water in the pond.
2. Attach smaller pieces of green tissue paper around the edge of the plate to resemble bushes, grass or plants around the pond.
3. Cut out a rectangle shape from cardboard and color any design on it. Attach the piece of cardboard onto the center of the plate. This will be your raft/boat.
4. Cut out 5 small fish shapes from card stock of any color. Color in and decorate your fish shapes. Punch one hole in one of the fish. Make sure the hole is at the front of the fish where the mouth would be.
5. Attach 4 of the fish shapes onto the plate in the blue part. Now you have fish swimming in the pond.
6. Cut out 2 stick figures of people and color them in. Attach them onto the raft/boat. You may need to attach each of them to a small strip of card stock or cardboard so that they can stand or sit up vertically in the raft. The strip will be the support. Attach each stick figure onto each strip and then attach the bottom of each strip onto the raft.
7. Take a piece of pipe cleaner and slide it through the hole in the last remaining fish. Attach the pipe cleaner with the fish onto the hand of one of the stick figures. This will make it seem as if the people on the raft/boat are fishing in the pond!
Enjoy the paper ponds below created by the children at the library!


After catching some fish or relaxing at the pond, perhaps it's time to travel to the beach with sand!

Botanical Gardens!

Supplies: One paper plate, fake grass, tissue paper, construction paper, pom pom, glue/tape and crayons/markers.
Directions:
1. Cover a paper plate with brown tissue paper. This will resemble your dirt/soil.
2. Glue/tape some fake grass around the edges of the plate.
3. Cut out flower shapes from construction paper.
4. Cut out green small rectangle shapes for the leaves and stems. Attach the rectangles together to resemble stems with leaves. (One in a vertical direction for the stem and one horizontally for the leaves).
5. Attach each flower head to a stem with leaves.
6. You may draw in a decoration onto a flower head or attach a pom pom to a flower head to make it more lively.
7. Bend the bottoms of the paper flowers and attach the bottoms of the flowers onto the center of the plate onto the paper soil. You may bend the stems in any way to make the flowers stand up. (Pop-up flowers.)
8. Cut out small, slender shapes from pink paper and draw faces on one end of them. These will be your earthworms. Attach the worms onto the plate in between the flowers.
9. Cut out a small rectangle from green paper. Bend the paper 3 times and then draw a face on top. Attach a small, slender piece of red/pink paper onto the top under the face. This will be your frog with a tongue sticking out. Attach the paper frog onto the plate next to a flower.
10. If you wish, crumple pieces of green tissue paper and attach around the edges of the garden to resemble small bushes.
Enjoy the gardens below created by the children at the library!


Happy Cinco De Mayo! After all the planting and gardening, it's time to enjoy some tacos!
Paper Tacos!

Supplies: One paper plate, construction paper (yellow/orange), small shredded pieces of scrap construction paper (the colors brown, red, green, yellow and orange are preferred), crayons/markers, glue/tape, scissors, green tissue paper and one cotton ball.
Directions:
1. Using crayons/markers, color in a design onto a paper plate.
2. Using scissors, cut out 3 circles from yellow or orange construction paper. Fold each circle. These will resemble your folded taco shells.
3. Color in designs or faces onto your paper taco shells.
4. Glue/tape the paper shells next to each other onto the plate.
5. Stuff each shell with shreds of scrap construction paper. Red shreds can resemble tomatoes, brown shreds can resemble meat, green shreds can resemble lettuce, yellow/orange shreds can resemble cheese, etc.
6. Cut out a small piece of construction paper into the shape of a rectangle or square. (Any shape of your choice is fine.) This will resemble a smaller dish or tray.
7. Crumble up a small piece of green tissue paper and attach it onto the smaller dish. Attach a cotton ball onto the small dish as well. This will be your small side dish of guacamole and sour cream.
8. Attach the small side dish onto the side of the plate next to the tacos.
Enjoy the paper tacos below created by the children at the library!


Paper Maracas
Supplies: Toilet paper tubes, popsicle sticks, construction paper, fake grass, pompoms, small pieces of old broken crayons, scissors, crayons/markers and glue/tape.
Directions:
1. Wrap a toilet paper tube in construction paper but leave the top open.
2. Decorate the tube by drawing a face or design on it. Attach pompoms or stickers for more decorations.
3. Place some broken crayon pieces into the tube and close up the top of the tube by folding up the top and taping over it. (The broken crayon pieces will make noise when you shake the tube, just like a maraca.)
4. Attach some fake grass onto the top of the tube for more decorations or hair for the face.
5. Attach a popsicle stick onto the back of the tube but make sure enough of the tube is sticking down at the bottom so that you can hold the stick with the tube in your hand.
6. Shake the maraca tube and have fun on Cinco De Mayo!
Enjoy the maracas below created by the children at the library!


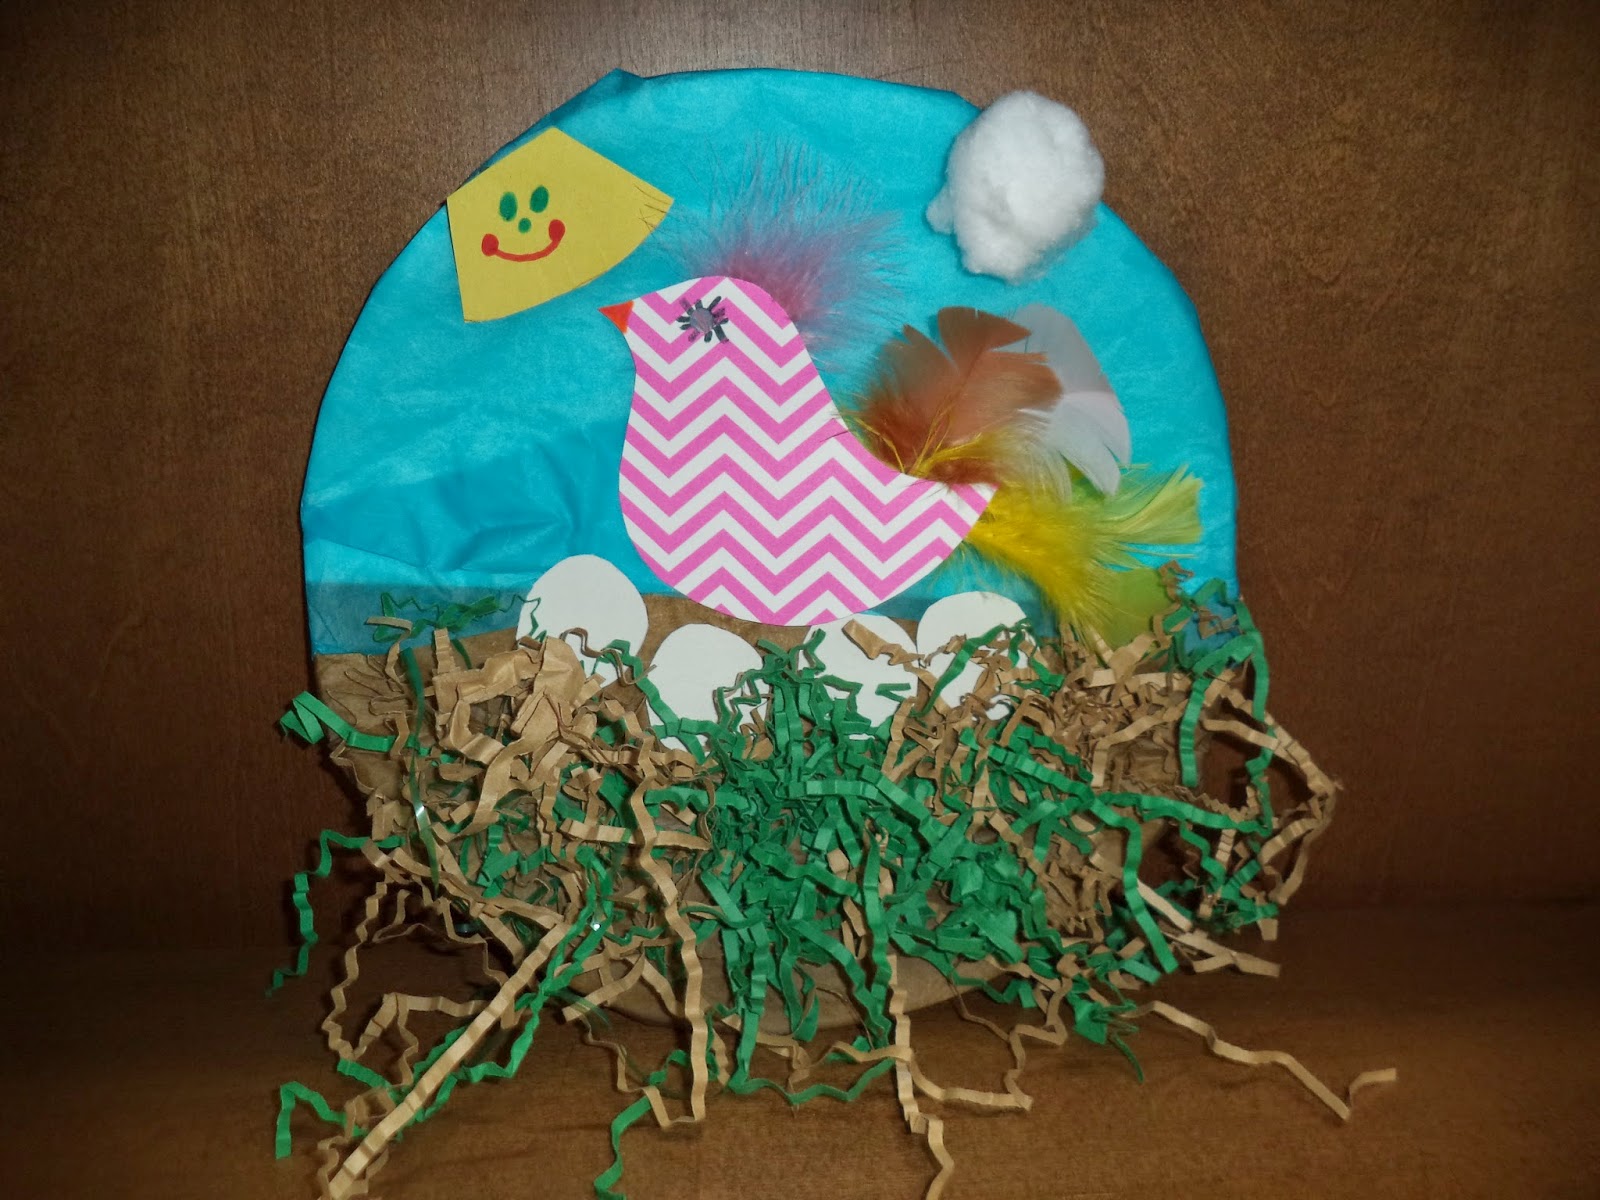
It's so nice outside! It's a nice day to go bird watching! Let's see if we can observe birds in the trees with their nests!
Birds in Their Nests!

Supplies: One paper plate, blue tissue paper, brown tissue paper, card stock, scissors, hole puncher, construction paper (white and yellow), one cotton ball, fake grass, feathers, crayons/markers and glue/tape.
Directions:
1. Cover one half of the paper plate in blue tissue paper. This will resemble the sky. Cover the other half in brown tissue paper and this will resemble the bird's nest.
2. Attach brown and some green fake grass onto the brown part of the plate. This will become the bird's nest.
3. Cut out a few egg shapes from white paper and attach them onto the top of the nest.
4. Cut out a bird shape from card stock and punch a hole onto the top with a hole puncher for the eye. (If you wish, you can just draw in an eye or attach a googly eye instead of punching a hole).
5. Using crayons/markers, draw in a face onto the bird or just color in a beak.
6. Attach feathers onto the bird.
7. Attach the bird onto the blue half of the plate on top of the paper eggs to make it seem as if the bird is laying eggs in the nest.
8. Cut out a small yellow piece of paper in the shape of a sun and if you wish, draw a face onto the sun. Attach the sun onto the top of the blue part of the plate.
9. Attach a cotton ball onto the top of the blue part of the plate to resemble a cloud.
Enjoy bird watching!


Let's go on a picnic!
Paper Picnic


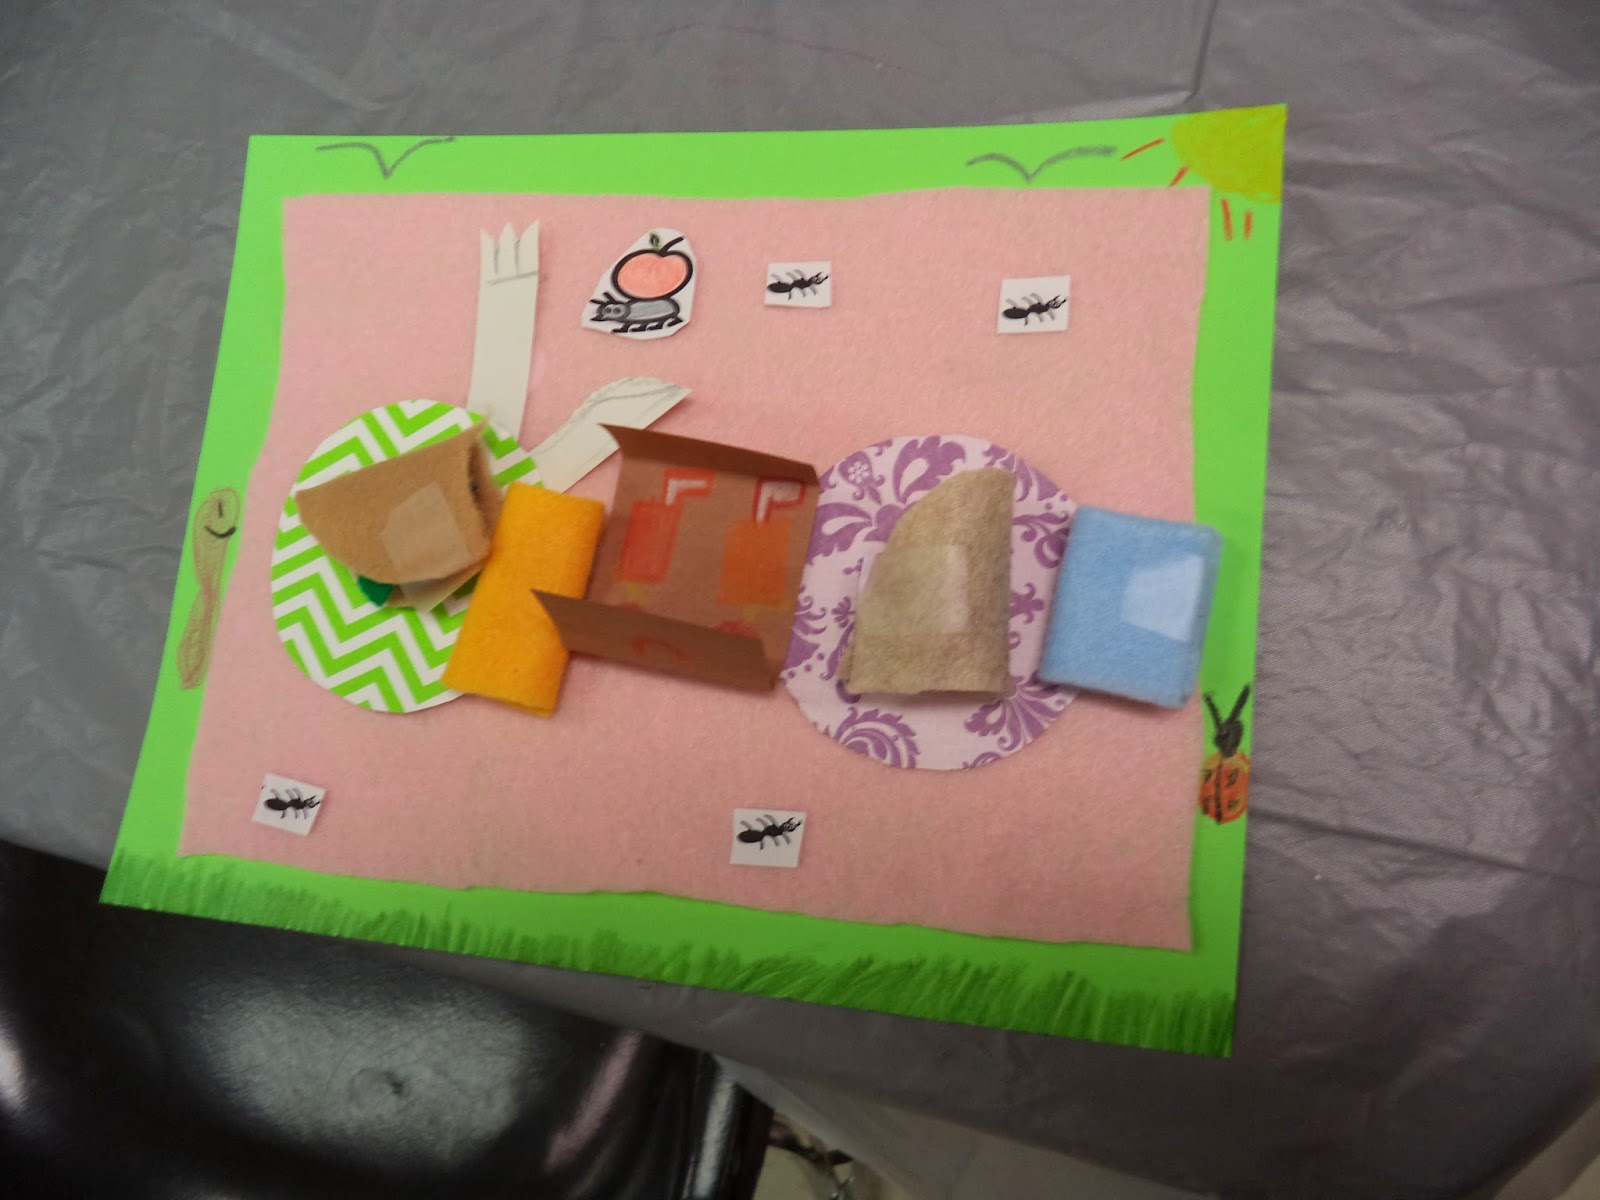

Supplies Used: One toilet paper tube, construction paper, card stock, fabric, pipe cleaner, scissors, glue/tape and crayons/markers.
Instructions:
1. Wrap a toilet paper tube in construction paper in any color of your choosing.
2. Using scissors, cut out wing shapes from card stock or construction paper. Cut out 6 strips of paper for the legs as well.
3. Glue/tape the wings and legs all along the top of the tube.
4. Cut out a piece of fabric in the shape of a triangle and glue/tape the fabric onto the wings to resemble a cape.
5. Cut out a small piece of pipe cleaner and bend it into a "V". Glue/tape the "V" onto the top front of the tube to resemble antennae for the bug.
6. Draw a face onto a small piece of paper and attach it to the front of the tube to resemble the bug's face.
7. Adorn your super bug with any other decorations of your preference.
8. Enjoy the super bugs below created by the children at the library!


Let's visit a farm and pet the animals in the petting zoo!
Paper Petting Zoo!


Paper Bag Houses


Let's visit the Museum of Natural History and build an exhibit!
Museum of Natural History Diorama
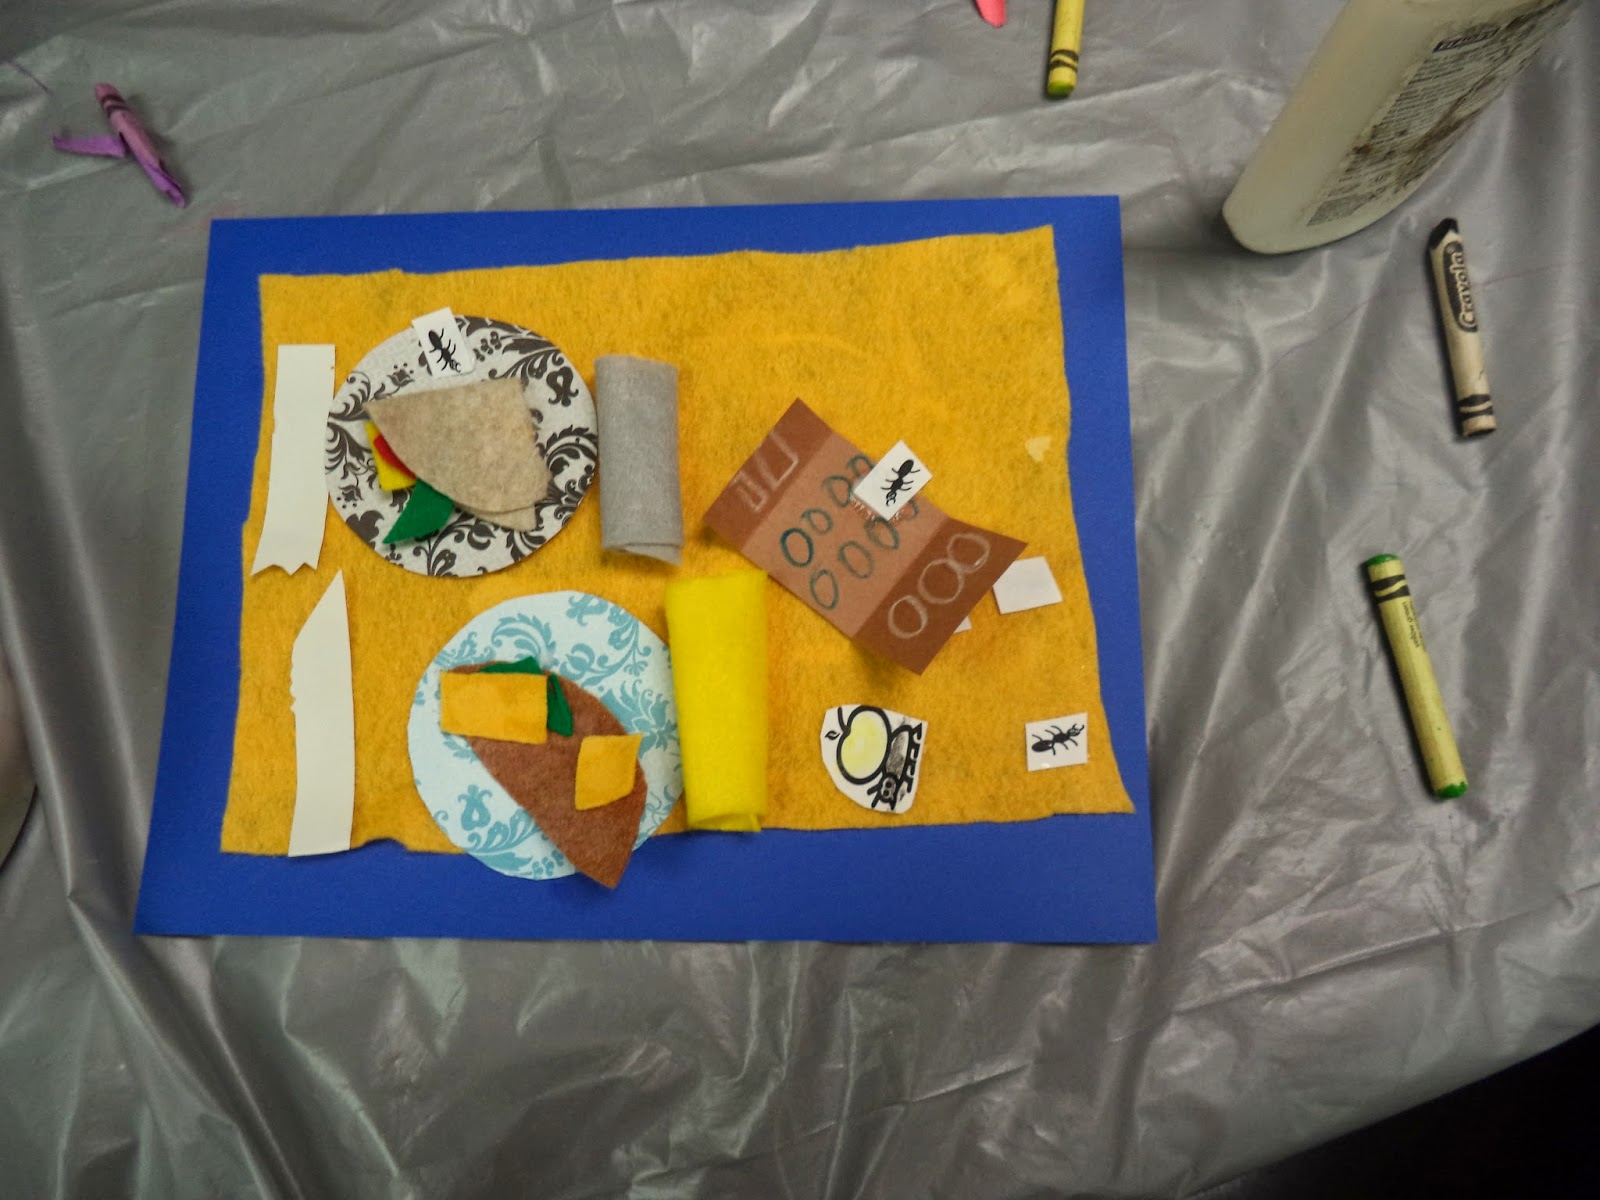
Supplies Used: Card Stock, Fabric, Pictures of Ants, Crayons/Markers, Glue/Tape and anything else you wish to use to embellish the picnic.
Instructions:
1. Glue a large piece of fabric onto a letter sized sheet of card stock. The fabric will resemble a picnic blanket on the ground.
2. Using a green crayon or marker, draw green lines or swirls on the edges around the blanket to make to seem as if there is grass on the ground.
3. Cut out 2 circles from card stock and glue or tape them onto the blanket. The circles will be your plates.
4. Cut out small square pieces of fabric and either roll them up or just fold them up. Use glue/tape to make them stay folded or rolled.
5. Glue/tape the folded or rolled fabrics onto the blanket next to the plates to resemble napkins.
6. Cut out small pieces of brown or tan fabric. Cut out smaller pieces of red, green, yellow and other colors of your choice to resemble condiments on a sandwich. Place all of the smaller pieces of fabric onto the brown or tan piece of fabric and fold up the brown or tan fabric around the other pieces to create a sandwich. Do all of this again if you want more sandwiches.
7. After holding the sandwiches together with glue/tape, glue or tape the sandwiches onto the plates.
8. Fold a piece of brown paper and glue/tape the paper onto the blanket to resemble a picnic basket.
9. Cut out small utensils such as a knife and fork from card stock or construction paper. Glue/tape the utensils onto the blanket next to the plates.
10. Download images of ants from online, print them and cut them out. Glue/tape the paper ants on the blanket to resemble ants at a picnic.
Enjoy the paper picnics below created by the children at the library!
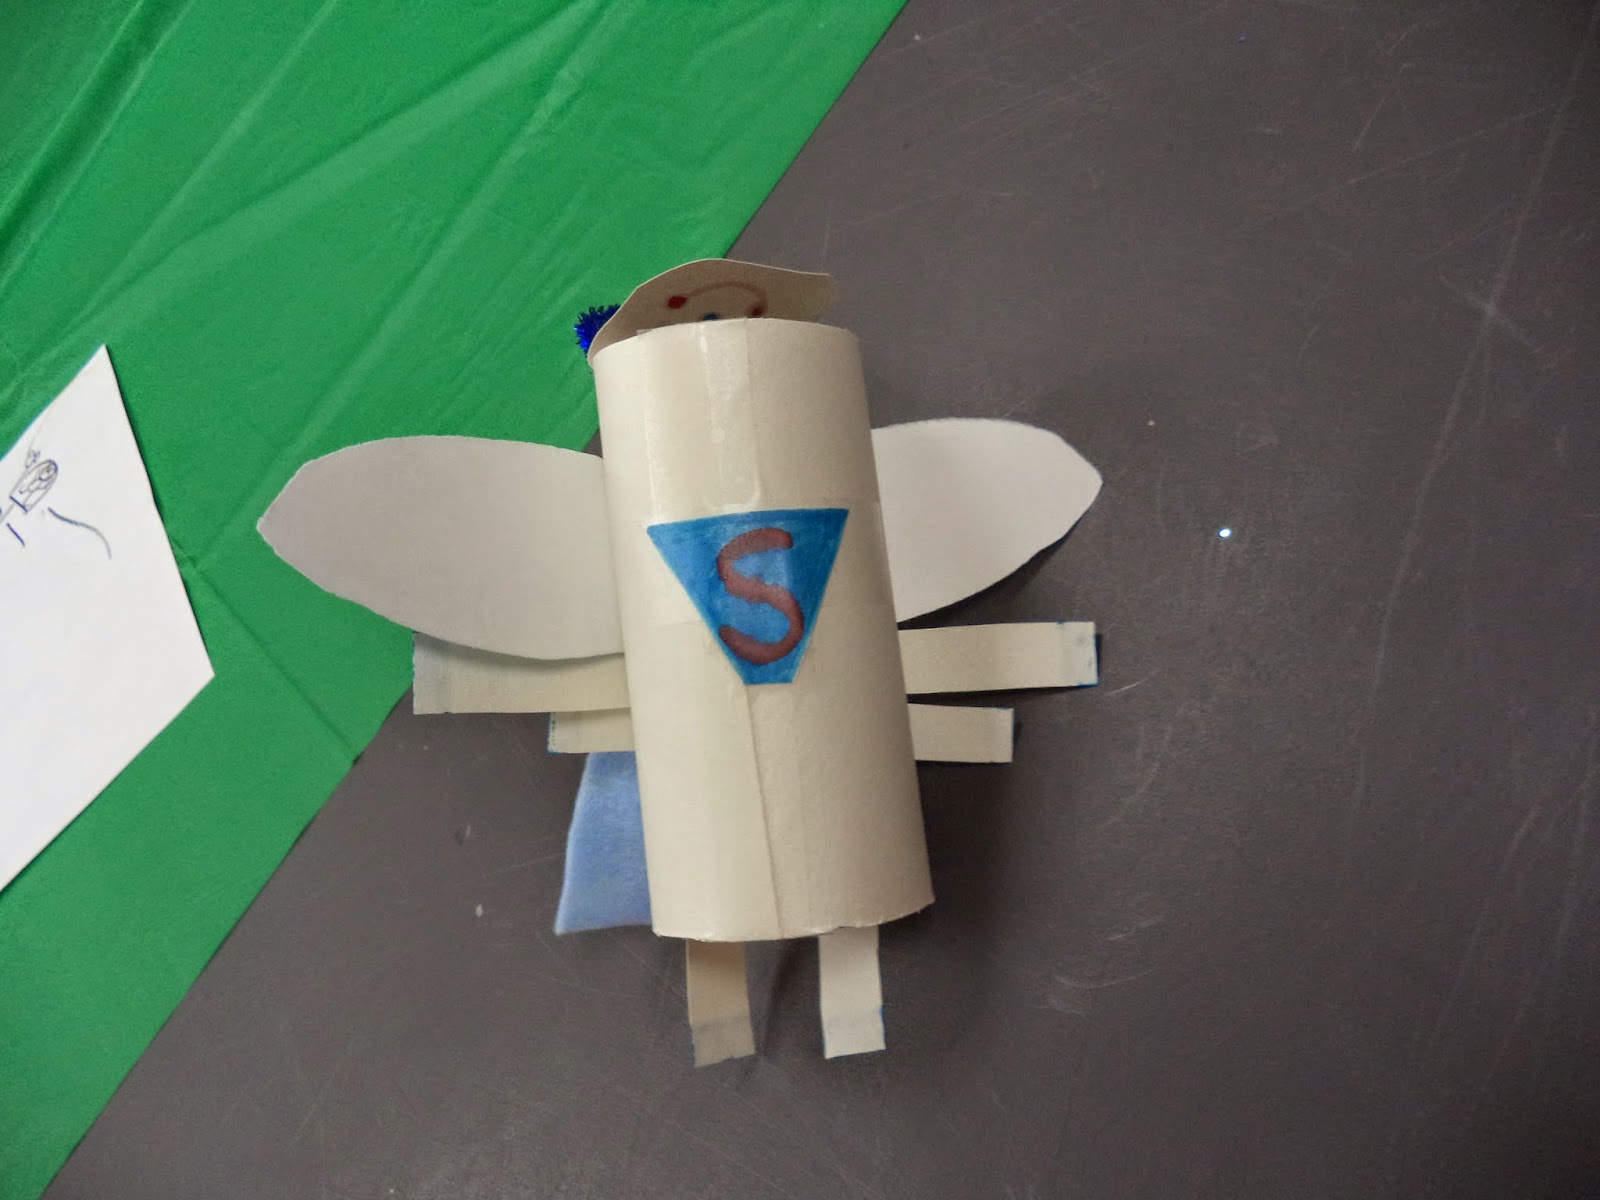
Let's observe the super bugs flying around!
Super Bug!
Supplies Used: One toilet paper tube, construction paper, card stock, fabric, pipe cleaner, scissors, glue/tape and crayons/markers.
Instructions:
1. Wrap a toilet paper tube in construction paper in any color of your choosing.
2. Using scissors, cut out wing shapes from card stock or construction paper. Cut out 6 strips of paper for the legs as well.
3. Glue/tape the wings and legs all along the top of the tube.
4. Cut out a piece of fabric in the shape of a triangle and glue/tape the fabric onto the wings to resemble a cape.
5. Cut out a small piece of pipe cleaner and bend it into a "V". Glue/tape the "V" onto the top front of the tube to resemble antennae for the bug.
6. Draw a face onto a small piece of paper and attach it to the front of the tube to resemble the bug's face.
7. Adorn your super bug with any other decorations of your preference.
8. Enjoy the super bugs below created by the children at the library!
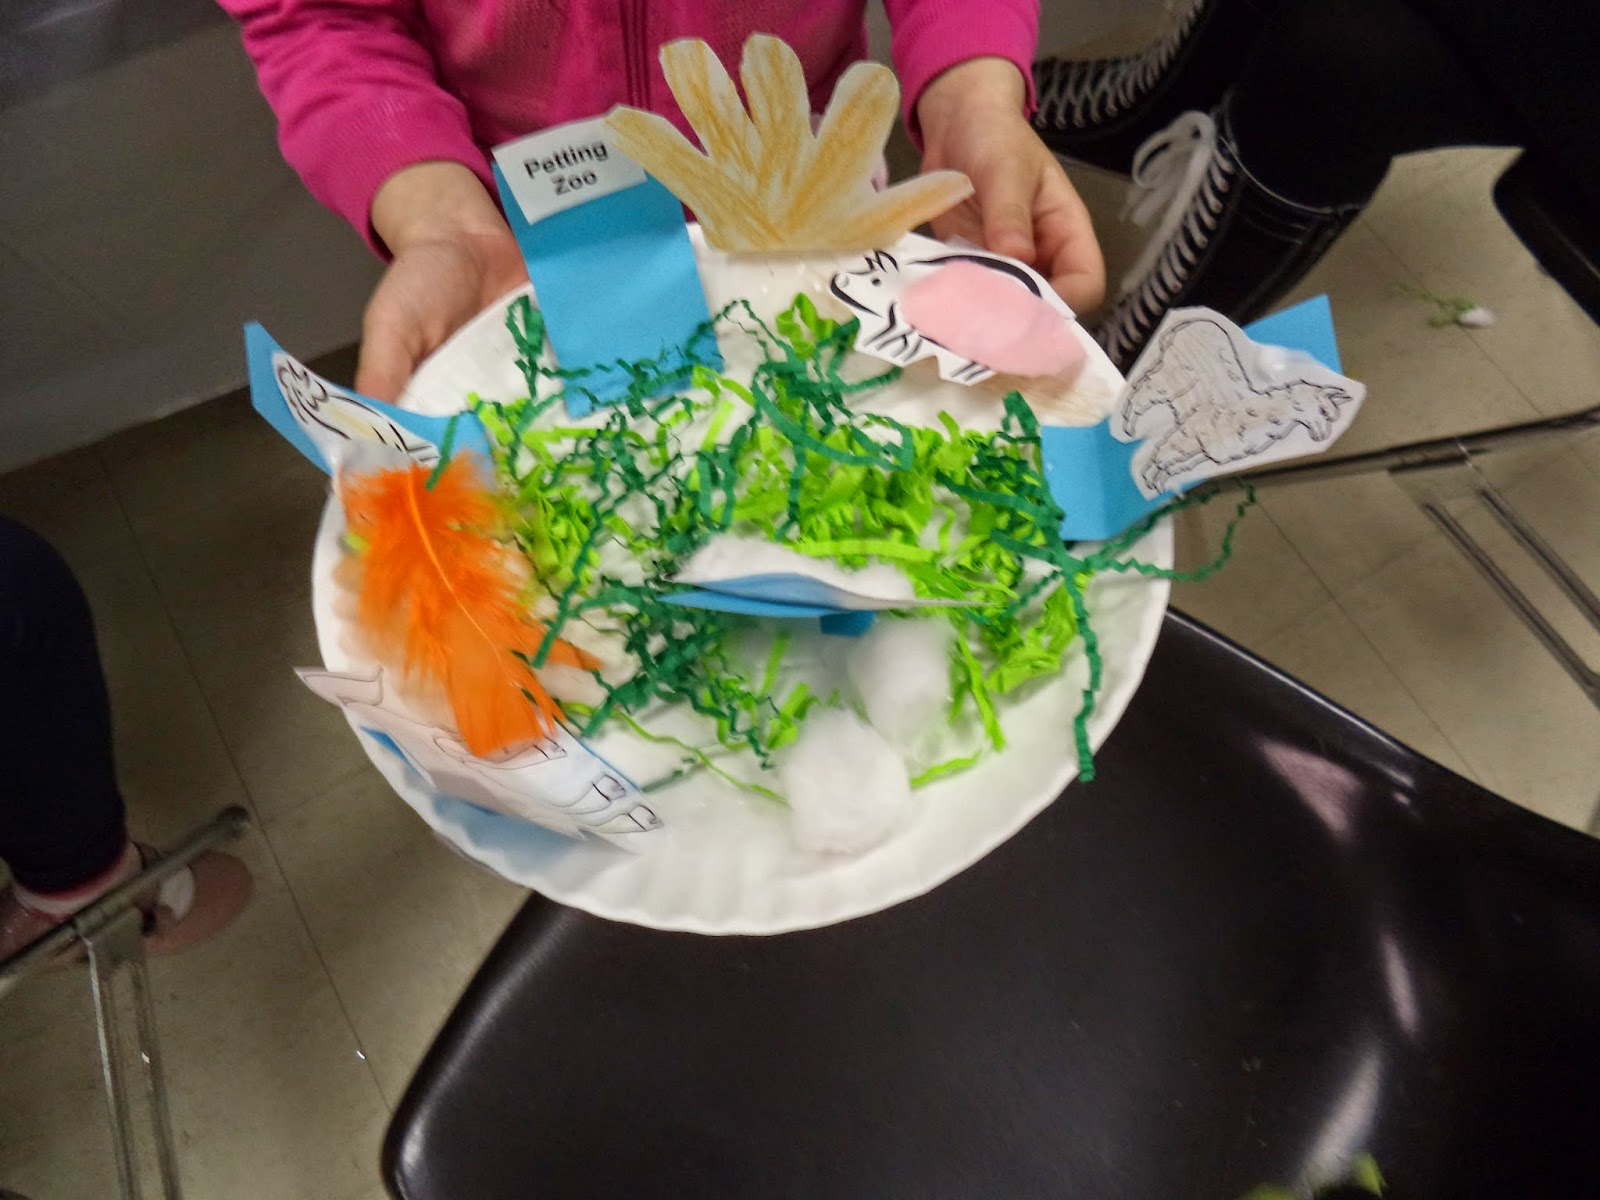
Let's visit a farm and pet the animals in the petting zoo!
Paper Petting Zoo!
Supplies Needed: Construction Paper, Card Stock, Printouts of Animals, Fake Grass, One Paper Plate, Cotton, Fabric, a feather, Scissors, Glue/Tape and Crayons/Markers.
Directions:
1. Color in the printouts of the animals or if you wish, you can print out pictures of animals using a colored printer.
2. If you wish, you may adorn the animals with fur or feathers by using a small piece of fabric or a fake feather or cotton. (For example, you may use a small piece of tan fabric and place it on the horse to make it seem as if the horse has real hair/fur. You may use cotton to place on the sheep to make the paper sheep feel soft to the touch. You may attach a feather onto a hen/rooster for more of a touch and feel texture.)
3. Attach each animal onto a piece of card stock.
4. Bend the bottom of each piece of card stock and attach the bottom of it onto the paper plate. This should make each animal appear as if they are standing up.
5. Attach fake grass onto the plate around the paper animals.
6. Cut out a longer piece of card stock into the shape of a rectangle. Write or print the words, "Petting Zoo" onto the top of the rectangle.
7. Bend the bottom of the rectangle and attach the bottom onto the plate. (This will be your petting zoo sign).
8. Cut out or download an outline of a human hand. Color in the hand and attach it onto the front edge of the plate. This will resemble a hand petting the animals.
Enjoy the Petting Zoos below created by the children at the library!
Let's browse some new houses that were just built
on our way home from the petting zoo!
Paper Bag Houses
Supplies Needed: One Paper Bag, Card Stock, Crayons/Markers, Scissors, Glue/Tape and stickers.
Instructions to be posted later:
Enjoy the paper bag houses below built and decorated by the children at the library!
Let's visit the Museum of Natural History and build an exhibit!
Museum of Natural History Diorama


Supplies Needed: One paper plate, tissue paper, construction paper, tin foil, one pipe cleaner, cut outs of a dinosaur and other creatures from online or drawn by hand, crayons/markers, glue/tape and scissors.
Directions:
1. Fold a paper plate in half and then stand it up vertically.
2. Cover the inside front of the paper plate with tissue paper of any colors of your choice.
3. Using scissors and construction paper, cut out shapes of bones, dinosaurs, a whale, a butterfly, fossils, a planet, rocks and anything else you like to see at a museum of natural history.
4. Using crayons or markers, color and decorate the creatures, planet and anything else on the display in any color or pattern of your choice. If you would like a butterfly in your exhibit, then take a half of a pipe cleaner, fold it and twirl it into a swirly strip and glue/tape it onto the middle of the butterfly.
5. Take pieces of tin foil the size of your hand and crush each one into a ball. These can resemble glittery rocks.
6. Once you have colored and decorated all of the objects, glue or tape them onto the front of the paper plate in any way you wish. Now you have your exhibit!
7. If you wish, you may type up or write up little rectangular labels of the names of everything in your exhibit, such as "Blue Whale", "Silver Rocks", "Planet", "Dinosaur", etc.
8. If you wish to embellish your exhibit with anything else, feel free to do so!
Enjoy the museums of natural history exhibits created
by the children at the library!


Now that we built our exhibits at the Museum of Natural History, it is now time to step outside, take a walk and relax by a colorful pond!
Paper Pond Creation


Supplies Needed: A paper plate, green tissue paper, blue/aqua tissue paper, green construction paper, computer printouts or outlines of images of pond creatures, such as a frog, duck, tadpole, turtle and a person walking a dog by the pond (if you wish), crayons/markers, glue/tape, scissors and Easter grass.
Directions:
1. Cover the paper plate with tissue paper. Preferably, the green tissue paper should be glued/taped around the edges of the plate to resemble grass and the blue paper should cover the center to resemble water of the pond.
2. Color the cut outs or outlines of creatures found in or around a pond, such as a turtle, frog, tadpole, duck, etc. You may also add a human figure walking a dog on a leash if you wish.
3. Glue/tape green Easter grass around the edges of the plate to resemble tall grass.
4. Glue/tape the cut outs onto the center (blue tissue paper) or around the edges of the plate depending on your preference and the type of creature.
5. If you wish to make any of the cut outs stand up, you may glue/tape a small folded "L" shaped piece of card stock against the back of the picture to make a support and then glue/tape the bottom of the "L" support onto the plate so that the picture stands up.
Enjoy the paper ponds below created by the children at the library!


After visiting the creatures at the pond, it is now time to visit the botanical gardens that look like palaces with plants! It's time to smell the roses!
Plant Palaces


Supplies Needed: One paper towel tube, 2 toilet paper tubes, construction paper, card stock (plain or with designs), stickers, glue/tape, crayons/markers, 3 pipe cleaners (any color) and scissors.
1. Wrap each cardboard tube in construction paper of any color of your choice and secure with glue/tape.
2. On one end of each tube, cut out a geometric pattern (alternating little squares or triangles) to resemble a pillar of a palace. The end with the design cut into it will be the top of the pillar.
3. After all the tubes are wrapped and cut at the top, decorate the tubes using crayons/markers and stickers.
4. After all the tubes are decorated, stick them together with glue or tape to create the effect of a palace or castle.
5. Cut out 3 shapes from pieces of card stock, such as a circle, star, heart or any other shape of your choosing.
6. Cut out 3 leaf shapes out of construction paper or card stock.
7. Decorate the cardstock shapes and leaves if you wish by coloring and using stickers.
8. Glue/tape each cardstock shape onto the end of one pipe cleaner. Glue/tape the paper leaves onto the middle of each pipe cleaner. Now you'll have a nice paper flower/plant.
9. Place each paper flower/plant into each tube. You may glue/tape the pipe cleaner stem of each plant/flower to secure it to the tube.
10. Enjoy the plant palaces created by the children at the library below!


Below is Perry the Peacock Puppet sitting next to the Plant Palace.
We all need a peacock to admire our plants!

While walking around the plant palaces and gardens, please say hi to the peacocks roaming around! Enjoy the colors of the plants and peacocks!
Peacock Puppet

Say hello to Perry the Peacock!
Perry the Peacock says "Hello!"

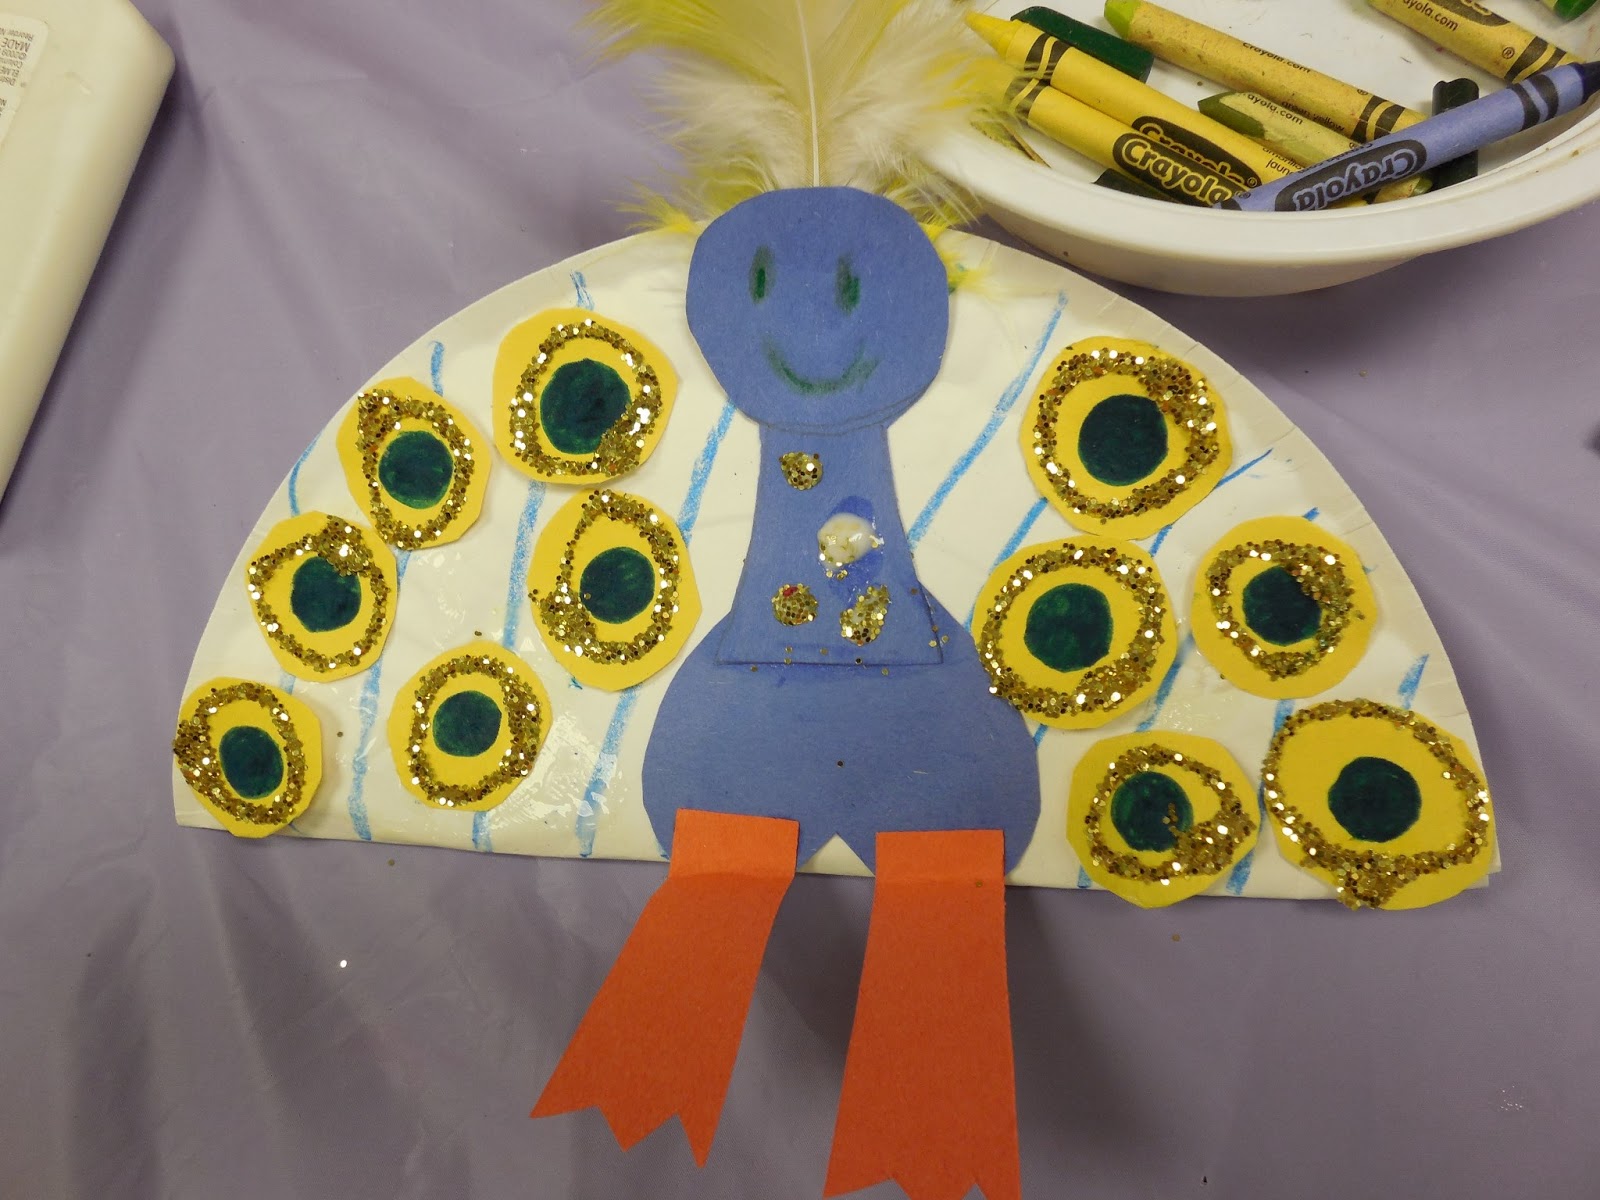
Supplies Needed: One paper plate folded in half, blue construction paper, yellow construction paper, orange construction paper, gold colored glitter, glue, tape, crayons/markers that are shades of blue, green, aqua, light blue, yellow and black, etc. and 3 feathers.
Directions:
1. Fold the paper plate in half and stand the folded paper plate up so that one half is the bottom and it's flat and the other half is the top part sticking up. *The bottom part that is down and flat will be the part that you hold with your hand when the plate becomes your peacock puppet. The front top part will be the fan of peacock feathers.
2. Using crayons or markers, color the top front of the plate using shades of blue, green, aqua, turquoise, gold, yellow, etc. You may opt for any color patterns of your choosing.
3. Cut a 2 inch heart shape out of blue construction paper. Cut out a small rectangle and a small circle out of the blue paper as well.
4. Using glue or tape, attach the small circle on top of the small rectangle to make the head and neck of the peacock.
5. Turn the blue heart upside down and attach the head/neck onto the turned up bottom part of the heart to resemble the body of the peacock.
6. Cut out 2 little legs with 3 toes each from the orange construction paper and glue each little leg onto the bottom of the body. Once the body is assembled, draw a face on the peacock using any color crayon/marker of your choice. (I recommend black or red so that the face can be seen.)
7. Cut out approximately 8-10 small circles from yellow construction paper. Color in a small blue circle on each of the yellow circles.
8. Squeeze some glue around the blue drawn-in circle on each yellow circle. Pour gold colored glitter onto the glue on all of the circles.
9. After a few minutes, shake off the excess glitter from each circle. Now you have the eyes of the peacock feathers!
10. Glue/tape the body of the peacock onto the colored in front of the plate.
11. Glue/tape the glittery circles on the front of the plate around the body and some near the edges to create a peacock plumage effect.
12. Attach 2-3 feathers on top of the peacock's head and now you have your peacock puppet!
Below are peacock puppets created by the children at the library!


After visiting the peacocks at the gardens,
there now is a need for speed!
there now is a need for speed!
Let's take a ride on a roller coaster!
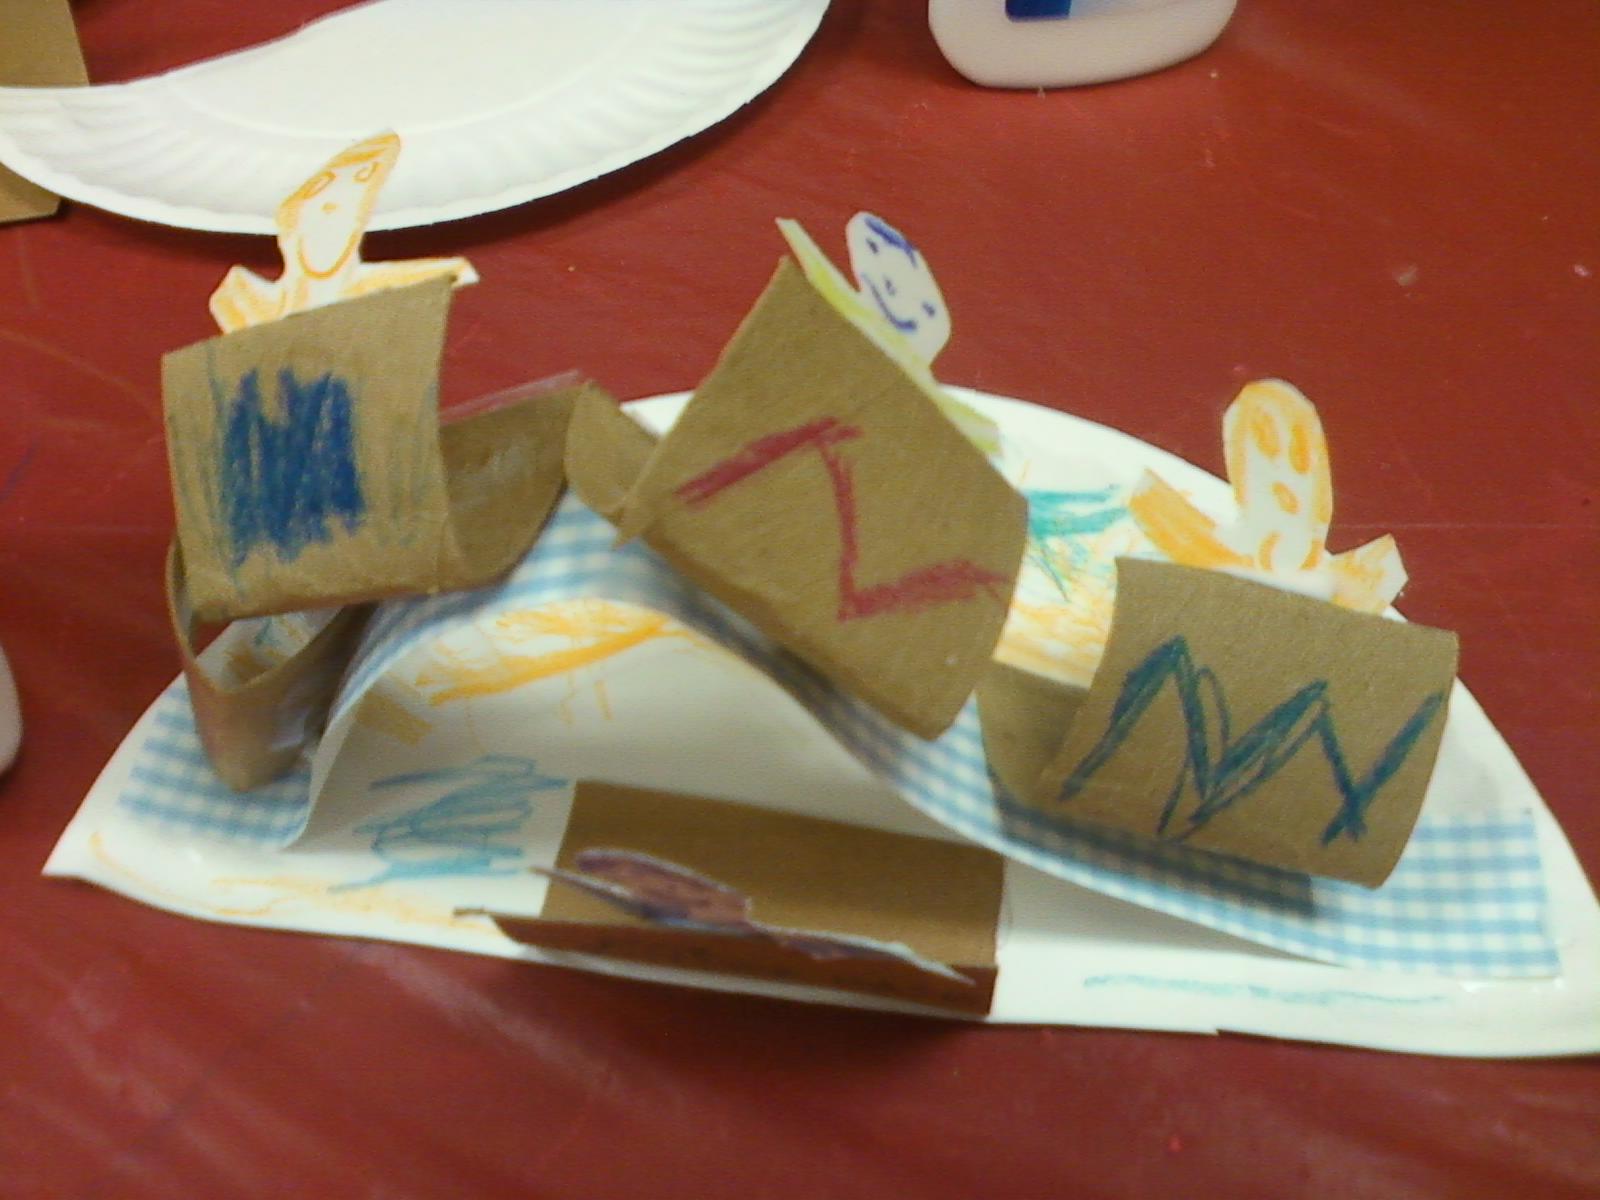
Roller Coaster Diorama!


Supplies Needed: Pieces of cardboard, one strip of card stock paper, construction paper, one half of a paper plate, crayons/markers, glue/tape.
Directions:
1. Cut a paper plate in half and use one half of the plate for the craft. Place that half of a plate flat on the table with the round side facing away from you.
2. You may color the half plate if you wish.
3. Cut out 5 square shapes out of cardboard using scissors and paper towel tubes or other recycled pieces of cardboard. The squares should measure approximately 2 inches tall and wide.
4. Fold each cardboard square in half.
5. Color and decorate all of the folded cardboard squares as you wish using crayons/markers and stickers. Four of the folded squares will resemble the roller coaster cars and the remaining fifth folded square will be your ticket counter.
6. Cut out 5 small human figures out of construction paper. All you need are the head, arms and upper bodies of the human figures.
7. Color the human figures as you wish to make them resemble children or young adults.
8. After decorating the cars and the people, attach a human figure into each car using glue/tape in any way of your choice. (I attached each human figure along the inside of the folded car and I made each human figure directly face me. )
9. Cut out a strip of card stock paper about 10 inches long and one inch wide. Glue each end of the strip onto the paper plate half. Make sure the strip is standing up and curving into an upside down "U" shape to make it resemble a roller coaster hill.
10. Take each car with a person inside and glue/tape it onto the top of the card stock strip. All four cars should be next to each other to resemble a set of roller coaster cars attached together. Some cars will be higher up than others. Make sure you can see the people waving in the cars!
11. Take the fifth square and decorate as well as the fifth human cut out and attach the human cut out behind the square part that is not decorated or will not be facing you.
12. Attach the flat bottom part of the folded square along the front of the plate half right in front of the roller coaster. Make sure the human figure is visible to resemble a ticket person. You may want to attach a small piece of white paper on one of the ticket holder's hands to resemble a person holding a ticket.
Enjoy the paper roller coasters below created by the children at the library!


Wow, what a long and fun-filled day! After visiting a museum, pond, gardens and riding a roller coaster, it is now time for rest and relaxation before embarking on another day of adventures!
Let's enjoy seeing a frog swimming around the pond!
Frog Puppet

Supplies: Green paper, pink/red paper, insect stickers, small round foam shapes, glue/tape, crayons/markers and anything else of your preference. If you wish, you may use the following template to help create the puppet. - http://www.enchantedlearning.com/crafts/puppets/frog/
Directions:
1. Cut and fold green construction paper into the shape represented by the template above.
2. Cut out a small strip of red or pink paper and attach it into the mouth of the frog. This will be the tongue.
3. Attach an insect sticker onto the top end of the tongue to make it seem as if the frog caught a fly or insect.
4. Using crayons/markers, glitter and anything else, draw a face on the frog. You may use small round foam shapes or googly eyes for the eyes.
Enjoy the frog puppets below created by the children at the library!


The children at the library enjoyed designing a Mother's Day doll card. I printed out and colored a girl's face coloring page from the following web site - http://www.supercoloring.com/
The dress is made out of construction paper. The arms and legs are cut from postcard paper. There is construction paper cut in the shape of the girl's face to open into a card.


Below is a pop-up book. The books were made using folded construction paper. The children can color with crayons or markers. They used shapes cut from post card paper and construction paper. Some of the images have a pop-up effect from using folded strips of post card paper underneath the image to make the image stand out and bounce around.


Visit the June posts for more adventures! Have a good night!