

Happy Holidays!
Wow, we are in the month of December! It's a nice time to walk around, see the sights, enjoy the window displays in the stores, share some holiday stories and enjoy some food!
It's snowing! Let's build a snowperson!
Snowman Sticks!

1.
1. Wrap the wooden stick in white paper. Now you have the body of the
snowman/snowperson.
2. 2. Cut out a
hat shape from dark paper and attach it to one end of the snowman. This will be the top of the snowman.
3. 3. Cut out a
strip of fabric and warp it around the neck of the snowman so that the snowman
has a scarf.
4. 4. Either
draw in a face or use foam shapes for the eyes, nose and mouth.


The Rockettes are performing at Radio City Hall. There are cute gingerbread dolls that resemble the Rockettes!
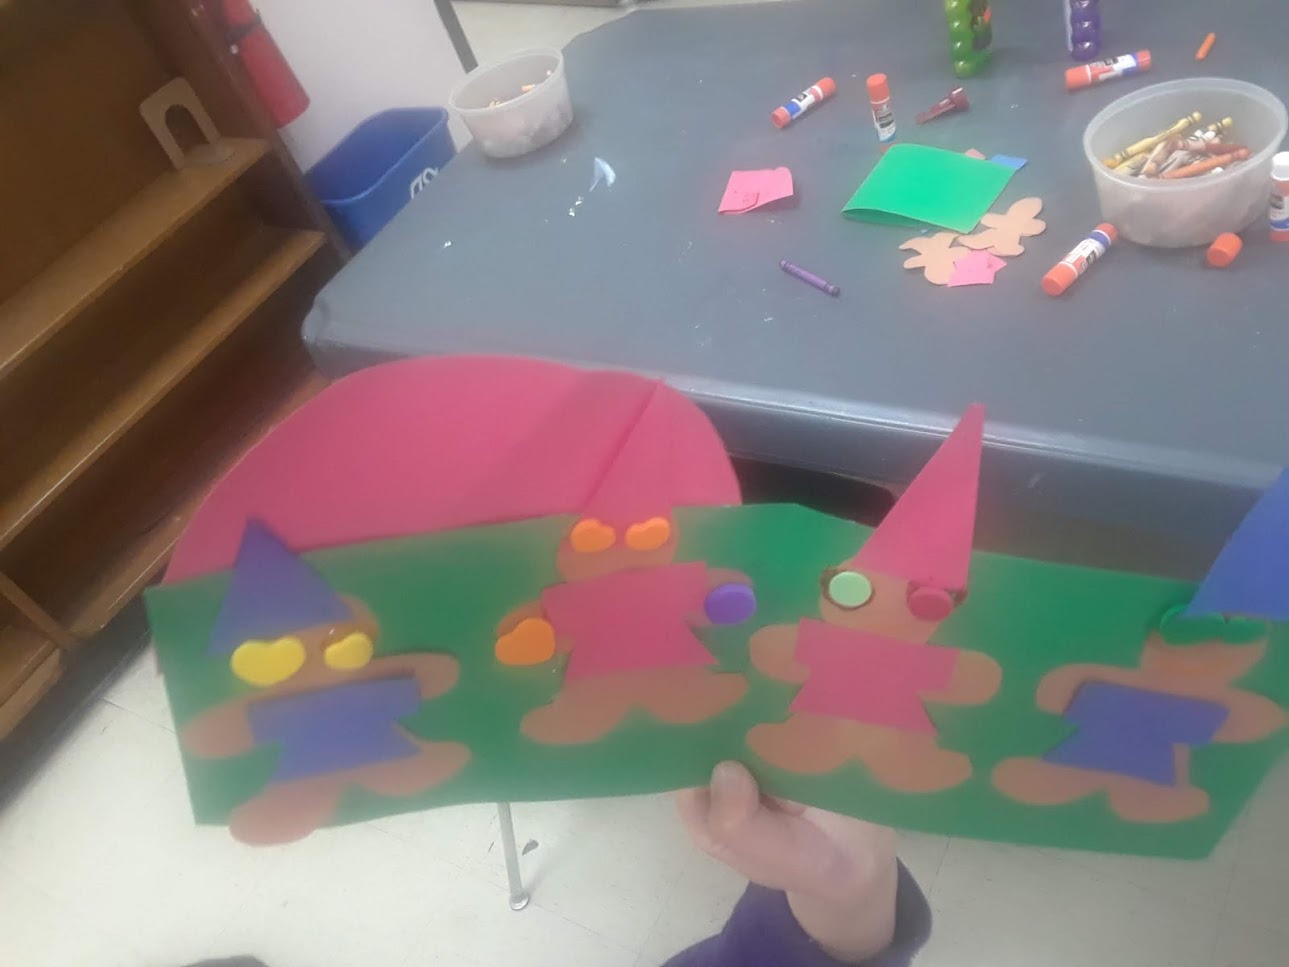
The Gingerettes!

Supplies: Card stock, scissors, brown paper, smaller pieces of paper in other colors, glue/tape, crayons/markers and small foam shapes or fabric.
Instructions:
1. Cut out a letter-sized sheet of card stock in half in a horizontal direction. Discard one half. With the half that's being used, fold it enough so that it can stand up on it's own. This will be the stage for the dancing ginger bread figures.
2. Cut out 4 ginger bread shapes from brown paper. Draw a face on each of them. Draw dance shoes on them as well
3. Cut out little outfits and hats for them and attach the outfits and hats on each of them. If you wish, draw a design on the outfits to make it look festive.
4. Attach the ginger bread figures in a line onto the card stock that is standing up. Make sure one leg is sticking out to make it look as if the ginger bread figures are dancing in a kick line like the Rockettes.
5. Feel free to adorn the Gingerettes with fabric or foam shapes for the hats and outfits.
6. If you wish, cut out a paper half circle and attach onto the top with the name of the Gingerettes to make it seem more formal. Draw in curtains on the edges if you wish.
Enjoy the paper Gingerettes below created by the children at the library!


There are rocking reindeer toys in the winter holiday window displays in the stores!
Rocking Reindeers!

Supplies: One paper plate, scissors, fabric, white paper, glue/tape and crayons/markers.
Instructions:
1. Cut out the center of a paper plate and discard the edges. Fold the center of the paper plate in half and place it on a flat surface standing up so that it rocks back and forth.
2. Cut out 2 reindeer shapes and attach them together to make one reindeer and to make it more sturdy. Color in the reindeer on both sides.
3. Cut out a saddle shape from white paper and attach onto the reindeer's back. Cut out a piece of fabric and attach onto the saddle on both sides to make it seem like a blanket or decoration for the saddle.
4. Attach the reindeer onto the top part of the rocking paper plate center. Now you should have a reindeer that rocks back and forth when you push it.
Enjoy the rocking reindeer below created by the children at the library!


It's snowing and it feels like winter! The gnomes outside are covered in snow!
Winter Gnomes!

Supplies: Card stock, white fabric, white paper, crayons/markers and glue/tape and stickers.
Instructions:
1. Cut a letter-sized card stock sheet of card stock in half and discard one half. The half that is being used, fold in half to make a card.
2. Cut out 2 heart shapes, one from card stock of a bright color, such as red, green or yellow. Cut out a smaller heart from white paper.
3. Turn the hearts upside down and attach the smaller white heart onto the bigger heart. Now you have the gnome hat with a white beard.
4. Cut out a small circle and attach onto the top of the beard. Draw a face on it.
5. Cut out small strips of white paper and curl them at the ends and attach onto the bottom of the beard to make a curly beard effect for the gnome.
6. Attach the gnome onto the bottom center of the card. The gnome should open up with the card when the card opens.
7. Cut out triangles from green paper or card stock and attach onto the card background around the gnome. Color in small stumps underneath each tree.
8. Attach pieces of white fabric under the trees to create the effect of winter and snow.
9. If you wish, adorn the gnome with a star sticker or any sticker of your choice.
Enjoy the winter holiday gnomes below created by the children at the library!


The air smells of gingerbread cookies and hot cocoa. Yummy!
Gingerbread Puppets in Hot Cocoa!

Supplies: Card stock or paper with designs on it, brown paper, one wooden stick, glue/tape, foam stickers, small foam shapes, white fabric and crayons/markers.
Instructions:
1. Cut out 2 identical mug shapes from colorful paper and attach them together by the handle and by the other side. Make sure you can put a small stick puppet through the top and bottom openings.
2. Cut out a small gingerbread shape from brown paper. Color in a face and decorations on the paper gingerbread shape. Attach small foam shapes for the buttons.
3. Attach the gingerbread shape onto one end of a wooden ice cream stick.
4. Decorate the paper mug with foam stickers. Cut out small squares from white fabric. This will be the marshmallows. Attach them onto the top of the mug shape. Cut out and attach a small strip of brown paper onto the top of the mug as well to make it look as if the mug has hot chocolate in it.
5. Place the gingerbread stick puppet through the openings of the mug and move it up and down to make it seem as if the gingerbread shape is emerging up and down from the hot chocolate.
Enjoy the gingerbread hot chocolate puppets below created by the children at the library!


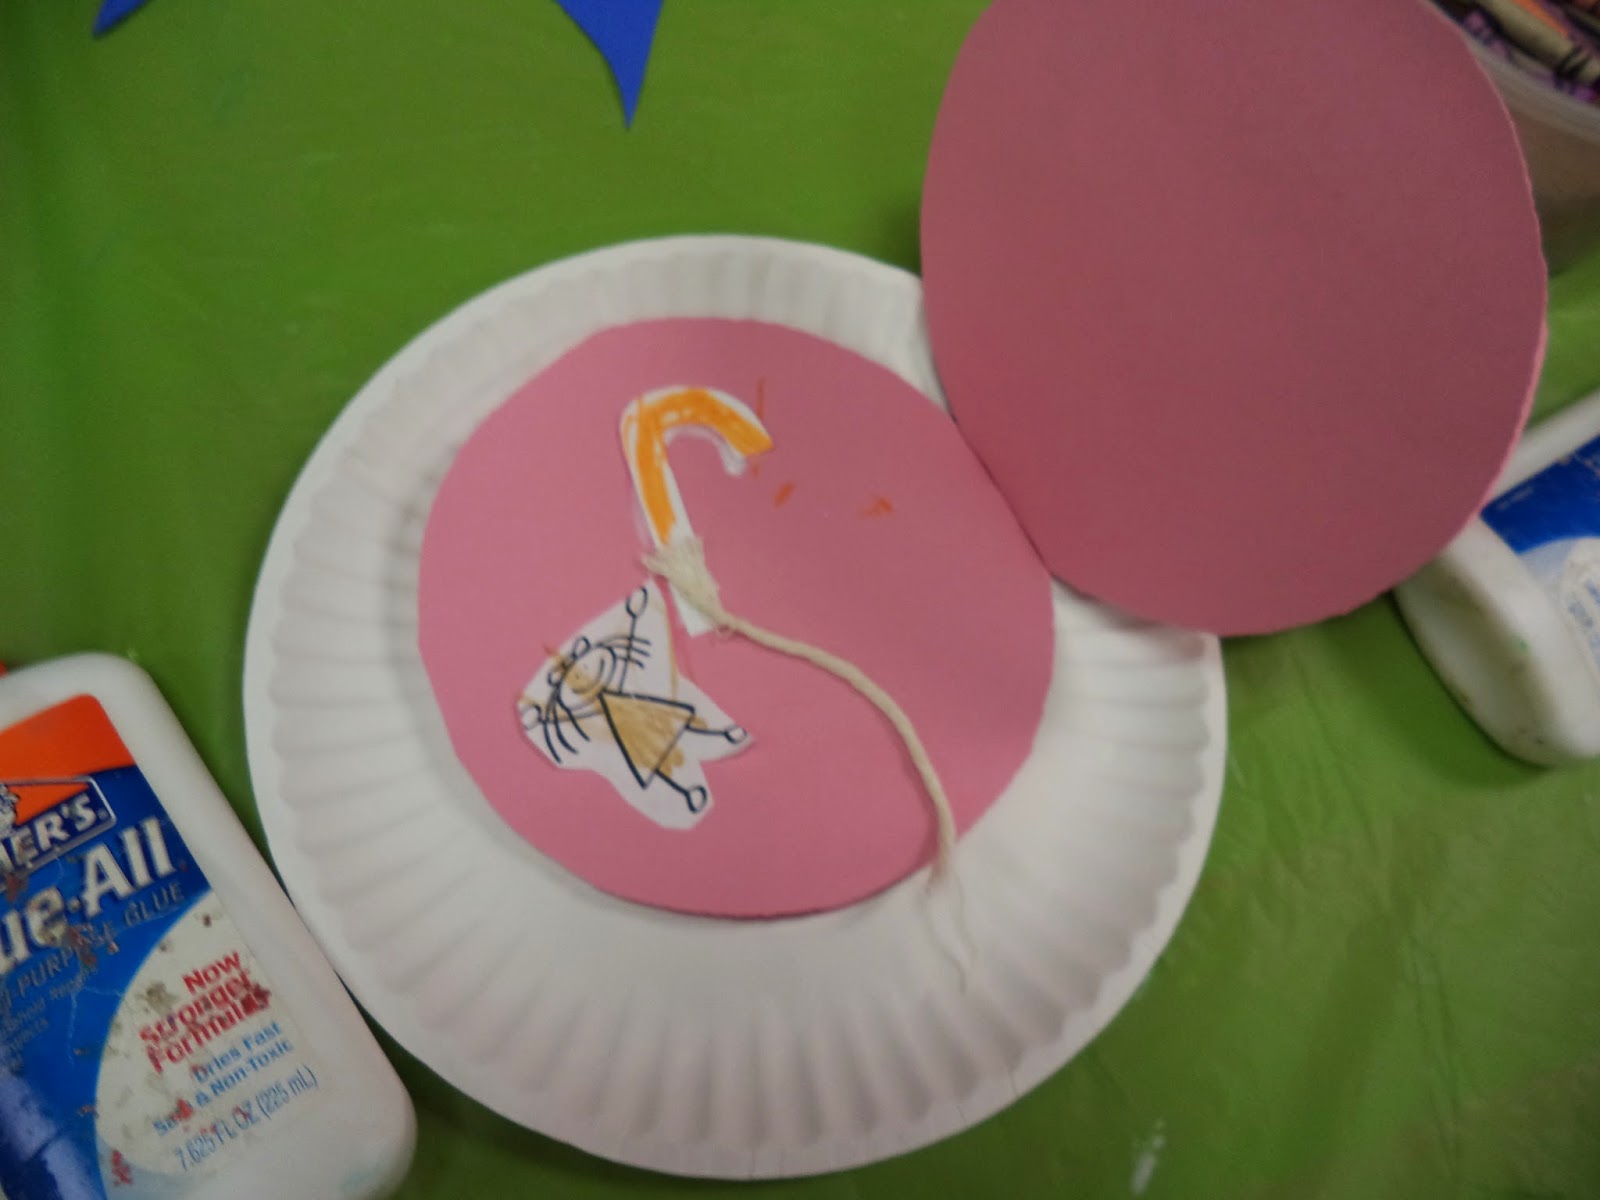
There are candy canes in the stores. They come in all colors and flavors!
Paper Candy Cane Designs!

Supplies: Card stock or construction paper, scissors, glue/tape and stickers.
Instructions:
1. Cut out a candy cane shape from construction paper or card stock.
2. Cut out several small strips of paper in different colors of your choice. Make sure the strips are wide enough to cover the candy cane shape.
3. Cover the candy cane shape with the strips of paper. Attach the strips onto the candy cane with glue/tape.
4. Adorn the candy cane with stickers if you wish.
Enjoy the paper candy canes below designed by the children at the library!


It's time to wrap presents and gift cards!
Paper Gift Card!


Supplies: One sheet of letter sized card stock, strips of paper, a paper bow, tissue paper, crayons/markers, glue/tape and other shapes you wish to use for decoration.
Instructions:
1. Fold the sheet of card stock in 3 sections. One end should fold over inward and meet the edge of the other end that folds over inward. Now you have a paper present or gift card.
2. Attach tissue paper on the inside of the folded paper card stock sheet so that it looks as if the present has tissue paper in it.
3. Attach strips of paper on the outside of the paper gift card to make it resemble ribbons or decorations. Attach a bow on the middle front as well.
4. Color in a design on the outside of the gift card and decorate with shapes and stickers of your choice. Feel free to place anything you like on the inside of the card or just leave empty and the gift card is for decoration for the holidays.
Enjoy the paper gift cards below designed by the children at the library!


It's nice to unwrap gifts under the tree and fireplace with the stockings hanging from the mantle!
Paper Fire Places with Stockings

Supplies: Card stock, fabric, 2 small strips of brown paper, black paper, crayons/markers, glue/tape and anything else you wish to use.
Instructions:
1. Cut out a rectangular piece of card stock and fold in half. The top half will be the fireplace and the bottom half will be the rug area.
2. Cut out an arch shape piece of black paper and attach onto the bottom middle of the top part of the folded card stock. This will be the fireplace.
3. Cut out 2-3 small strips of brown paper and attach them onto the bottom of the black arch. These will be the logs.
4. Attach a paper flame on top of the logs. You can use yellow or orange paper and color in a red outline on the flame.
5. Cut out a strip of card stock and attach onto the very top of the fireplace onto the top edge of the folded card stock. This will be the mantle or shelf of the fire place.
6. Cut out 3 or 4 stocking shapes from fabric and attach onto the mantle. Draw any festive design on the mantle, such as lights or holiday greenery.
7. Cut out a square or rectangular piece of fabric and attach onto the bottom half of the folded card stock so that there appears to be a rug to sit on facing the fireplace.
Enjoy the paper fire places below created by the children at the library!


One of the gifts opened is a holiday sweater! It'll be nice to wear it for the holiday party!
Holiday Sweaters!

Supplies: Fabric, Plain Card Stock, Glue/Tape, String, Scissors and Foam Shapes.
Instructions:
1. Cut out a sweater shape from plain card stock. Cut out a sweater shape from fabric.
2. Attach the fabric sweater shape onto the card stock sweater shape.
3. Decorate the sweater with strips of fabric and foam shapes.
4. Attach a string onto the back of the sweater so that you can hang the holiday sweater on a tree like an ornament.
Enjoy the holiday sweaters below created by the children at the library!


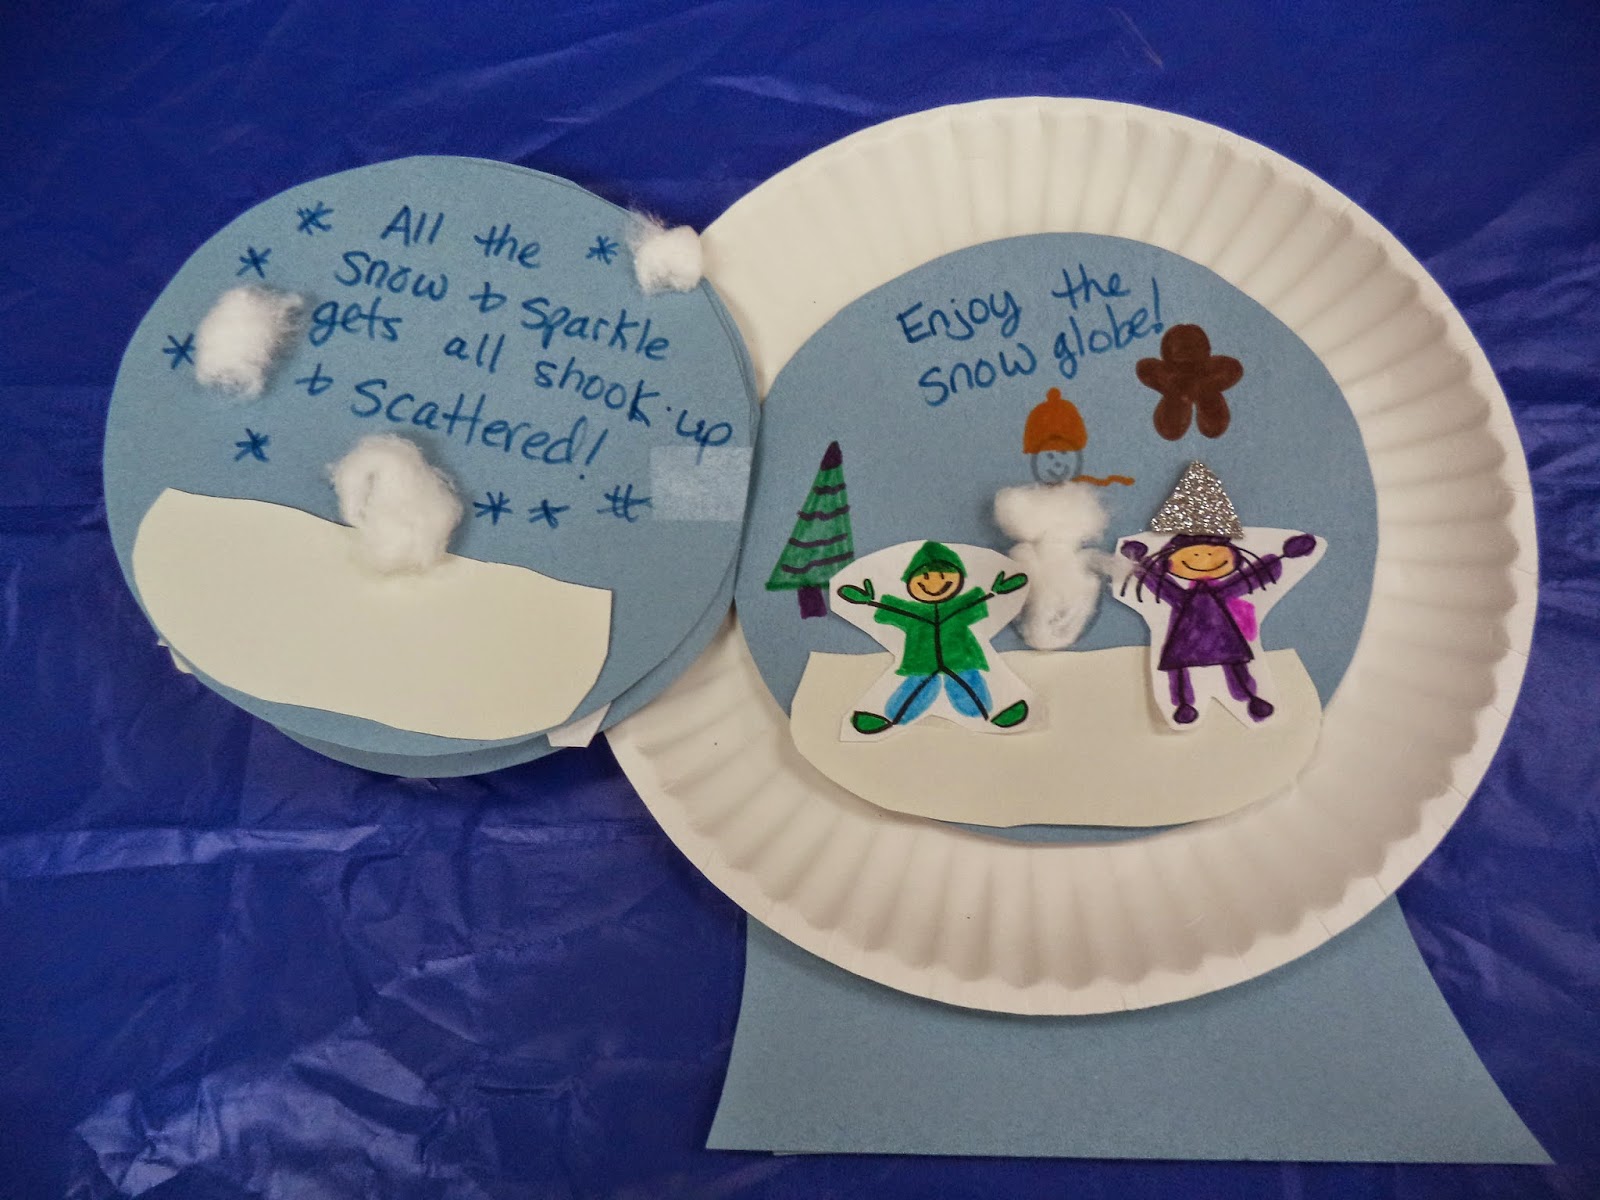
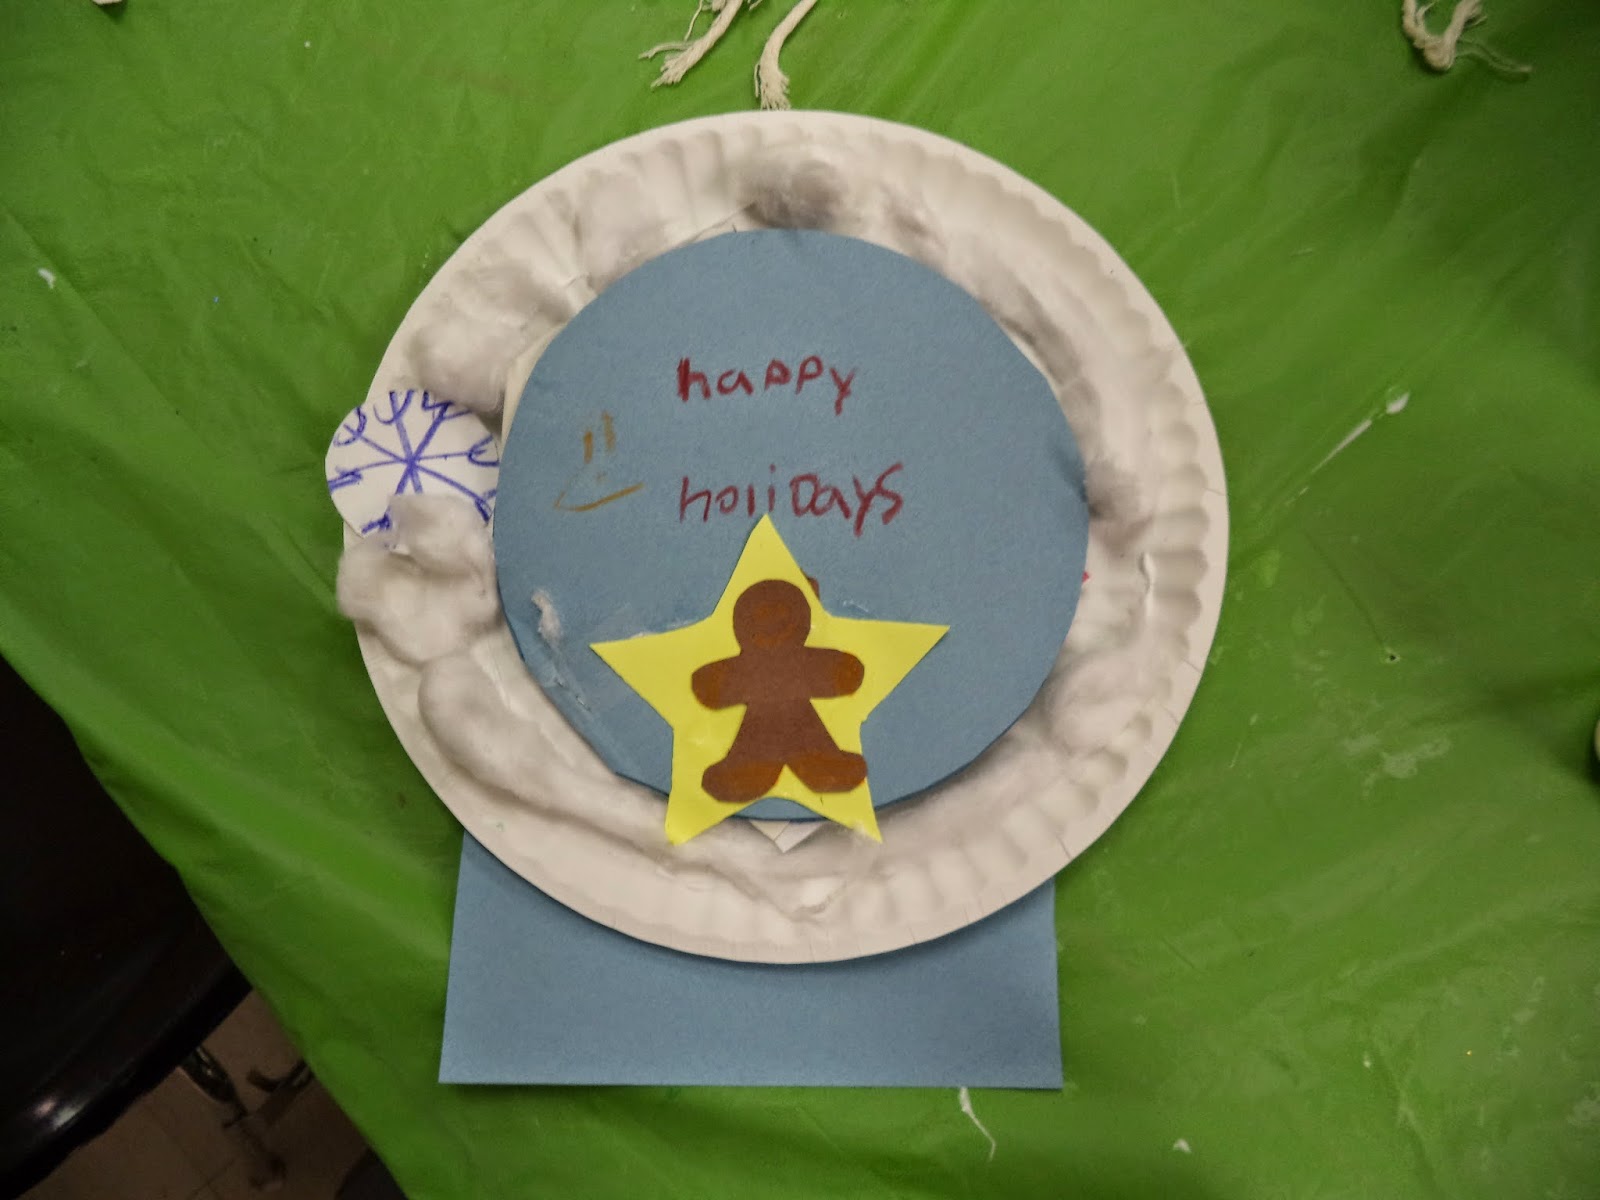
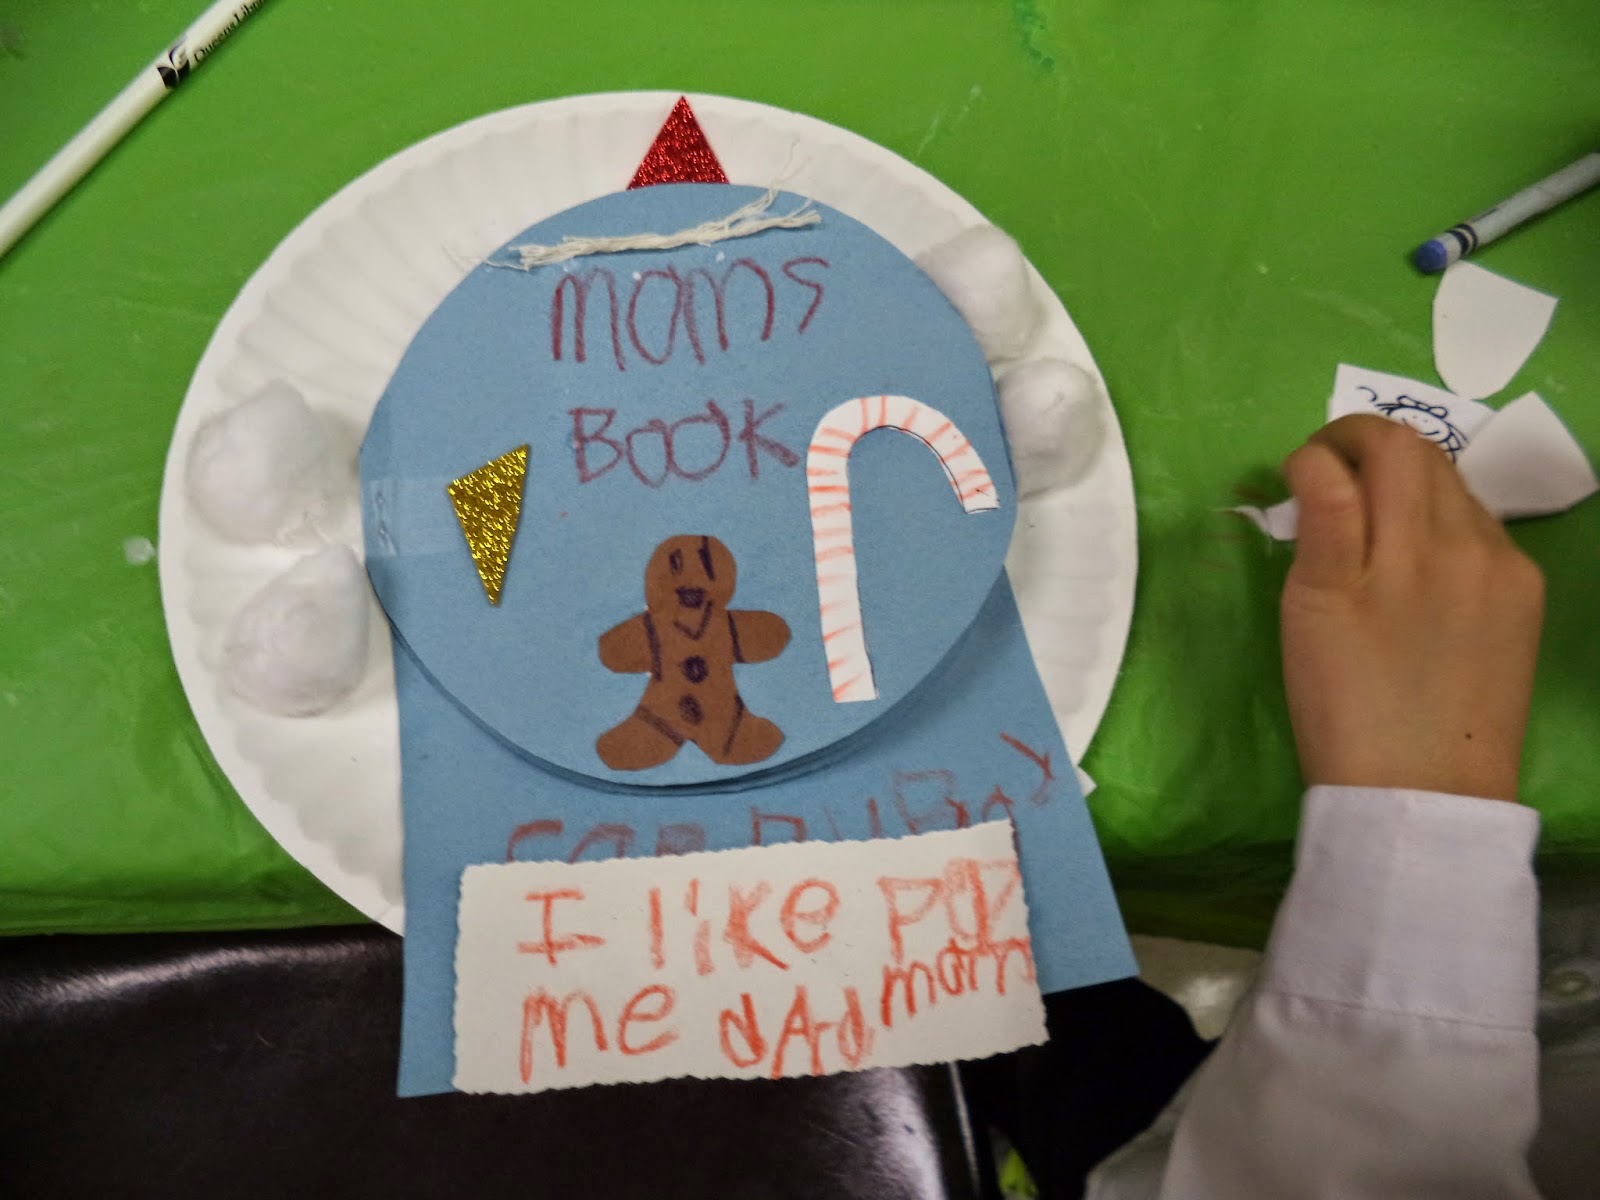
Another nice present to receive is a snow globe!
Paper Snow Globes!

Supplies: Card stock, 3 strips of cardboard, one small strip of fabric, glue/tape, crayons/markers, stickers, foam shapes and white fabric.
Instructions to follow later:


Lego Land has gingerbread figurines! Perhaps we can build a Lego Gingerbread House!


Supplies: One letter-sized sheet of card stock, small pieces of paper cut in squares, rectangles and circles, small green paper triangles, cut outs of gingerbread shapes, stickers, crayons/markers, scissors, glue/tape, pom poms and anything else you wish to use.
Instructions:
1. Fold the sheet of card stock into a book. Stand it up on a flat surface. Cut out slants or angles from the top edges to make a roof shape. Now you have your gingerbread house.
2. Cut out gingerbread figures from brown paper. Make sure the hands and feet are of similar shape to Lego figurines. Draw faces on them and decorate with stickers, pom poms and small pieces of paper. Attach the gingerbread figures on the outside and inside of the folded card stock sheet house.
3. Attach the smaller shapes of paper (squares, rectangles, circles and trapezoids) onto the gingerbread house and make them into holiday decorations, such as wreaths, presents, candy, snow, etc.
4. The green triangles can be holiday trees.
5. If you wish, you may draw snow or frosting using white crayons.
Enjoy the Lego gingerbread houses below created by the children at the library.


Building a Lego Gingerbread House makes me want to go to a holiday party. A holiday party is always a nice gift within itself!
Fold Out Holiday Party!


Supplies: One sheet of letter-sized card stock, strips of white paper, a bow, cut outs of presents, a snowman, treats, a tree, a gingerbread house, a menorah and other holiday decorations.
Instructions:
1. Fold the card stock in 3 sections from top to bottom. Unfold it and lay it flat.
2. Fold the top part down and while the top part of the card stock is folded down, paste 2 strips of paper and a bow in the middle to make it seem as if it looks like a bow and ribbon on a present.
3. Unfold the top again. Inside the card stock sheet, attach holiday decorations, presents, treats, etc.
4. Refold the card stock back up so that the bow and ribbon is facing out on top and the holiday party is inside as a surprise.
Enjoy the holiday parties below created by the children at the library!


Wow, with all the treats at the party, one can make a wreath of treats!
Treat Wreath!

Supplies: One paper plate, scissors, glue/tape, crayons/markers, foam stickers, construction paper, tissue paper and ribbon/string.
Instructions:
1. Using scissors, cut out the center of the paper plate and discard the center or use the center towards another project in the future.
2. Cover the paper plate edge with tissue paper. Now you have a wreath.
3. Cut out holiday treat shapes, such as candy canes and mints from white construction paper and color in a design on them. Attach the paper candies onto the wreath.
4. Adorn the wreath with candy themed stickers as well.
5. Attach a ribbon or string on top so that you can hang up the wreath for decoration.
Enjoy the treat wreaths below created by the children at the library!


Perhaps we can ride a sleigh to the toy store! We need reindeers!
Rocking Reindeers!


Supplies: Card stock, brownish paper, cut out of a reindeer's face, google eyes, crayons/markers, glue/tape, tissue paper and glitter glue.
Instructions:
1. Cut out 2 letter "U" shapes from brown or brownish paper. These will be the front and back parts of the reindeer. When the "U" shapes are turned upside down, the bottom edges will be the hooves of the reindeer.
2. Cut out a strip of brown like paper.
3. Cut out an image or outline of a reindeer's head or face.
4. Color in the reindeer's face and attach googly eyes onto it.
5. Turn the "U" shapes upside down and color in both bottom edges or parts for the hooves.
6. Attach the brown strip of paper between each of the upside down "U" shapes to assemble the body of the reindeer. Attach the head onto the top front of one "U" shape for the front of the reindeer and attach a tail shape onto the top front of the other "U" shape for the back of the deer.
7. Attach the reindeer by the feet/hooves onto a sheet of card stock. Decorate the card stock with glitter glue and tissue paper.
Enjoy the pop-up reindeer below created by the children at the library.


Let's shop at the toy store!

Supplies Used: Card stock, fabric, self-stick ribbons, paper cut outs of toys, crayons/markers, glue/tape and any other stickers of your preference.
Instructions:
1. Fold a letter-sized sheet of card stock in half and stand it up so that it stands like a card.
2. Download images or cut out images that resemble toys, such as cars, trains, stuffed animals, etc. and color them in.
3. Cut out a narrow piece of fabric and attach it onto the bottom of the card stock. This will be the carpeting.
4. Cut out a small rectangle from card stock and place on top of the rug. This can be a cash register or table.
5. Use self-adhesive ribbons to make lines for rows of toys. You can draw in the lines if you don't have ribbon.
6. Place the toy cut outs along the rows. If you wish, use stickers to further embellish the toy store.
Enjoy the toy stores below created by the children at the library!


I see some Lego sets! A snowman Lego set is better!
Lego Snowman!

Supplies: White card stock, white construction paper, green paper, one small cardboard tube, crayons/markers, scissors, tape/glue and anything else of your preference.
Instructions:
1. Fold a letter-sized sheet of white card stock in half and position the folded sheet on a flat surface so that one side is standing up and the other side is down flat.
2. Cut out six 2" circles from white card stock or white paper. Attach the circles onto the bottom half of the folded card stock. They should be arranged in 2 rows, 3 in each row.
3. If you wish, take a dark crayon or marker and color a circle around the edge of each circle so that the circles resemble Lego indentations .
4. If you wish, color the vertical top part of the card stock in a light blue or grey shade to resemble a winter background.
5. Wrap a small card board tube in white paper. Draw a snowman face on it. This will be the snowman's head. Cut out a hat shape from paper and color it black or any other color of your liking. Attach the hat on the top front of the tube. Now the snowman has a hat.
6. Cut out a trapezoid shape from white card stock or paper. Attach it onto the bottom of the snowman's tube head.
7. Cut out 2 smaller strips of paper. Cut one end of each strip into the shape of the letter "C". These will be the arms. The "C" shape ends of each arm resembles the arms and hands of a Lego figurine. Attach each arm onto each side of the trapezoid shaped body.
8. Cut out 2 bigger and wider strips of white paper or card stock. Make sure that they resemble legs and feet of a Lego figurine. You can make the tops of the legs bulge like a figurine by folding the top edge down on each one. Attach them to the bottom of the trapezoid body. Fold out the ends of the strips towards you for the feet.
9. Once the Lego snowman figurine is put together, draw on buttons and anything else you would like the figurine to have. Attach the paper snowman figurine onto the top part of the folded card stock.
10. Cut out triangles from green paper and attach onto each side of the Lego snowman. These will be the trees.
Enjoy the Lego snowman figurines below created by the children at the library!


After all of the shopping for toys and presents, the gift giving and parties, it's time to countdown on New Year's Eve for the new year!

Supplies: One sheet of card stock, glitter, glue, one paper circle shape, one image of a clock, 2 smaller paper circles, cut outs of party hats, one strip of paper, crayons/markers, scissors and anything else you wish to use.
Instructions to follow later:


I see some pretty snow globes in the corner!

Supplies: Cap code sticker, foam snow flakes, tissue paper, card stock, white paper, crayons/markers, tape, scissors and shiny star stickers.
Instructions:
1. Cut out a round snow globe shape from a cap code sheet.
2. Cut out a cardinal bird shape from white paper or red paper. Color a design and face on your cardinal. Color in holiday pine branches on a small piece of white paper. This will resemble pine branches in snow.
3. Peel off the back covering of the round sticker cap code.
4. Place the bird and snow with branches colored side down onto the sticky part of the cap code. You want the colored side of the bird and branches to show through the cap code.
5. Attach foam snowflakes onto the sticky part of the cap code around the bird and branches.
6. Place a sheet of tissue paper over all of the decorations. There should still be some gaps and spaces on the sticky part to allow the tissue paper to stick on with everything else.
7. Cut out a long piece of card stock and fold it in half horizontally. Stand up the card stock so that the folded side is up and the bottom edges are down. This will be the snow globe stand or support Attach the snow globe onto the stand using tape.
8. You may further embellish the snow globe by sticking on shiny star stickers onto the front of the snow globe.
Enjoy the snow globes below created by the children at the library!


I see a toy reindeer barn that looks so nice and festive!


Supplies: One letter-sized sheet of card stock, white paper, brown paper, green paper, scissors, glue/tape and crayons/markers.
Instructions:
1. Fold a letter-sized sheet of card stock in half and stand it up on the edges. If you wish, cut an angle on the top of each side to make it seem as if the top parts have a slant. The top part is the roof.
2. Cut out a door shape on the bottom center. You can do that on both sides, front and back. Just cut enough so that you can fold the door open and closed.
3. Cut out 4 arch shapes from white or light colored paper. Attach 2 on the front and 2 on the back. Draw a design on the bottoms of each arch.
4. Cut out 4 reindeer heads from brown paper. Draw faces and a nose on the reindeer.
5. Attach is reindeer head onto the middle of each arch. Now it looks as if each reindeer has its' own stall.
6. Attach white paper onto the roof. This can be snow or a white roof reflecting snow. If you wish, draw a design on the roof.
7. Cut out 2 small circles from green paper. These will be the wreaths. Draw designs on the wreaths and attach them onto the barn.
8. Feel free to embellish the reindeer barn with anything else of your preference.
Enjoy the reindeer stables below created by the children at the library!


The holidays are a nice time to enjoy some feasts with the family!
Paper Feasts!


Supplies Needed: Construction paper, tissue paper, fabric, scissors, glue/tape and crayons/markers.
Instructions:
1. Fold the edges of a letter sized sheet of construction paper in and under. Place the sheet down with the edges below so that the sheet is standing flat with the edges supporting it. This will be the table!
2. Cut out 8 pieces of fabric. Four should be in the shape of a rectangle and four should be in the shape of small squares. This will be your napkins and place mats.
3. Glue/tape the fabrics along the edges of the table to resemble place settings with napkins.
4. Cut out a 3" by 3" inch circle from construction paper and glue/tape in the center. This will be a large serving plate for turkey, ham or anything else. If you wish, you may draw a design on the plate with crayons/markers.
5. Cut out 4 smaller circles from paper and glue/tape each one onto a place mat. These will be plates for each place setting.
6. Cut out 2-3 oval shapes from paper and attach onto the paper table as well. These will be more serving dishes. You may color a design on the serving dishes before attaching them onto the table if you wish.
7. Using crayons/markers, draw utensils (knife, fork, spoon, etc.) at each place setting. You may cut out small utensil shapes from paper and use those if you wish.
8. Crumple up small pieces of tissue paper and glue/tape onto all the plates and serving dishes. This will be your food. You may color coordinate if you wish. For example, orange tissue paper can be used for yams, green for peas and brown for turkey, etc. )
9. You may fold small strips of paper and place them standing up around the table and these can be your chairs!
Enjoy the paper feasts below created by the children at the library!


I see a reindeer in the yard! It's nice to enjoy a feast and see some wildlife outside!
Paper Tube Reindeer!

Supplies Needed: Small cardboard tube, brown construction paper, white paper, 1 small pom pom, crayons/markers, glue/tape and scissors.
Instructions:
1. Using scissors, cut out 3 small arch shapes from the bottom of the tube. You should now have 3 or 4 stumps on the bottom for the legs.
2. Draw a thick line on the bottom of each leg and these will become the hooves.
3. Cut out an outline from brown construction paper of a reindeer head. Make sure to include a small rectangle on top of the head in addition to the ears so that there is a tab to fold over the tube when attaching the head.
4. Using crayons/markers, draw 2 eyes on the head. They can be 2 small simple dots or circles. You may add eyebrows and eyelashes if you wish.
5. Attach a small pom pom onto the tip of the nose.
6. Cut out 2 antler shapes from white paper and attach them on top of the head. You may fold over the tab and attach the antlers onto the tab so that they are behind the tab and on top of the head.
7. Once you decorated your reindeer head, attach the folded tab part onto the inside of the top of the tube. Use glue or tape to secure the tab so that the deer's head stays attached to the tube.
8. If you wish to embellish the reindeer with anything else, feel free to do so.
Enjoy the reindeer below created by the children at the library!


Seeing the reindeer outside and feasting with friends and family reminds me that the holidays are all a gift!
Gift of Holidays!

Supplies Needed: One sheet of construction paper (letter-sized), 2 long strips of paper, one smaller pieced of paper, scissors, glue/tape, crayons/markers, foam stickers and images of the holidays.
Instructions:
1. Using glue/tape, attach the 2 long strips of paper onto the letter-sized sheet of construction paper. You may attach them in a vertical and horizontal direction or both in one direction or in a diagonal direction. These will be your ribbons.
2. Cut out a bow shape from a small sheet of construction paper and attach to the top of the sheet of paper.
3. Download images of the holidays and color them in. Glue/tape them onto the sheet of construction paper above or below the ribbons.
4. If you wish, attach foam stickers on your paper holiday present.
Enjoy the gifts of holidays below created by the children in the library!


It's nice to open gifts given during the holidays! I got a nice portrait of a penguin!
Portrait of a Penguin!

Supplies Used: Construction paper, fabric, foam shapes, cotton, glue/tape, crayons/markers and scissors.
Instructions:
1. Cut out an outline or shape of a penguin from black construction paper. (Any dark color is fine.)
2. Attach the black penguin outline onto a letter-sized sheet of construction paper.
3. Cut out an egg shape from white construction paper and glue/tape the white shape onto the front of the penguin shape below the face. The egg shape should be covering the penguin's belly and chest.
4. Cut out 2 small feet shapes from orange or yellow paper and attach them onto the bottom of the penguin shape.
5. Cut out a small triangle from yellow or orange paper and attach it upside down onto the penguin's lower part of the face. This will be the beak or nose.
6. Cut out 2 small circles from white paper and attach them above the triangle. These will be the eyes.
7. Cut out a small arch shape from paper of any color and attach the arch shape onto the top of the penguin's head. Cut out 2 small circles from fabric and attach onto each end of the arch on each side of the head. Now the penguin has ear muffs!
8. Cut out 2 small strips of fabric and attach them onto the neck of the penguin. One strip should be in a horizontal direction and the other should be placed in a diagonal direction. Now the penguin has a scarf!
9. Attach small pieces of cotton onto the bottom of the sheet of paper under the penguin. Now the penguin is standing on some snow!
10. If you have foam shapes in the shape of snowflakes, then attach some of those above or around the penguin. If you do not have foam snowflakes, then use paper snowflakes, cotton or anything else that you wish to use for decoration.
11. Feel free to color any decorations with crayons/markers onto and around the penguin!
Enjoy the portraits of penguins below created by the children at the library!


Wow, I see some pretty snow globes in the store windows! Let's browse through them and see what kinds of stories snow globes convey!
Paper Snow Globes

Instructions:
1. Cover a paper plate in blue tissue paper. This will be the blue round ball of the snow globe.
2. Cut out a trapezoid shape from green construction paper (any color of your choice is fine) and attach the shape onto the bottom of the plate. Make sure the longer part of the trapezoid is facing the bottom and the shorter top part is attached to the plate. This will be the base of the snow globe.
3. Cut out 2 pine tree shapes from green paper and 2 small stumps from brown paper. Attach each paper stump onto the bottom of each green tree shape. Attach the tree shapes onto the paper plate (on the side covered in tissue paper).
4. Cut out a snowman outline. Draw a face on the snowman and any accessories such a buttons, scarf, etc. You may attach stickers or fabric on the snowman too if you wish.
5. Cut out a picture of a child dressed for the winter. The picture can be downloaded from online or from an old magazine or catalog. Color in the picture if you wish.
6. Attach the snowman and the child onto the plate around or in between the pine trees.
7. Use glue to draw a design onto the paper snow globe. For example, you can glue dots around for snowflakes and snow on the trees.
8. Sprinkle glitter onto the glue designs. Wait one moment and then shake the glitter off. Now you have sparkly designs on the snow globe.
9. If you wish to create a more snowy effect, then use cotton balls or white paper for snow.
Enjoy the paper snow globes below created by the children at the library!


Snow Globe Story!


Supplies Used: One paper plate, white construction paper, light blue construction paper (or any other color of your preference), cotton, card stock, glitter foam sheet stickers, crayons/markers, glue/tape and scissors.
Instructions:
1. Using scissors, cut out 4-5 large circles from construction paper of any color. Staple or tape the circles together on one side to make a book.
2. Glue/tape the circle book onto the center of the paper plate.
3. Cut out a shape from construction paper of a base of a snow globe (you can just cut a rectangle or trapezoid if you wish) and attach the base onto the bottom of the plate.
4. Using scissors, cut out shapes from card stock, white construction paper and glitter foam sheets to adorn the pages of your book.
5. Attach all of the shapes on the pages of your book. Using crayons or markers, write words to your story or draw pictures if you wish.
6. You may further adorn the book with glitter foam stickers, cotton, string and anything else you would like to use.
Enjoy the snow globe stories below created by the children at the library!


Let's see the window displays in front of the stores! Cool, I see a snowman on skis!
Skiing Snowman Craft!

Supplies Used: One paper plate (folded with one side sticking up vertically), white card stock, one small cardboard tube, white tissue paper, blue tissue paper, small pieces of fabric, cotton balls, small pieces of card stock in other colors, pipe cleaners, glue/tape and crayons/markers.
Instructions:
1. Cut out 3 small circles from white card stock. Glue/tape the white circles together to create the snowman.
2. Cut out 4 small strips of paper from card stock of any color and attach 2 of them on each upper side of the snowman for the arms and 2 of them on the bottom for the feet.
3. Cut out a hat and scarf out of pieces of fabric and attach them to the head and neck.
4. Draw a face on the snowman. If you wish, you may attach some cotton onto the snowman to make it soft.
5. Attach a piece of pipe cleaner to the end of each arm to make it look as if the snowman is holding ski poles.
6. Cut out 2 more small strips of paper from card stock of any color and bend both pieces at one end.
7. Attach the 2 bent strips of card stock to the feet using glue or tape and that'll be the skis.
8. Wrap a small cardboard tube in white tissue paper and glue/tape the tube onto the bottom part of the plate. Make sure the tube is positioned horizontally.
9. Attach the skiing snowman on top of the tube to make it seem as if the snowman is skiing down the slope.
10. Decorate the top vertical part of the plate with blue tissue paper and paper snowflakes for a snowy, blue-sky background. (You may use more paper white circles and draw snowflake designs on them to create snowflakes if you wish.)
Enjoy the skiing snowmen below created by the children at the library!


Let's visit the gingerbread house store! Perhaps we can make one too with lots of candy!
Paper Bag Gingerbread House!


Supplies Used: One paper bag, card stock or construction paper of different colors, crayons/markers, glue/tape, scissors and glittery foam sheet stickers.
Instructions:
1. Using scissors, cut out different shapes of candy (candy canes, peppermints, gum drops, etc.) from construction paper/card stock and color them as you wish.
2. Cut out a door, windows and a tree from card stock/construction paper as well.
3. Using scissors and brown paper, cut out a ginger bread man shape too. You may cut out more than one ginger bread figure if you wish.
4. Using scissors, cut out candy shapes or any other shapes of your preference from glittery foam sheets to create some sparkling decorations as well.
5. Attach all of the shapes onto the paper bag, front and back. You may color in other designs on the bag too, such as lines for bricks or shingles.
6. If you wish, you may use cotton or white paper to attach to the bag as well to create the effect of snow.
7. Close and seal up your bag once you are all done decorating your paper bag gingerbread house!
Enjoy the paper bag gingerbread houses created by the children at the library pictured below!


