

It's back to school time and we can make it fun by creating colorful backpacks, pencils, crayons, groovy buttons, pop-up playgrounds and cool community posters! We can look forward to the school food too! It's apple picking time!
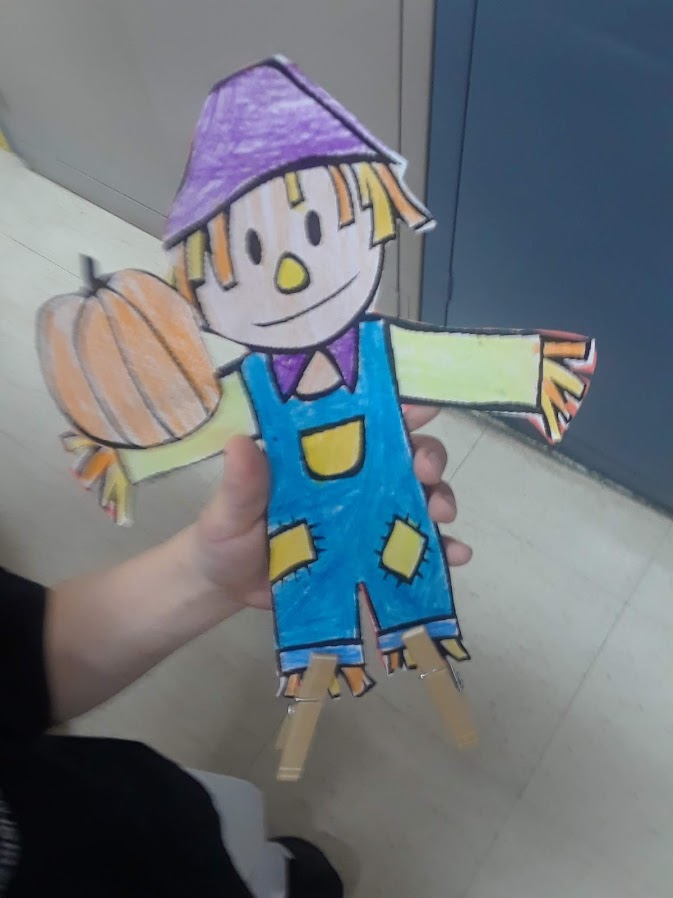
Scarecrows are placed near crops!
Scarecrow Doll on Stilts


The apple doesn't fall far from the tree!


An apple a day keeps the doctor away. Now is a great time to learn about apples and the life cycle of an apple!
Apple Life Cycle Book!


Perhaps we can go apple picking and select some apples for the teacher!
Ten Apples in a Basket!


The leaves outside are changing color! Fall is around the corner! Let's create some fall trees of our own!
Fall Trees in 3D Mode!


Scarecrows are placed near crops!
Scarecrow Doll on Stilts

Supplies: Card stock, a black/white printout of a scarecrow, scissors, crayons/markers, glue/tape, 2 clothes pins, one pom pom, some paper pumpkins and anything else of your preference.
Instructions:
1. Print out a black/white scarecrow coloring page. Color in the scarecrow and cut out the scarecrow.
2. Cut out a piece of card stock in the same shape and size as the colored in scarecrow and attach it onto the back of the scarecrow to make the scarecrow more sturdy. You now have your scarecrow doll.
3. Attach paper pumpkins onto the arms and legs of the scarecrow.
4. Place a clothes pin onto the bottom of each leg/foot of the scarecrow so that you can stand the scarecrow up by itself.
5. Place a pom pom onto the nose if you wish.
Enjoy the paper scarecrow dolls below created by the children at the library!


The apple doesn't fall far from the tree!

Supplies: One paper plate, scissors, crayons/markers, glue/tape, one ice cream stick, cut out of an apple tree, construction paper and anything else of your preference.
Instructions:
1. Cut a slit in the bottom center of the plate and the slit should be in a diagonal direction.
2. Cut out and color in a picture of an apple tree and attach onto the plate on one side of the slit.
3. Cut out an apple shape from red paper and attach onto one end of an ice cream stick. Attach a paper stem and leaf on top of the apple.
4. Cut out a basket shape from brown paper and attach onto the plate on the other side of the slit.
5. Now you can move the apple on the stick through the slit up and down in a diagonal direction to make it seem as if the apple is falling from the tree and into the basket.
6. Color in grass and a sun and anything else of your preference.
Enjoy the apple falling from the tree crafts below created by the children at the library!


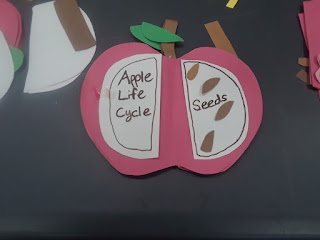
An apple a day keeps the doctor away. Now is a great time to learn about apples and the life cycle of an apple!
Apple Life Cycle Book!


Supplies Used: Red construction paper (yellow or green is fine too), white paper, green paper, brown paper, pink paper, crayons/markers, and glue/tape.
Instructions:
1. Cut out 4 apple shapes from red paper (or yellow or green). Fold them in half and then attach them together following the directions in the link below:
http://www.hellowonderful.co/post/MAKE-A-3D-PAPER-APPLE-BOOK-CRAFT
The apple shapes will be attached in a way so that you have a book that stands up and has pages.
2. Cut out 8 semi circles and attach onto each page of the apple. These will be the core of the apple.
3. Decide which page of the apple is the title page. Cut out a few brown seed shapes and attach onto the next page after the title page. These will be the seeds.
4. Cut out a tree shape with brown paper for the bark and green paper for the leaves. Attach onto the page after the seeds page.
5. Cut out a bud shape from brown paper and pink paper and attach onto the page after the tree.
6. Cut out small flowers from pink paper and attach onto the page after the bud page.
7. Attach another tree shape onto the next page and draw pink blossoms onto the top leaves of the tree or the green part of the tree.
8. Attach another paper tree onto the next page and draw red apples on it.
9. Cut out a small basket shape and attach onto the last page and draw red apples onto or on top of the basket. Now you have the life cycle of the apple on each page.
Enjoy the apple life cycle books below created by the children at the library!


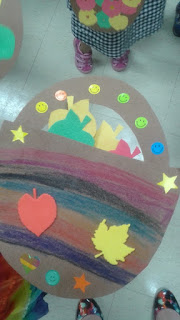
Perhaps we can go apple picking and select some apples for the teacher!
Ten Apples in a Basket!

Supplies: Brown construction paper, red paper, yellow paper, green paper, crayons/markers, glue/tape and stickers.
Instructions:
1. Cut out a basket shape from brown construction paper. Cut out an arch shape for the handle of the basket and attach it onto the top of the basket so that you can hold the paper basket shape by the handle.
2. If you wish, color in a design onto the basket.
3. Cut out apple shapes. Attach the apple shapes anywhere onto the basket.
4. Decorate the apples and baskets with stickers.
Enjoy the baskets of apples below created by the children at the library!


The leaves outside are changing color! Fall is around the corner! Let's create some fall trees of our own!
Fall Trees in 3D Mode!

Supplies: One letter-sized sheet of light colored construction paper, brown paper, small pieces of paper in Autumn colors (yellow, gold, red, orange, etc.), leaf shape foam stickers, crayons/markers, glue/tape and stickers.
Instructions:
1. Lay a light colored letter-sized sheet of construction paper on a flat surface in a vertical direction.
2. Cut a tree trunk shape from brown paper and attach onto the flat sheet of construction paper.
3. To create the 3D branches, cut strips from brown paper. Bend each strip into a round or semi-circle shape with the ends of each strip bent in. Attach the strips of paper along the top of the tree trunk next to each other with each of the bent ends of the strips attached via glue/tape.
4. Cut out small pieces of paper of different fall colors, such as red, orange, gold, etc. Cut the pieces into the shape of leaves.
5. Attach the leaves onto the bent strips of paper or 3D branches.
6. If you wish, color in a sun, grass and adorn with stickers of your preference.
Enjoy the 3D fall trees below created by the children at the library!


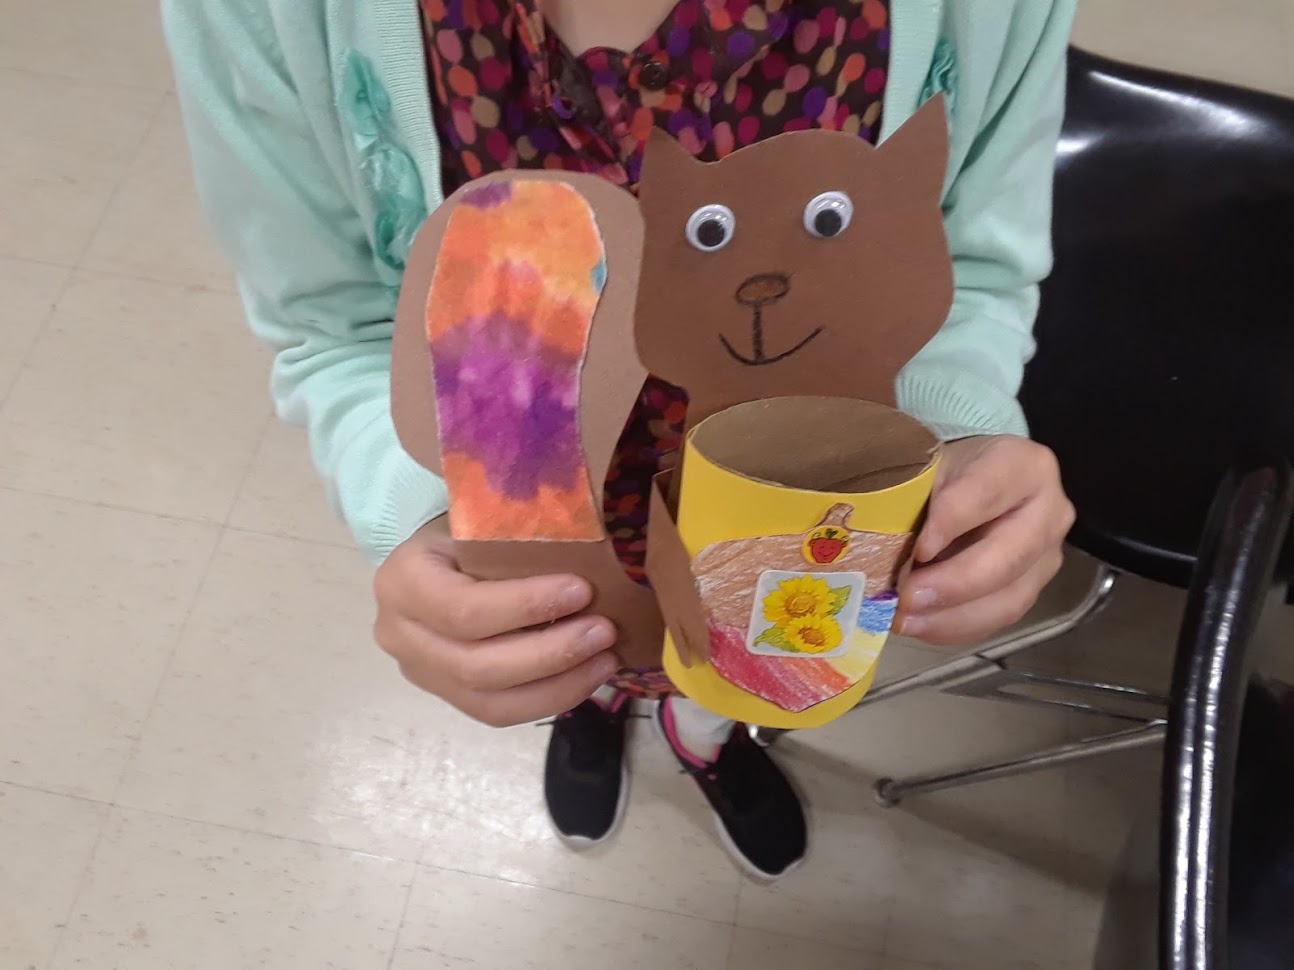
I see an acorn! A squirrel is collecting the acorns! Let's make a squirrel with an acorn and soft tail!
Squirrels with Acorn Figurine!


Apples, Pumpkins and Acorns all get along well together for the fall season! Imagine an apple and pumpkin swinging together in a tree!
Swinging Apple and Pumpkin in a Card!


Squirrels with Acorn Figurine!
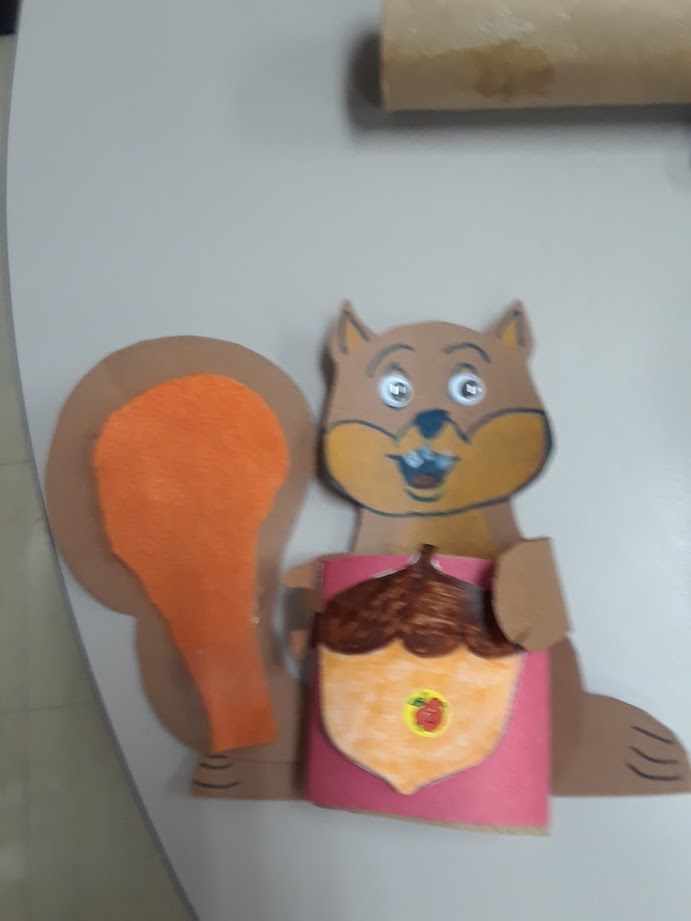
Supplies: Brown construction paper, fabric, one small cardboard tube, an outline or cutout of an acorn, crayons/markers, google eyes, glue/tape and anything else of your preference for decoration.
Instructions:
1. Cut out a squirrel figure from brown construction paper including the tail. If you need to or wish, you may cut out feet and arms/paws for the squirrel separately and attach them onto the body.
2. Draw a face on the front of the squirrel's head and attach google eyes on it if you have them.
3. Cut out a piece of fabric and attach onto the tail to make it feel soft.
4. Color in a picture of an acorn or print out a colored picture of an acorn and attach onto a small cardboard tube. Attach the tube with the acorn on it on the front belly of the squirrel and make sure the acorn is showing in the front.
5. If the arms of the squirrel are long enough, wrap them around the tube so that it looks as if the squirrel is holding onto the tube with the acorn on it.
Enjoy the squirrel figurines below created by the children at the library!


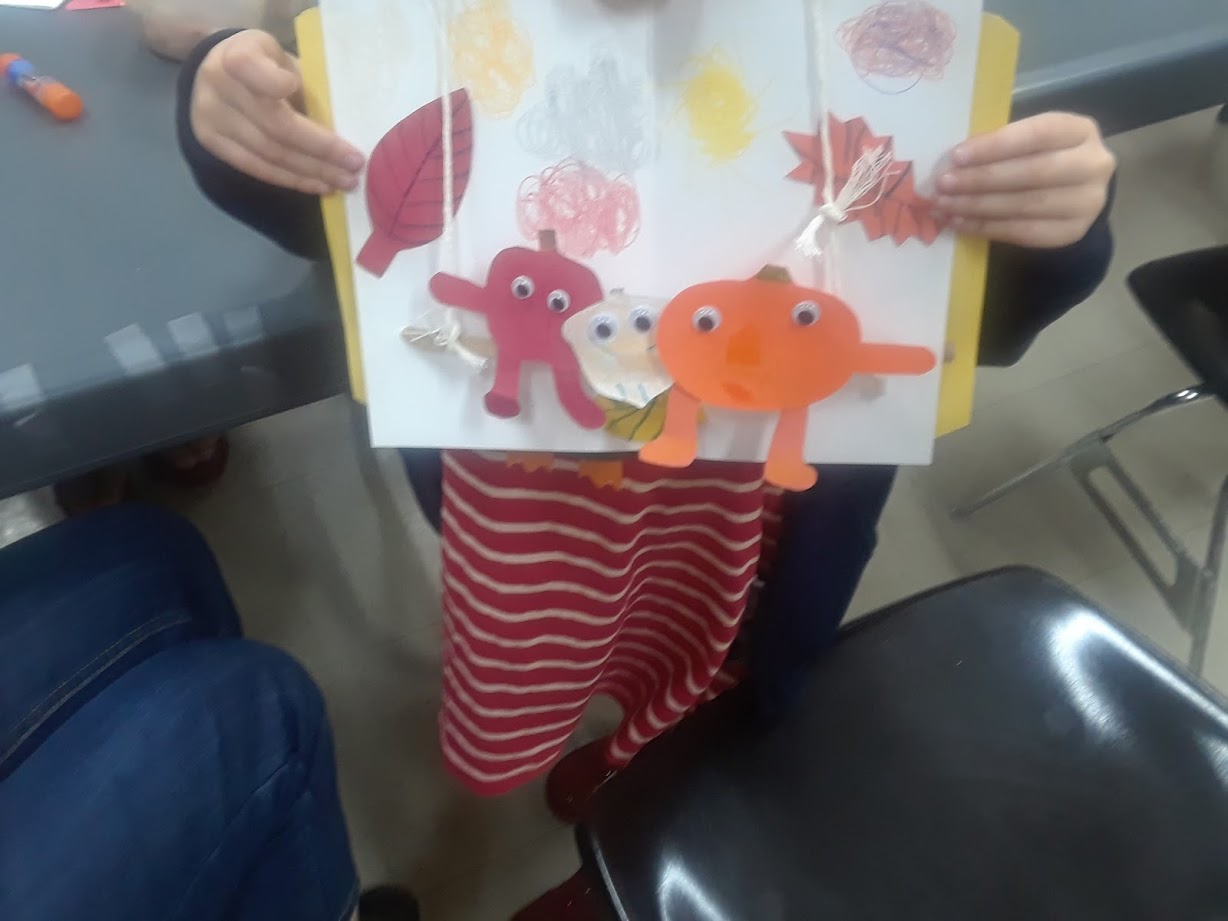
Apples, Pumpkins and Acorns all get along well together for the fall season! Imagine an apple and pumpkin swinging together in a tree!
Swinging Apple and Pumpkin in a Card!

Supplies: One letter sized piece of card stock folded in half, orange paper, red paper, yellow paper, a picture of an acorn, scissors, glue/tape, google eyes, string, a long thin piece of cardboard, hole puncher and crayons/markers.
Instructions:
1. Stand up the folded piece of card stock in a vertical position.
2. Cut out a pumpkin from orange paper and cut out legs for it. Cut out an apple from red paper and cut out legs for it. Cut out an arm for each fruit.
3. Draw faces on the apple and pumpkin and attach the legs and arm to each of them. Stick google eyes onto each of them. Attach them both onto the center of a thin strip of cardboard.
4. Using a hole punch, punch a hole on each end of the card stock in the middle of the edges. Place each end of the cardboard strip through the each hole. The pumpkin and apple should be sitting on the strip with an arm held out.
5. Make a loop in the middle of a string and attach the loop onto the top of the card stock above the apple and pumpkin. Let each piece of string dangle from the loop or knot. Attach each piece of hanging string onto the hand of the apple and of the pumpkin so it looks as if the apple and pumpkin are on the swing together and each holding onto a string with one hand.
6. Cut out leaves from red, yellow, orange and brown paper and adorn on the card stock around the apple and pumpkin.
7. Color in a paper acorn and attach under the apple and pumpkin.
8. Color in a sun and grass.
Enjoy the fall cards below created by the children at the library!


It's a good time to eat healthy in school to thrive in the classroom and beyond!
School Lunch Trays!
School Lunch Trays!
 \
\Instructions:
1. Place a letter-sized piece of card stock flat on a table or any even surface. This will be your lunch tray.
2. Cut out squares, circles and rectangles from card stock. Attach them onto the tray. This will be the indentations for the food.
3. Cut out a triangle and color it in to resemble pizza or any slice of pie. Place the slice onto any indentations on the tray.
4. Cut out orange slices from orange paper and place on another part of the tray. You can cut out any fruit slices you wish to use from paper of any color.
5. Draw brown dots onto a tan or off-white circle and attach onto the tray. This can be a chocolate chip cookie.
6. Crumple up pieces of green and red tissue paper and attach onto another part of the tray. This can be a salad.
7. Cut out a milk carton shape from card stock and stand it up onto the tray.
8. Cut out an image of a knife and fork and spoon as well and attach onto the tray.
Enjoy the lunch trays below designed by the children at the library!


Wow, it's exciting to learn about forest animals during the fall term of the school year!
Forest Animals Diorama!

Supplies Used: Paper towel tube, forest animal cut outs, tissue paper, foam leaf stickers, one letter-sized piece of card stock, crayons/markers, scissors, hole puncher and glue/tape.
Instructions:
1. Cut a paper towel tube in half and cut the other half up into strips. The half of a tube will be the tree trunk and the strips will be the branches.
2. Using a hole puncher, punch a hole near one end of the trunk and use scissors to make the hole bigger.
3. Attach the tube and strips on top of the tube onto the card stock. This should resemble a tree with branches.
4. Color in cut outs of forest animals and attach them onto or around the tree and branches. The forest animals should be a bear, owl, fox, squirrel, mole and any other animals that live in the forest.
5. Adorn the tree with tissue paper of fall colors and foam leaf stickers. Use green tissue paper for grass below the tree.
6. Color in a sun in the sky and anything else of your preference.
Enjoy the forest animal dioramas below created by the children at the library!


We need colorful crayons to color in pictures and dioramas!


Supplies Needed: Card stock, yellow construction paper, scissors, crayons/markers, glue/tape, small white strips of paper, googly eyes and stickers you wish to use!
Instructions:
1. Cut out 2 outlines of a crayon box shape from yellow construction paper. Attach the 2 outlines together on one side so that the 2 outlines are attached and can open and close as a book!
2. Cut out 6-7 crayons shapes from card stock pieces of different colors.
3. Using crayons/markers, draw faces on them and any other embellishment on them. If you wish, use stick on googly eyes for the eyes.
4. Cut out small strips of white paper and attach a strip of white paper onto the back of each crayon. The strips should be sticking out on both sides to resemble arms for the crayons. You may color in the tips to resemble hands if you wish. (You may cut some strips into the shape of a "V" to make it seem as if the crayon is raising its' arms up in the air.)
5. Glue or tape the crayons along the top edge of the box or anywhere else on the box that works for you!
6. If you wish, color the outside of the box and decorate with stickers to make the box of crayons cool!
Enjoy the colorful collections of crayons below created by the children at the library!


Now let's walk to the school house, meet the teacher and find out about more supplies needed for school! Let's see what the school contains!
School House!


Supplies Needed: White construction paper, scissors, small pieces of construction paper in different colors, (yellow, pink, black and other colors), glue/tape, crayons/markers and stickers/foam stickers.
Instructions:
1, Cut out 2 school house shapes from white construction paper and attach them together on one side so that they can open up as a book.
2. Using crayons/markers, draw designs and windows on the school house and a door as well.
3. Cut out a bell shape from construction paper and attach it onto the top front of the school house.
4. Cut out a small rectangle from construction paper (any color) and fold it in half. This can resemble a laptop. Draw a screen on one side and a keyboard on the other and attach it to the inside of the school house.
5. Cut out a small rectangle or square from black paper and draw a word or design on it with a white crayon. This will be your chalk board. Attach the chalk board onto the inside of the school house. Cut out a small piece of white paper into the shape of a piece of chalk and attach it onto the chalk board.
6. Cut out other shapes from paper resembling other school supplies. For example, cut out a small yellow rectangle from yellow construction paper and draw lines on it to resemble a ruler. Cut out a pencil shape from yellow construction paper and color in the tip black and draw dark vertical lines on it to resemble a pencil. Cut out a crayon shape from construction paper of any color.
7. Attach the school supplies along the inside of the school house. If you wish, you may draw faces on the ruler, crayon, pencil, chalk board, etc. You may draw arms and legs on them to animate them.
8. Using scissors, cut a small vertical line at the front bottom of the school house and fold the cut part over to resemble a door that opens and closes.
Enjoy the school houses below created by the children at the library!


Now that we saw the school house, we can stop by the clothes store on the way home and shop for a new outfit. Those sneakers are cool and so are those groovy buttons! Just like "Pete the Cat" and his four groovy buttons!

Supplies Needed: Dark blue construction paper (or black), white construction paper, fabric, metallic ribbon, scissors, glue/tape, crayons/markers and stickers.
Instructions:
1. Cut out an outline of "Pete the Cat's" head from dark blue or black construction paper. Cut out an outline of his body. Attach the head onto the top of the outline of the body to put the cat together.
2. Cut out 4 long strips of dark blue or black construction paper. Place one strip on the top of each side along the body and these will be the arms. Attach 2 strips onto the bottom of the body and these will be the legs. Cut out a longer strip of dark paper and attach the strip at one end onto the back of the cat and this will be the tail.
3. Cut out 2 oval shapes from white paper and color them in according to what Pete the Cat's eyes look like.
4. Attach the eyes onto the head.
5. Cut out a small triangle from white paper and attach it onto the center of the face below the eyes. *The triangle should be upside down to look like the cat's nose!
6. Cut out 6 small strips of metallic or shiny ribbon and attach them along the side of the nose, 3 on each side. This will be the whiskers! You may draw the whiskers onto the cat with a crayon/marker/pencil if you do not have any ribbon.
7. Cut out an outline of a shape of a shirt from fabric (or paper of a bright color if you wish.)
8. Attach the shirt shape onto the body of the cat below the face.
9. Cut out 4 small circles from white or light colored paper. Color in the circles and decorate with stickers as you wish. Attach the circles onto the shirt and these will be Pete the Cat's 4 groovy buttons!
10. Cut out 2 shoe shapes from white paper and color them in as you wish. Attach each one onto the bottom of each leg. This will be the cat's shoes!
11. Color in the paw and anything else on the cat as you wish!
Enjoy the "Pete the Cat" cats below created by the children at the library!


We need a brand new back pack to hold our crayons and other school supplies!
Paper Backpack


Supplies Needed: One paper bag (any color of your choice), construction paper or card stock, glitter foam sheet sticker, scissors, crayons/markers, glue/tape and stickers.
Instructions:
1. Using scissors, cut out 2 long one inch wide rectangular strips out of card stock or construction paper.
2. Bend each strip into an arch shape or near circular shape until the ends almost connect.
3. Glue/tape each end of both strips onto one side of the paper bag. Make sure that the strips are next to each other and on the upper center part of the bag. The strips should be about 1.5 to 2 inches apart from each other. The strips will now be your backpack straps for the shoulders and the side with the straps will be the backside of the backpack.
4. Cut out a square from card stock or construction paper and make sure the square is about 4 inches wide and 4 inches long.
5. Fold the square and color designs on it if you wish and put stickers on it. Glue/tape one side of it onto the top part back of the bag near where the bag opens.
6. Attach a small rectangular shaped foam sticker onto the front side of the paper square that is not attached to the backpack. That will resemble the Velcro fastener to fasten the bag closed.
7. Cut out a slightly smaller square from construction paper or card stock and decorate it using crayons/markers and stickers.
8. After you decorate the smaller square of paper, glue/tape the square onto the front and center of the bag under the Velcro fastener. But only glue/tape the bottom part of the square and the bottom of the sides. The top of the square should not be attached and then this will be your pocket.
9. Cut out a little yellow square of paper and decorate it to resemble a crayon box and cut out pencil shapes and decorate it to resemble a pencil and try to place them in the paper pocket on the front of the backpack.
10. You may further embellish your backpack with more decorations and supplies if you wish. You may place the backpack onto a stuffed animal with arms that can go through the straps if you wish to have fun with the new backpack.
Enjoy the paper backpacks pictured below created by the children at the library!


Now that we have our backpacks, we need more school supplies to place in our new school bags! Let's make some colorful pencils and crayons!
Pencil Puppets

Supplies Needed: Card stock, beige or off-white paper, pink fabric, scissors, crayons/markers, glue/tape, stickers, googly or any other decorations you wish to use.
Instructions:
1. Draw an outline of a pencil onto a sheet of card stock. You may trace an outline from a picture of a pencil as well if you wish.
2. Using scissors, cut out the pencil shape from the card stock.
3. On beige or off-white paper, draw or trace a triangle the same size as the bottom point of your paper pencil. You may place the card stock pencil shape onto the light paper and trace the shape of the point if you wish.
4. Once the triangle is drawn, cut out the triangle using scissors and then glue/tape the triangle onto the pointed tip of the pencil.
5. You may color the point of the triangle black or any other color of your choice.
6. Cut out a rectangle shape from pink fabric. The pink fabric shape should be the same width as the pencil and measure around an inch in height.
7. Place the pink rectangular fabric onto the top end of the pencil that is not pointed. This will resemble the eraser.
8. Decorate the pencil as you wish using crayons, markers, stickers, googly eyes, glitter foam shapes, etc.
9. Cut out a small strip of paper and shape the paper into a circle attaching both ends together. Use glue/tape to fasten the ends together.
10. Glue/tape the circle onto the back of the pencil (the side not decorated) and place your finger or fingers through the circle so that you can hold the pencil as if you are holding a puppet.
Enjoy the pencil puppets below created by the children in the library!


Now that we have a colorful variety of pencils, perhaps we can create multicolored crayons for art classes!
Crayon Mosaic

Supplies Needed: Construction Paper, pieces of cardstock or pieces of old postcards, glue/tape & scissors.1. Cut a crayon shape out of construction paper.
2. Glue/tape pieces of postcards all over the crayon shape in different patterns to resemble a mosaic.


With colorful crayons, you can create a poster about your neighborhood!
Neighborhood Poster


Supplies Needed:
Construction Paper and or Cardstock, glue/tape, crayons/markers, scissors.
1. Cut out shapes and borders from pieces of card stock, such as trees, buildings, animals, the sun, clouds, people and anything else in your community.
2. Glue or tape all of the cut outs of elements in the community onto a sheet of construction paper of a light color.
3. Feel free to color or stick a boarder around the edges to create a picture effect.
4. Color or draw anything of your liking to embellish the poster.
Now that we prepared for school and did our homework, let's play on the playground at school or at the park!
Paper Playground


Supplies Used: Cardstock, glue or tape, scissors, stickers and string.
1. Cut out pieces of multicolored card stock into different shapes (circles, rectangles, squares, etc.) and sizes.
2. Bend some of the pieces of card stock into a round shape and tape the ends together to make hoops. You may then tape the hoops onto a big flat piece of card stock in a formation to make it look like tunnels or money bars.
3. Take 2 rectangular pieces of card stock and attach them together by each end to make a long rectangle. Bend the rectangle to form an arch. Make sure one side of the arch is flat and diagonal. Then stand up the arch on top of the flat card stock to form a slide. Glue/tape the slide onto the cardstock. You may have to bend the bottom of the slide or adjust it so that the slanted part of the slide actually slants down. Make sure the slanted top part of the slide is flat and diagonal to actually resemble a real slide.

4. Take a small piece of card stock, roll it into a circle and then placed it underneath a rectangular piece of card stock to make a see saw.

5. I attached a small piece of string to a large hoop to make a swing.
6. I took a small piece of card stock and folded the ends underneath to form a bouncy trampoline.
7. Feel free to adorn your paper playground with stickers, small pieces of patterned cardstock and anything else of your preference.
8. Have fun!
Make sure to prepare for the class field trip to the library the next day! You will need your library cards to borrow books!
Paper Pop-Up Library!


Now we can look forward to the fall season and Halloween!