

Welcome to the month of November!
Let's prepare for more of the fall season,
football season and Thanksgiving!
There are turkeys!
Paper Turkey Puppet Bracelets!

Supplies: Card stock, construction paper, scissors, fabric, foam shapes, glue/tape and crayons/markers.
Instructions:
1. Cut a thick strip of card stock into a rectangular shape and make a loop with it by attaching the ends together. Do the same thing with a smaller strip of card stock. Attach the smaller loop on top of the bigger loop. Now you have the turkey's head and body attached together.
2. Cut out 9-10 strips of construction paper and attach them together on the back of the bigger loop in a fan shaped formation. Now the turkey has feathers/tail.
3. Draw a face on the turkey and attach a small strip of fabric for the snood and wattle. Cut out a diamond shape and fold it so that it's a triangle. Attach onto the face for the beak.
4. Cut out turkey feet from paper and attach onto the bottom. If the bottom loop is big enough, you can wear the paper turkey puppet on your wrist and hold it that way.
Enjoy the paper turkeys below created by the children in the library!


Seeing turkeys makes me hungry for apple pie!
Paper Apple Pie

Supplies: Two paper plates, brown paper, yellow paper, red paper, scissors, crayons/markers and glue/tape.
Instructions:
1. Cut out the center of one of the paper plates and discard it or save it for another craft. Place the paper plate with no center on top of the other paper plate with the center. Attach the edges of the plates together. You now have the pie form.
2. Color in the pie form in colors to make it resemble apple pie, such as yellow, brown, light brown, etc.
3. Cut out strips of brown paper and place them across the top of the pie form in a tic tac toe pattern to resemble the crusts.
4. For decoration, cut out shapes of apple slices from yellow paper and an apple shape from red paper and attach onto the top of the pie.
Enjoy the paper apple pies below created by the children at the library!


There are some autumn corn decorations! The corn are colorful!

Supplies: One small cardboard tube (toilet paper size), yellow paper, green tissue paper, fake brown hay, crayons/markers, scissors and glue/tape.
Instructions:
1. Wrap the cardboard tube in yellow paper.
2. Draw a design on the yellow tube to look like corn.
3. Wrap the paper corn in green tissue paper but make certain that the corn design is sticking out in the front.
4. If you have fake brown hay, then stuff some fake hay at the top of the tube. You can use shredded brown paper too if you wish.
Enjoy the autumn corn below designed by the children at the library!


That apple pie smells delicious! Yummy.
Lift the Flap Apple Pies!


Supplies: Card Stock, Construction Paper, Brown Tissue Paper, White Tissue Paper, Scissors, Crayons/Markers and Glue/Tape.
Instructions:
1. Cut out a pan outline shape from card stock. Cut out a shape that resembles the top of the apple pie filling from yellow paper.
2. Attach the yellow top of the pie filling along the top of the paper pan but only attach them by the top sides. Make sure you can still lift the bottom of the filling up and down for a lift-the-flap effect.
3. Cut out brown paper strips and attach them vertically and horizontally along the top yellow filling to make it look like cross crusts.
4. Scrunch up a piece of white tissue paper into a ball and place it onto the top of the pie filling to resemble whipped cream.
5. Cut out 2 apple slice shapes from beige or tan paper and color in an apple design, such as the pits and red outline. Attach the apple slices onto the top of the pan underneath the paper filling.
6. Scrunch up brown pieces of tissue paper into balls and attach onto the bottom of the pan under the filling for the rest of the crust.
Now you have a lift-the-flap paper apple pie! Enjoy the paper apple pies below created by the children at the library!


Do you see the turkeys walking along outside at the farm?
Turkey Finger Leg Puppets


Supplies: Card stock of bright colors, fabric, crayons/markers, glue/tape and scissors.
Instructions:
1. Cut out a sizable circle from card stock of a bright color. Cut out a small round hole on the bottom of the circle and make sure you can fit two fingers through the hole.
2. Cut out the body of the turkey and place it on the front of the circle in the center and above the hole.
3. Cut out 8 feather shapes from card stock of bright colors and attach them onto the top back edge of the circle behind the turkey's head so that they stick out like turkey feathers.
4. Draw a face on the turkey. Cut out a snood or waddle from red fabric and attach onto the face.
5. Cut out a pilgrim hat from dark paper and attach onto the top of the turkey head.
6. Cut out a round piece of fabric and attach onto the belly of the turkey to make it feel soft. Now place 2 fingers through the hole and now the turkey has legs.
Enjoy the turkey finger leg puppets below created by the children at the library!


Seeing turkeys dressed up as pilgrims encourages learning about pilgrims!
Pop Up Pilgrims!


Supplies: Brown paper, light colored card stock, black or blue paper, white paper, scissors, glue/tape and crayons/markers.
Instructions:
1. Cut out 2 small Mayflower boat shapes from brown paper and attach them together but make sure that there is an opening at the top of the paper boat.
2. Cut out a thick strip from dark colored card stock. This will be the body of the pilgrim. Attach a small strip of card stock of the same color horizontally on the back center of the body for the arms.
3. Cut out a circle from beige paper and draw a face on it. Attach it onto the top of the body. Cut out a pilgrim shape hat and attach it onto the top of the face.
4. Attach the bottom part of the body inside the top opening of the paper boat. If you wish to create a pop up effect, then fold down the body in a zigzag vertical way so that the pilgrim springs up and down for a jack-in-the box effect.
5. Color in decorations on the boat and pilgrim.
Enjoy the pop up pilgrims below created by the children at the library!


It's always this time that we learn and remember the pilgrims who sailed on the Mayflower and settled in the colonies!
Rocking Mayflowers!

Supplies: One paper plate, scissors, one picture of pilgrims, blue tissue paper, crayons/markers, glue/tape and stickers.
Instructions:
1. Cut out the center of a paper plate and fold it in half. Stand up the folded center of the plate so that the edges are on the bottom and it rocks back and forth. This will be the boat part of the Mayflower.
2. Use the left over edges of the paper plate to cut out masts and sails. Attach them onto the top of the boat.
3. Attach blue tissue paper along the bottom of the boat to resemble water.
4. Print out and color in a picture of pilgrims and attach it towards the top of the boat in front of the sails.
5. Adorn the boat and sails with stickers of your preference.
Enjoy the rocking Mayflowers below created by the children at the library!


While learning about the pilgrims and the Mayflower, it's nice to see the different colored feathers of turkeys!
Pop-Up Turkey!


Supplies: One paper plate, tissue paper, a paper cut out of a turkey, paper cut out of a Cornucopia, crayons/markers, glue/tape, one strip of paper and stickers.
Instructions:
1. Fold a paper plate into a basket by following the directions in the image below.

2. After the plate is folded into a basket, cover it with tissue paper.
3. Color in a picture cut out of a turkey.
4. Fold a strip of paper in sections from one end to the other end in a zigzag way.
5. Attach the turkey onto one end of the strip of paper. Attach the other end onto the bottom inside of the paper plate box. Now your turkey can pop up and down like a puppet!
6. Color in a picture of a cornucopia. Attach onto the front of the box.
7. Adorn the turkey and box with stickers of your choice.
Enjoy the pop-up turkeys below created by the children at the library!


I see candy canes in the stores! It's that time of year where after Thanksgiving, there is preparation for Christmas and Hanukkah!
Paper Candy Canes!
 |

Supplies: White construction paper, scissors, ribbon, glue, hole puncher and tissue paper.
Instructions:
1. Cut out 2 candy cane shapes from white construction paper. Glue the 2 shapes together so that both candy cane shapes form one candy cane. Punch a hole at the top of the candy cane.
2. Glue pieces of tissue paper onto one or both sides of the cane. Use tissue paper of any colors and attach to the cane in any design.
3. Pull a ribbon through the hole and tie a bow with both ends.
Enjoy the paper candy canes below designed by the children at the library!


November is a month where there is an abundance of food from harvests! What is inside the cornucopia?
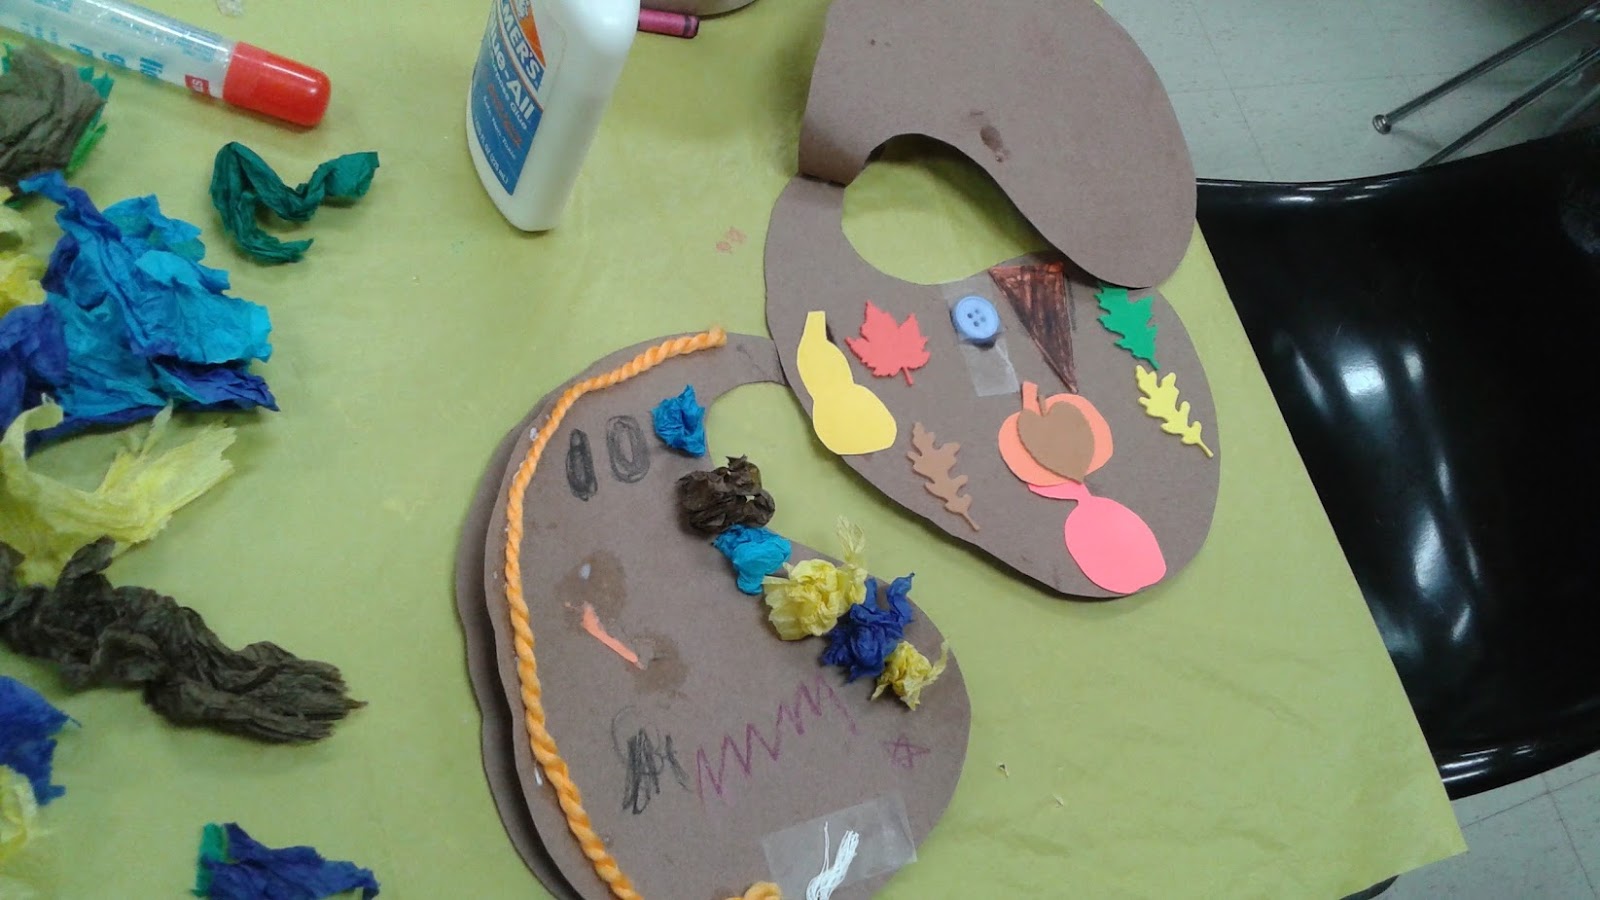
Lift-the-Flap Cornucopia


Supplies Used: Brown construction paper, card stock, tissue paper, leaf shaped foam stickers, glue/tape, scissors, string/yarn and anything else of your preference.
Instructions:
1. Cut out 2 cornucopia shapes from letter-sized brown construction paper. Attach both the shapes together at the tip of the cornucopia horn handle. Now the cornucopia should open up as a book or lift-the-flap shape.
2. Color in and decorate a design onto the top front of the cornucopia. You may draw lines, a face or any other pattern. You may use leaf stickers, tissue paper, etc.
3. Cut out fruit and vegetable shapes from card stock. You may color designs on them. Lift up the front part of the cornucopia and attach the fruit and vegetable shapes as well as stickers and pieces of tissue paper onto the inside of the cornucopia.
4. Attach one end of a string onto the bottom front of the cornucopia and when you pull the string, the front part should lift up revealing an abundance of the fruits, veggies and leaves inside the cornucopia.
Enjoy the lift-the-flap cornucopias below created by the children at the library!


Seeing all of the food and leaves in the cornucopia makes me think of turkeys. Let's talk turkeys!
Turkey Talk Shadowbox!

Supplies Used: An empty box, brightly colored masking tape, 2 paper turkey shapes, paper pilgrim hat, pumpkin shape, glitter foam stickers, glue/tape, crayons/markers and anything else you wish to use to embellish the craft.
Instructions:
1. Cover the inside of an empty box with brightly colored masking tape.
2. Cut out 2 paper turkey shapes and color them in and decorate with glitter stickers or any other stickers of your preference.
3. Cut out an orange pumpkin shape and color a face or design on it.
4. Cut out a pilgrim hat shape. The pilgrim hat can be cut from dark paper or you can color it in.
5. Cut out an image of a vase with a flower.
6. Attach the paper turkeys, pumpkin, hat and flowers onto the inside of the box on top of the masking tape. Stand up the box.
Enjoy the turkey talk shadow boxes below created by the children at the library!


Let's go through the corn maze! Let's enjoy the lines of corn!

Supplies: Yellow construction paper, scissors, glue/tape, crayons/markers, yarn, green tissue paper and smaller pieces of paper.
Instructions:
1. Cut out a paper doll chain in the shape of corn from yellow construction paper. There are instructions online about how to cut out a basic paper chain.
2. Using crayons/markers, draw designs and faces on the corn.
3. Cut out small pieces of yarn and attach to the top of the corn figures for the hair.
4. Cut out hats and bows from smaller pieces of paper and attach to the corn figures as well for decorations such as hair bows or bow ties.
5. Attach small green pieces of tissue paper onto the backs of the corn figures or the front.
Enjoy the lines of corn or corn lines below created by the children in the library!


There are people dressed as pilgrims near the corn maze. Perhaps we can make pilgrim puppets that will look like pilgrims!
Pilgrim Popsicle Sticks

Supplies: 2 popsicle sticks, white construction paper, black construction paper, brown construction paper, yellow construction paper, scissors, glue/tape and crayons/markers.
Instructions:
1. Cut out 2 popsicle shapes from white construction paper and using crayons/markers, draw faces on them.
2. Cut out pieces of hair and bangs from yellow and/or brown construction paper. Attach the pieces of paper hair onto the top of each popsicle shape above the face.
3. Cut out one pilgrim hat shape from black construction paper and one bonnet shape from white paper. Attach the hat on top of one face and the bonnet onto the back of the other face.
4. If you wish, cut out a small strip of yellow paper and attach above the rim of the black paper hat to make a buckle.
5. Once all the pilgrim faces are created, attach each one to a wooden popsicle stick using tape or glue.
Enjoy the pilgrim popsicle sticks below created by the children at the library!


I seem some colorful turkeys trotting in the woods!
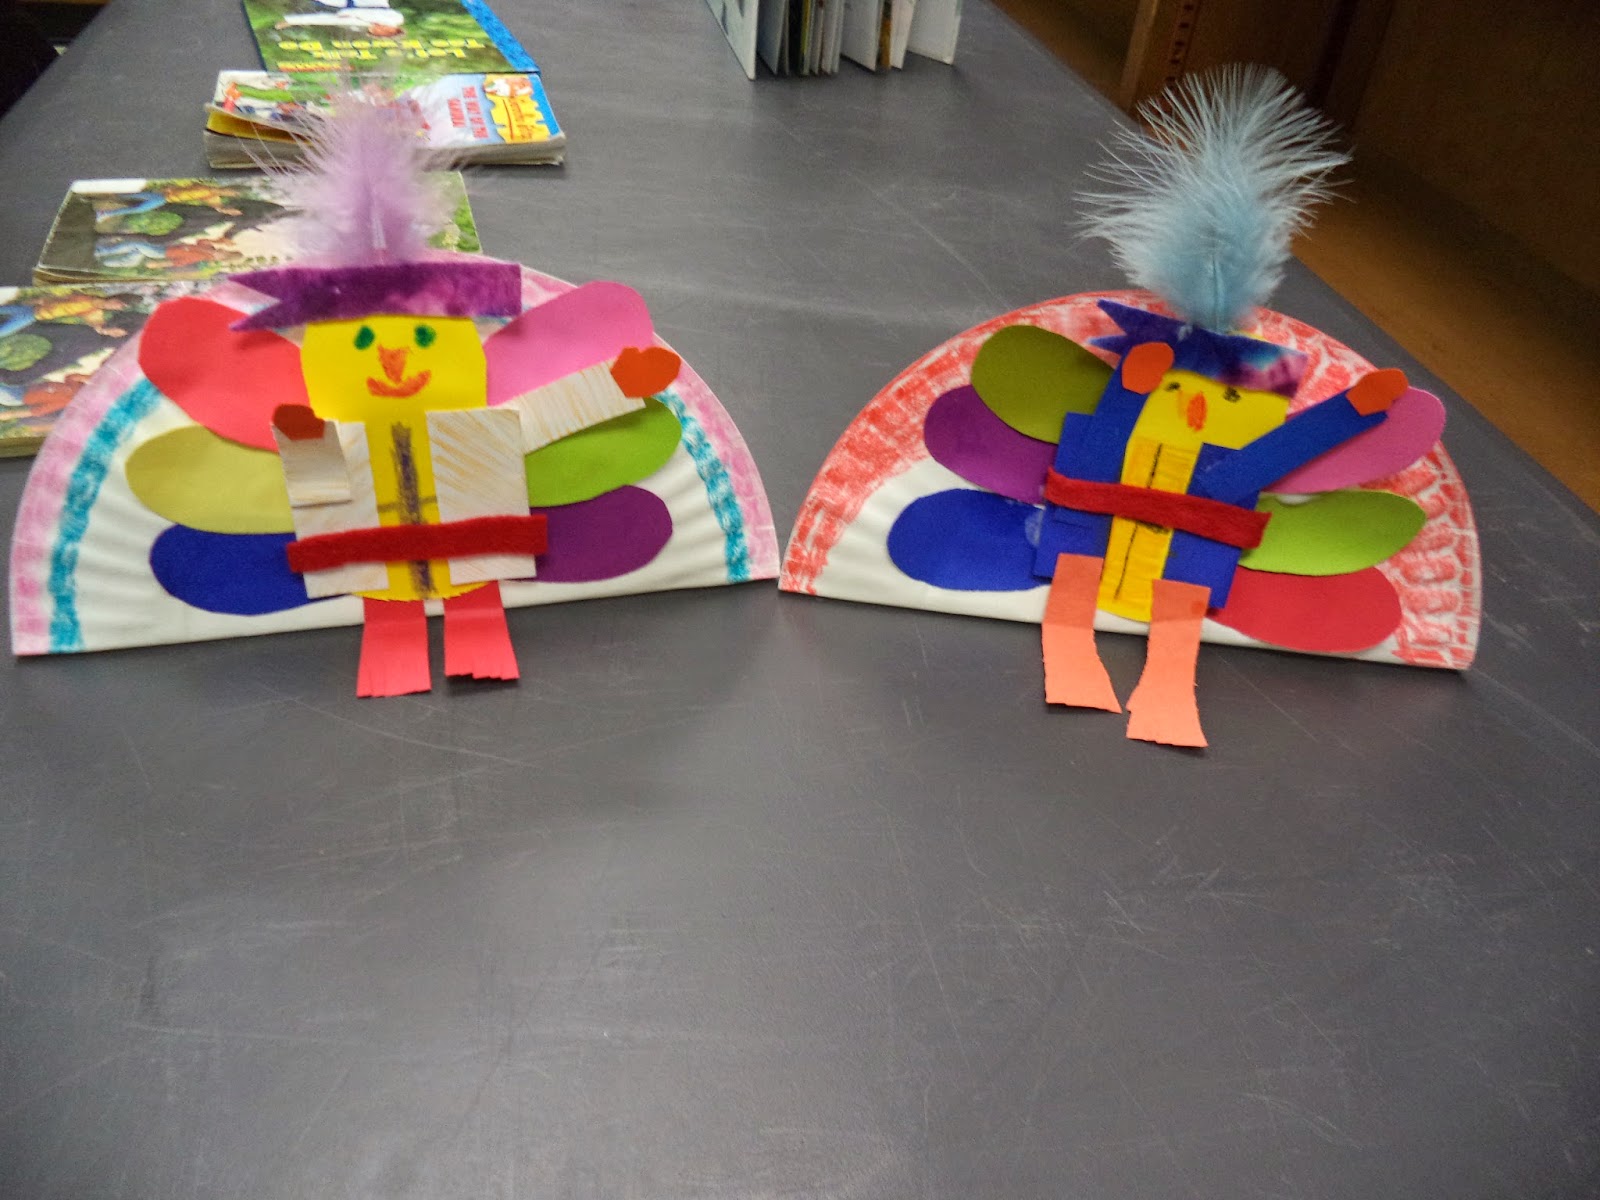
Their feathers and tails look like fans!
Turkey Fans!

Supplies: One small cardboard tube, fabric, brown paper, orange paper, glue/tape, scissors, one piece of construction paper folded into a fan, one feather, and crayons/markers.
Instructions:
1. Using scissors, cut out a basic turkey shape outline from brown paper. The turkey shape should be 3-4 inches tall.
2. Draw a face on the head of the turkey. Include a snood and wattle.
3. Cut out 2 turkey leg shapes from orange paper and attach the legs onto the bottom of the turkey.
4. Cut out a small outline of a shirt from fabric and attach it to the body of the turkey.
5. Cut out a flag shape from orange paper or any color of your choice and attach it to the head of the turkey. Attach a feather onto the flag as well.
6. Once you decorated and dressed the turkey, attach the turkey onto one side of a small cardboard tube.
7. Draw a design onto a long rectangular shaped piece of construction paper. Fold the paper back and forth in both directions to make ridges for the fan.
8. Place your fan through the tube at the top. Fan out the ridges over the sides of the tube and attach the edges of the fan with tape.
Enjoy the turkey fans below created by the children at the library!


Some of them look as if they want to fight or defend themselves.
Teenage Mutant Ninja Turkeys!

Supplies Used: One paper plate, card stock, fabric, one feather, glue/tape, crayons/markers & scissors.
Instructions:
1. Cut out a shape of a turkey's body out of yellow, tan or brown card stock.
2. Using crayons/markers, draw a face on the turkey. (Eyes, snood and wattle).
3. Cut out a rectangle from white or dark card stock with a length of 4-5 inches and a height of 1-2 inches. Fold the rectangle around the back center of the turkey's body and fold up the ends around the front. This should make the turkey look as if it's wearing a martial arts gi top. (You can use fabric for this instead of card stock if you wish.)
4. Cut out a strip of fabric and attach it onto the front center of the body (towards the bottom) to resemble a martial arts belt going around the waist.
5. Cut out another strip of fabric and attach it to the top of the turkey's head above the eyes to resemble a bandanna.
6. Cut out 2 smaller strips of card stock and attach them to the sides of the gi to resemble arms. You can bend the arms and and legs to make it seem as if the turkey is punching and kicking.
7. Cut out 2 small pieces of card stock into the shape of boxing gloves and attach each glove to the end of each arm.
8. Cut out feather shapes from card stock of different colors for the turkey.
9. Glue/tape the card stock feather shapes around the back edge of the turkey so that most of the feathers stick out from behind the back of the turkey and they are visible.
10. Cut out legs for the turkey and attach them to the bottom of the turkey.
11. If you wish, you may add a real soft feather onto the turkey to further embellish it.
12. Fold a paper plate and stand up the plate so that one side is vertical. Attach the ninja turkey onto the vertical side of the plate to make it seem as if it is standing up and fighting.
Enjoy the ninja turkeys created by the children at the public library below.


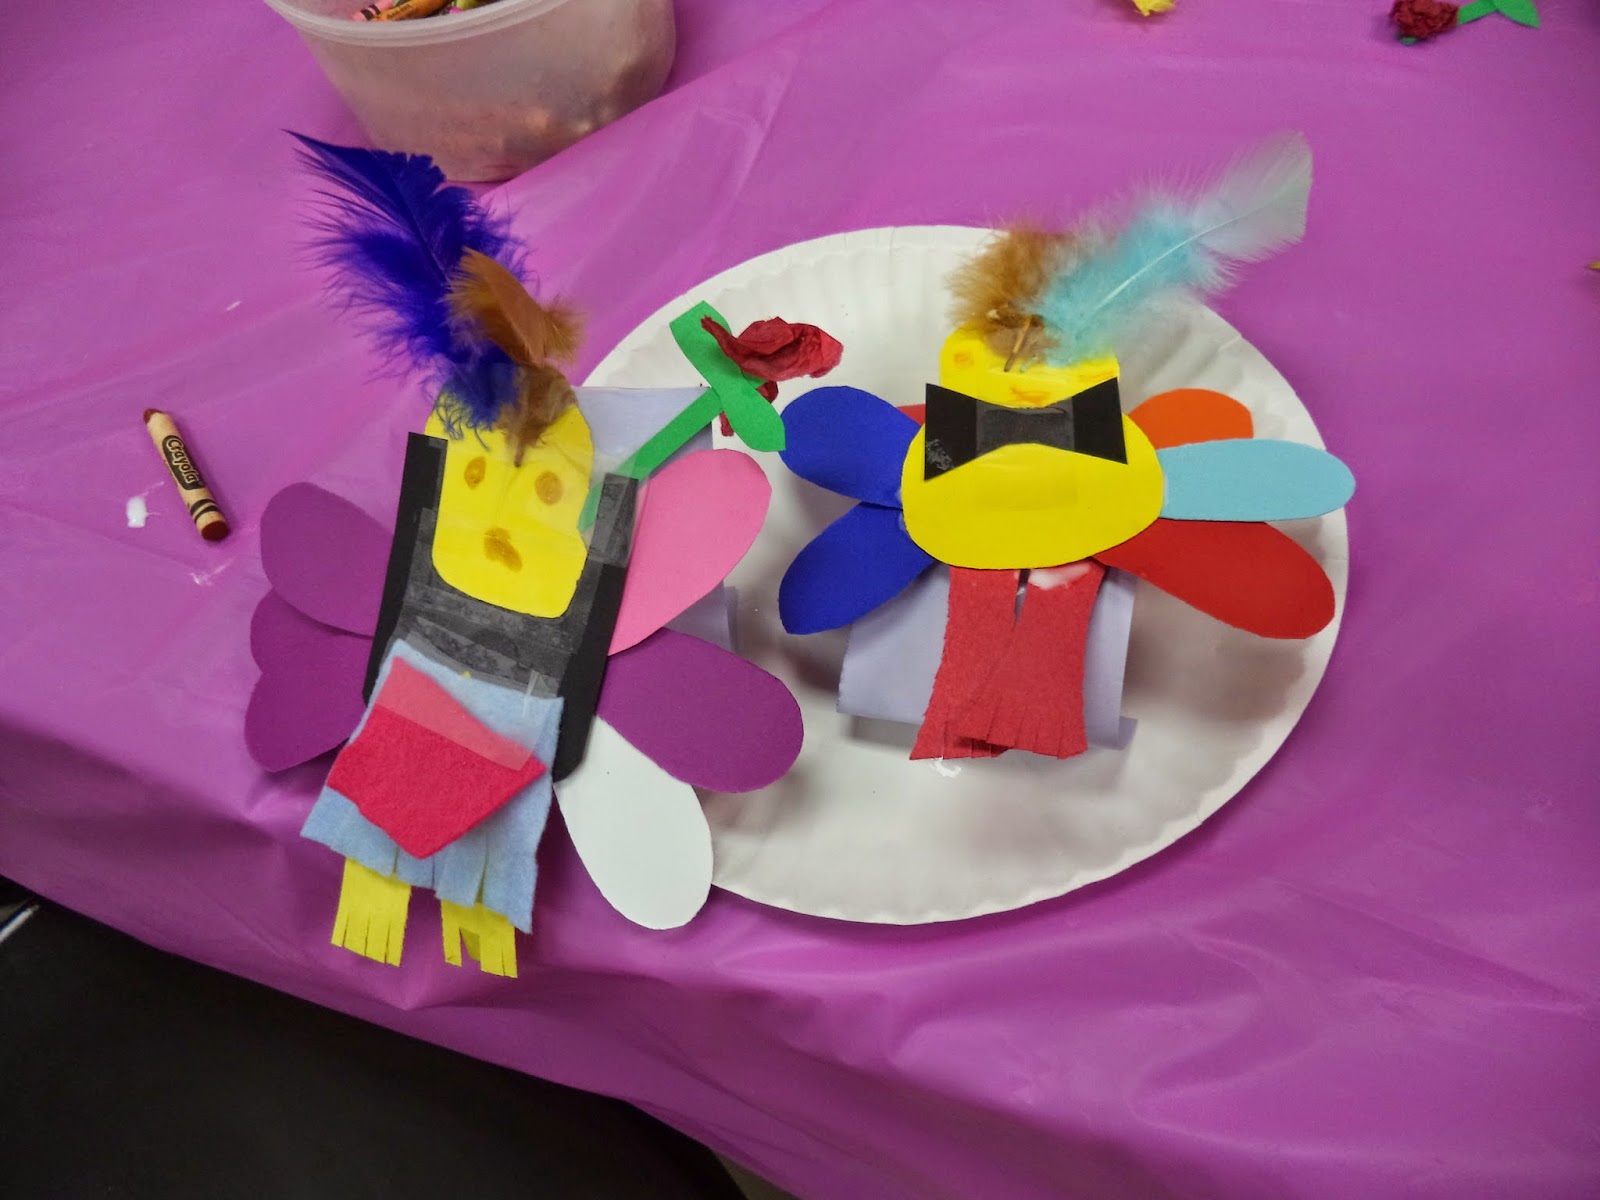
Some of them look as if they are doing the tango!
Tango Turkeys!

Supplies Used: One paper plate, card stock, pieces of fabric, pieces of foam sheet stickers, one or 2 feathers, red tissue paper, scissors, glue/tape & crayons/markers.
Instructions:
1. Cut out 2 shapes of a turkey's body out of yellow, tan or brown card stock.
2. Using crayons/markers, draw a face on the turkeys. (Eyes, snood and wattle).
3. Cut out feather shapes from card stock of different colors for each turkey.
4. Glue/tape the card stock feather shapes around the back edge of the turkeys so that most of the feathers stick out behind the back of the turkey and they are visible.
5. Cut out legs for the turkeys and attach them to the bottoms of each turkey.
6. If you wish, you may add a real soft feather onto one or both turkeys to further embellish them.
7. Cut out a top and skirt or a one piece dress from fabric and glue/paste it onto one of the turkeys.
8. Cut out black or dark blue pants from card stock and attach them to the other turkey. Cut out a small bow tie shape as well and attach that onto the neck of the turkey with the pants. You may draw buttons onto the turkey's chest or cut them from dark paper.
9. To make the turkeys appear more glittering, cut out strips of glittery foam shape stickers and attach them to the turkeys. Perhaps the turkey with the dress can have a glittery head band and the turkey with the pants and the bow tie can have a glittery foam cumber bun.
10. If you wish, you can cut out a stem and leaves from green card stock and attach some scrunched up red tissue paper onto the stem to resemble a flower. You may then glue/paste it onto one of the turkey's mouth area.
11. To stand the turkeys up on the paper plate, fold 2 pieces of rectangular shape card stock and attach each one to the back of each turkey. This will be the supports for the turkeys.
12. Glue/tape the bottom of each support onto the plate next to each other so that the turkeys appear to be dancing next to each other.
Enjoy the pictures of the turkeys doing the tango below created by the children at the library!


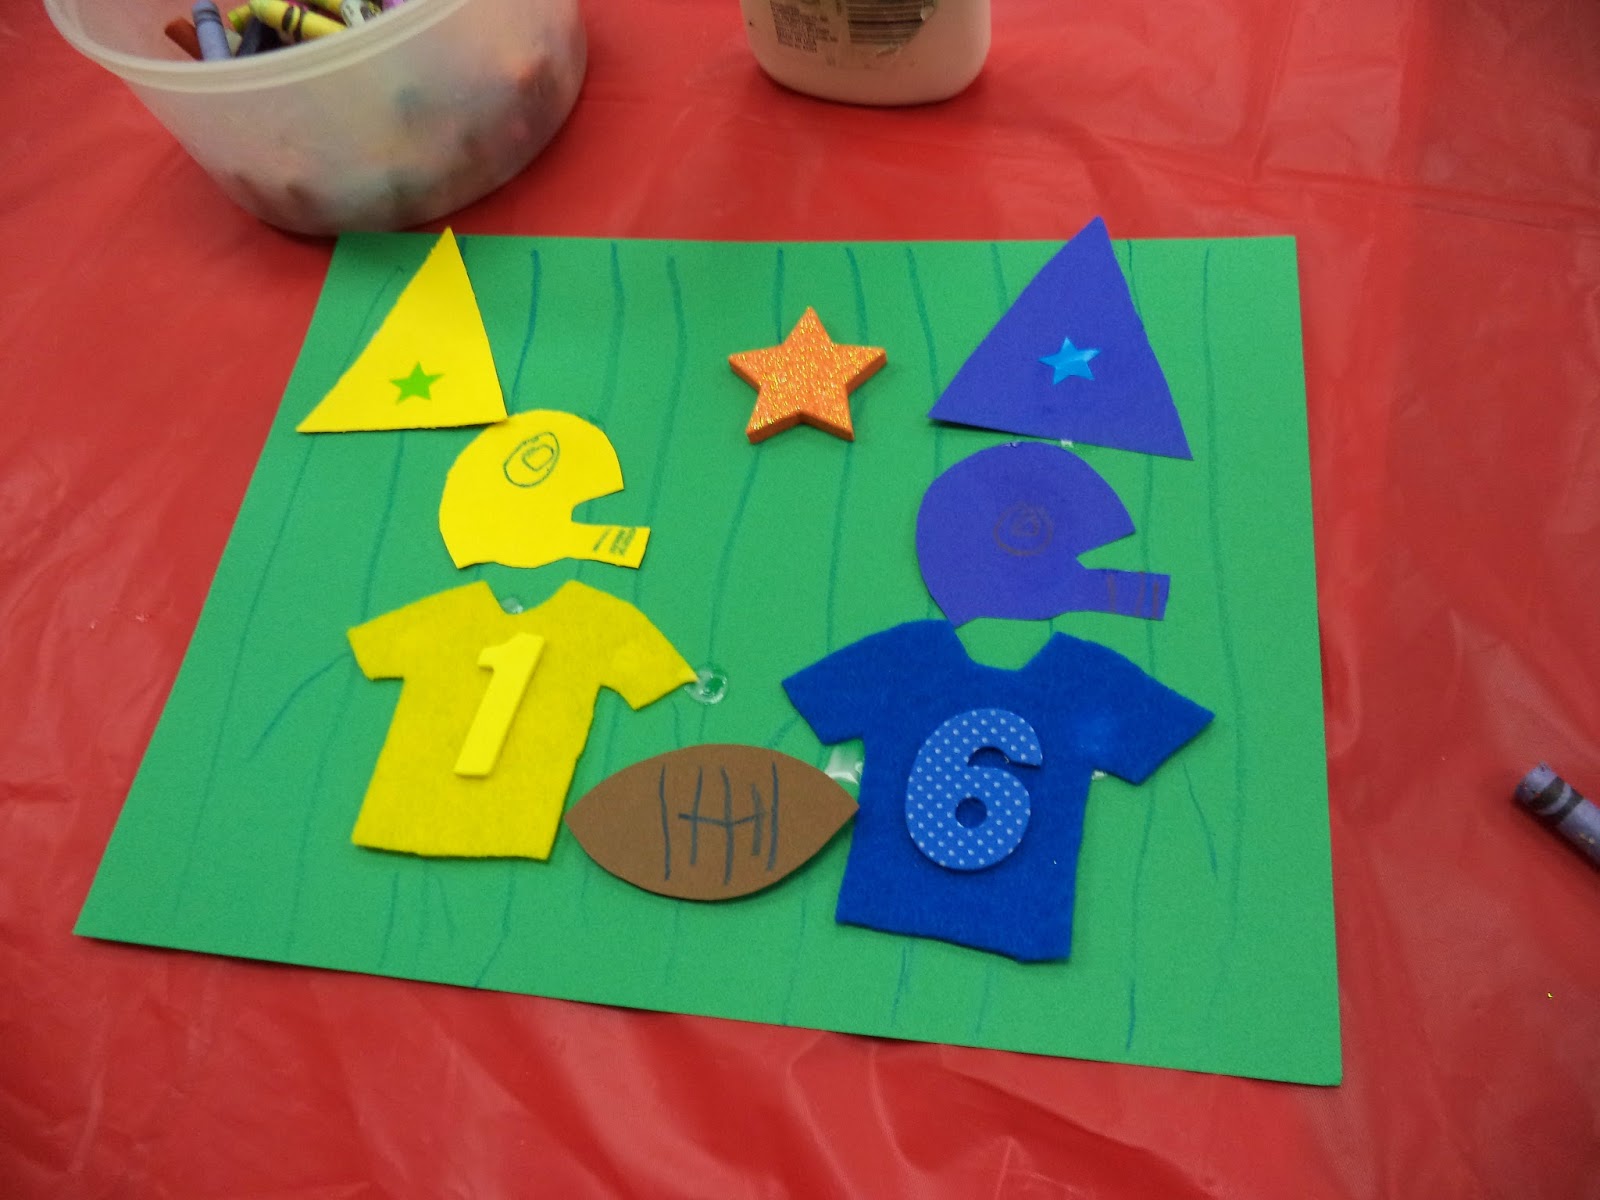
I hear some sounds and cheers! It looks like there is a football game occurring down on the field! Let's watch the game! Let's see the colors of the jerseys, helmets and flags!
Football Field Design!

Supplies Used: One letter sized piece of card stock (preferably green), fabric, smaller pieces of card stock, number foam stickers, crayons/markers, glue/tape and scissors.
Instructions:
1. Lay the letter sized green card stock down onto the table or drawing space in a horizontal direction. Using crayons/markers, draw vertical lines across the paper and numbers on the bottom to resemble numbered lines on a football field.
2. Using scissors, cut out 2 pieces of fabric in the shape of shirts or football jerseys.
3. Take 2 foam stickers in the shape of numbers and stick each of them onto each fabric jersey.
4. Attach the fabric jerseys onto the field.
5. Cut out helmet shapes from smaller pieces of card stock as well as triangles for flags.
6. Cut out a football shape from card stock as well.
7. Glue/tape the helmets, flags and football onto the green card stock.
8. Cut out 2 white bracket shapes from card stock and attach each one onto each end of the football field to resemble goals.
9. Feel free to embellish your football field with any other decorations using stickers, glitter and anything else of your preference.
Enjoy the football fields and games below created by the children at the library!


Pom Pom and Banners for Team Spirit

Supplies Used:
Banner - one straw, card stock, crayons/markers, scissors, tape and any other decorations of your choice.
Pom Pom - One Popsicle stick, tin foil, green fake grass, silver fake grass, shiny holiday garlands, pieces of lanyard, scissors, glue and tape.
Instructions for Banner:
1. Using scissors, cut out a triangle shape (isosceles or equilateral) from card stock of any color of your preference.
2. Color and decorate the triangle using either crayons, markers, stickers, glitter foam shapes, etc. You may decorate the triangle with any colors you like or colors that represent your school or favorite team!
3. After you decorate your triangle, bend the top part of the straw over and tape the top bent part of the straw onto the other side of the triangle along one of the edges of the triangle.
4. Now you have a banner that you can wave for school and team spirit!
Instructions for the Pom Pom:
1. Wrap a Popsicle stick in tin foil and use tape to fasten the tin foil onto the stick.
2. Attach a bunch of fake Easter grass, and/or fake metallic grass, sparkling holiday garlands, lanyards, strings, ribbons and anything else you can think of onto one end of the Popsicle stick. Use glue or tape to fasten everything together.
Now you have a sparkling pom pom to cheer for your team! Hooray!
Enjoy the pictures below of the banners and pom poms created by the children at the library!


.JPG)
Let's watch the Macy's Thanksgiving Day Parade!
.JPG)


Now let's harvest some corn, enjoy eating corn or creating corn dolls!
Corn Dolls


Supplies Needed:
Yellow Construction Paper, crayons/markers, scissors, glue/tape, a Popsicle stick, fabric, glitter foam stickers, feathers and anything else you wish to use to embellish the doll.
Instructions:
1. Trace an outline of an ear of corn onto yellow construction paper and cut out the corn shape.
2. Using crayons/markers, color designs and a face on the corn shape.
3. If you wish to humanize the paper corn, attach fabric, foam sheet stickers, feathers and anything else to dress up the corn shape into a human figure. Using crayons/markers, you may draw clothes onto the corn shape as well.
4. Cut out 4 small strips of paper to create arms and legs and attach the arms and legs onto the corn shape.
5. Using glue/tape, attach a Popsicle stick onto the bottom back side of the corn shape so that you can hold up the corn doll as a puppet if you wish.
Enjoy the corn dolls below created by the children at the library!


Let's go to a turkey trot! Now let's see the turkeys trot!
Turkey Trot

Instructions:
1. Take one sheet of construction paper and fold over all of the edges to simulate an enclosure.
2. Draw or trace an outline of a body of a turkey on brown construction paper and cut out the shape of the turkey's body. Repeat this again to make another turkey's body. (There should be at least 2 turkeys in the process of being made)
3. Draw or trace outlines of turkey feathers onto construction paper of different fall colors. Using scissors, cut out the feathers. There should be at least 10 feathers to attach onto the bodies of the turkeys, 5 for each turkey.
4. Draw or trace 4 outlines of the legs and feet of a turkey. There should be 2 pairs of legs/feet for each turkey.
5. Attach the feathers and legs/feet onto the bodies of the turkeys. Using crayons/markers, color a face onto the turkeys, eyes, nose, beak, snood and wattle. You may color in other designs of your choice anywhere on the turkeys. You may use glitter stickers as well for the snoods and wattles if you wish.
6. Bend the feet of the turkeys and glue/tape the bent feet of the turkeys onto the paper enclosure so that the turkeys look as if they are standing and trotting.
7. Glue/tape fake grass around the edges of the enclosure to resemble a natural environment for the turkeys.
8. Enjoy the turkey trots!
Enjoy the turkey trots below created by the children at the library!


Now that we harvested corn, cheered for our football teams and saw some turkeys trot, it's time to watch the Macy's Thanksgiving Day Parade!
The Macy's Thanksgiving Day Paper Parade


Supplies Needed: Card stock, crayons/markers, glue/tape, scissors, string and stickers to adorn
Instructions to follow later:
Enjoy the Macy's parades below created by the children at the library!


Pop Up Indian Corn

Supplies Used: Toilet Paper Tubes, Construction Paper (green and brown), tape or glue, markers or crayons.
1. Wrap a toilet paper tube with yellow construction paper.
2. Decorate the yellow tube to resemble real Indian corn. I drew lines and squares and colored some of them in. You can use stickers or other materials if you wish.
3. Cut out long leaf shapes out of green construction paper and tape them or glue them around the tube to resemble corn husks surrounding the kernels.
4. Cut up strips of brown paper and stick them in the top of the tube to resemble silks.
5. Enjoy your Indian ears of corn.
Tic-Tac-Toe Turkey


Supplies Used: Construction Paper in the fall colors, soft crafty feathers, glue or tape, crayons or markers.
1. Cut out 2 circles from brown construction paper. One large circle for the body and one smaller one for the head. Paste or tape the 2 circles together to make the turkey shape.2. Cut out triangles from construction paper of other colors for the nose and feet. You can cut out red or pink rectangles for the tongue. You can draw on the eyes with a crayon or marker or you can use googly eyes.
3. Cut out feather shapes from paper of different colors. I cut out 6 feathers, 2 red, 2 yellow and 2 orange. Either paste or tape the feathers on top of the back of the body so that they surround the body and the head. I added real craft feathers on top of the paper feathers for a nice effect.
4. Draw a big square with 9 smaller squares of the same size in it to make a tic tac toe grid.
5. You can use x's or o's or triangles of different colors for the players of the game.
6. Have fun with your Tic-Tac-Toe turkey.
While you are enjoying your corn and turkey, let's remember the pilgrims that sailed to Plymouth on the Mayflower! Enjoy creating pilgrim stick dolls!
Pilgrim Stick Dolls


Supplies Used: Popsicle Sticks, Felt Pieces cut into shapes of clothes, paper, glue or tape, crayons/markers
1. Cut felt pieces into hat, pants, skirt, shirt, arms and feet shapes.
2. Paste or tape the felt clothes, arms and feet onto the popsicle stick to resemble the body of the pilgrim.
3. Take small pieces of paper and cut them into little round shapes and draw faces on them. Stick them onto the top of the popsicle stick above the clothes. For the male pilgrim, stick on a felt hat on top of the head. For the female pilgrim, draw an outline near the edge to make it look like a bonnet.
4. Enjoy the pilgrim stick dolls for the holidays.
It is now time to prepare for and enjoy the holidays in December!