

Welcome to the joyful month of June! Summer is here and it's time to enjoy the beach, lemonade and other fun things to do outdoors!
There are colorful skateboards on sale at the store! Let's purchase a skateboard and go skateboarding in the nice weather!
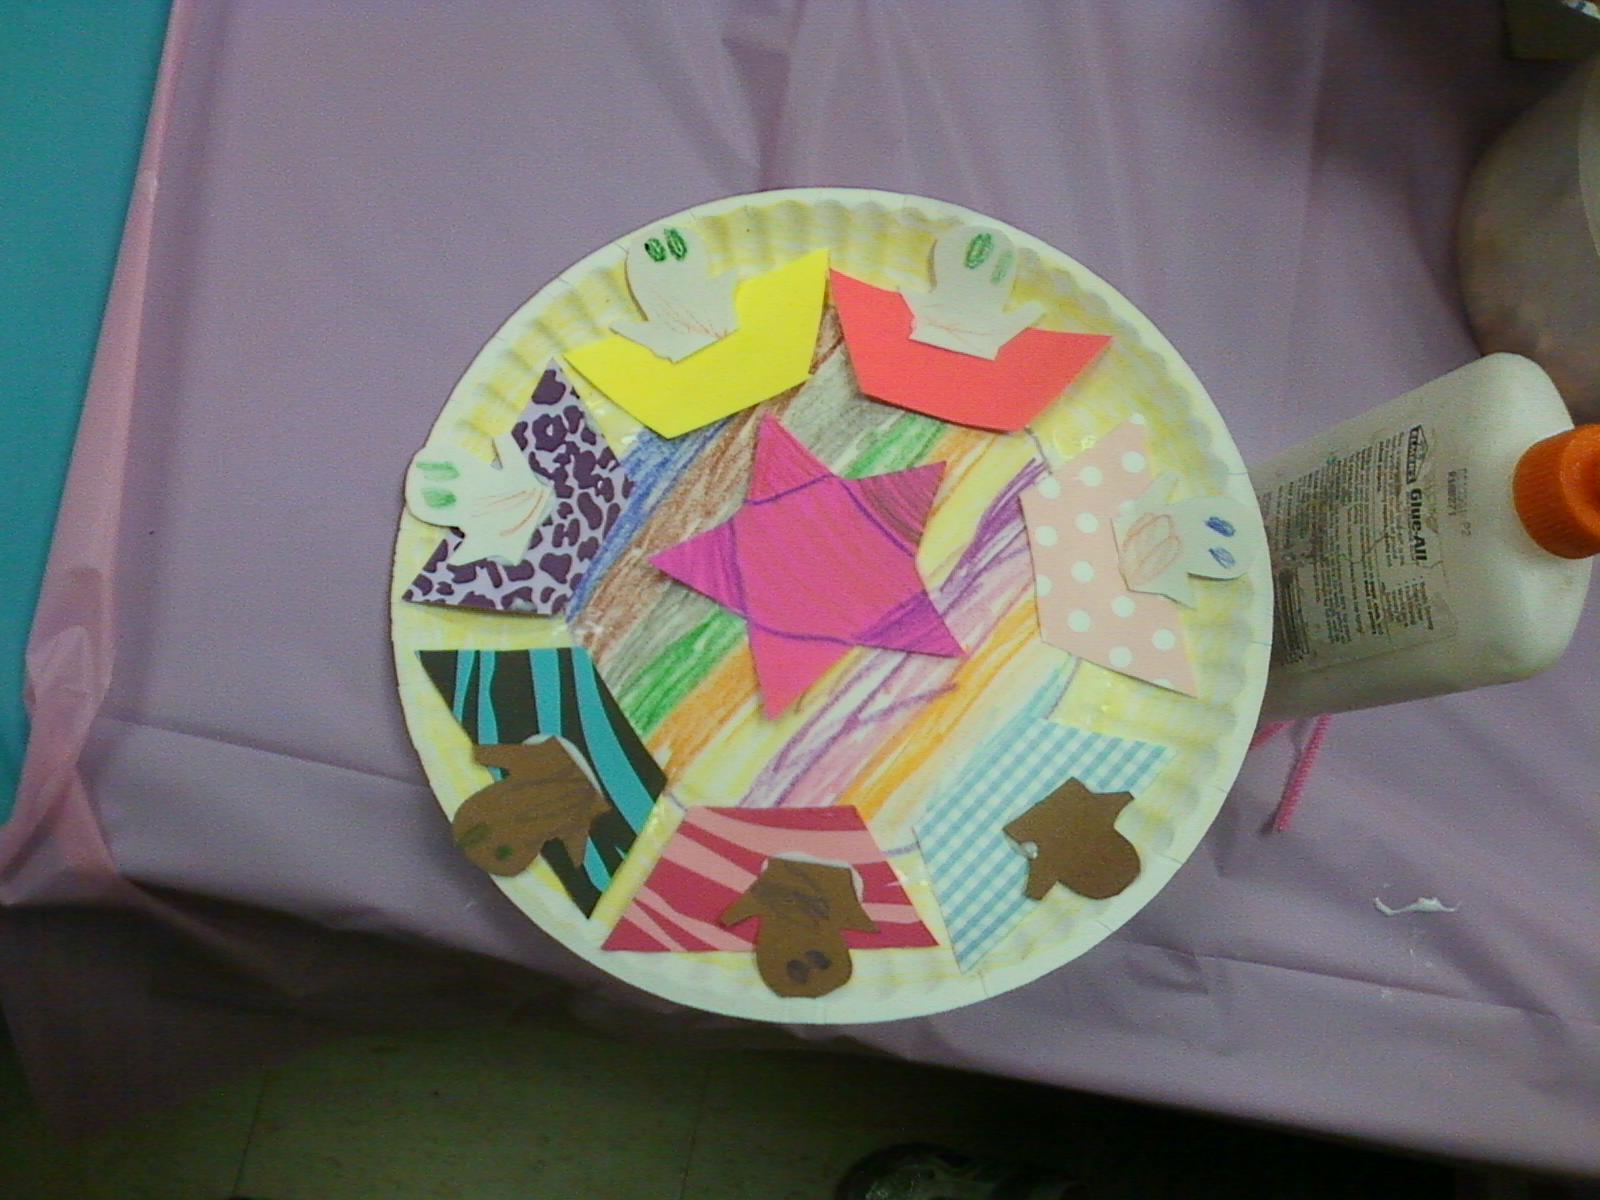
Paper Skateboards!


Supplies: Card stock or construction paper, stickers, glue/tape, crayons/markers and scissors.
Instructions:
1. Using scissors, cut out a skateboard shape from card stock or construction paper. Draw a design onto the skateboard shape.
2. Cut out 4 thick strips of paper and fold them into round loops, attaching the ends together on each one.
3. Attach all 4 loops onto the bottom of the paper skateboard shape. Two loops should be at the front on one end and the other two should be at the back. Now the skateboard has wheels.
Enjoy the paper skateboards below created by the children at the library!


Let's play some basketball! Paper basketball tube!

Supplies: Card stock, construction paper, cardboard tube, glue/tape, crayons/markers, one pom pom and tissue paper(optional).
Instructions:
1. Wrap a card board tube in construction paper. If you wish, you can cover the bottom of the tube with tissue paper or just leave the bottom open.
2. Cut out a basketball net board shape from card stock.
3. Decorate the board with strips of paper, stickers and color in designs.
4. Attach the tube onto the center of the board near the bottom using glue or tape.
5. Now you can throw in your pom pom into the tube and aim!
Enjoy the paper basketball tubes or nets created below by the children at the library!


Playing basketball is a good way to bond with a father figure!
Let's wish a daddy a Happy Father's Day!
Paper Shirt Cards!


Supplies: Card stock or construction paper, stickers, crayons/markers, glue/tape, scissors, and anything else you wish to use to decorate the card.
Instructions:
1. Fold a letter-sized sheet of card stock or construction paper in half.
2. Using scissors, cut 2 slits across on the top, each an inch long on each side on the top. The slits should be about an inch down from the top. Fold the ends over and in to make a collar.
3. Cut out 2 pocket shapes from card stock and attach onto the front of the card to make it look as of the shirt has pockets as well as a collar.
4. Using crayons or markers, drawer buttons or a zipper, a pattern and anything else you like. Decorate the card with stickers. Write a Father's Day message inside.
Enjoy the shirt cards below created by the children at the library!


It's a nice day to see the aquarium. They have a shark tank! Wow!

Supplies: Aqua or light blue card stock, darker blue paper, smaller pieces of orange paper, grey paper, green pipe cleaner, one small piece of white paper, crayons/markers, glue/tape and sea creature stickers.
Instructions:
1. Cut out a rectangle shape from aqua card stock. Fold into 3 sections and then unfold and stand it up.
2. Cut out a rectangle shape of darker blue paper and cut out a wave outline at the top. Attach onto the top of the aqua card stock.
3. Cut out a shark shape from gray paper. Color in eyes on the shark. Cut out a small white semicircle and draw teeth on it and attach onto the shark under the eyes. This will be the mouth.
4. Attach the shark onto the bottom center panel of the aqua paper.
5. Attach small pieces of green pipe cleaner along the bottom of the aqua paper. This will be the kelp or seaweed sticking up.
6. Cut out fish and starfish shapes from orange paper and attach anywhere around the shark.
7. Adorn the shark tank the sea creature stickers or any other designs of your preference.
Enjoy the shark tanks below created by the children at the library!


The aquarium offers a whale watching boat ride! Let's watch some whales!


Supplies: Blue card stock, blue construction paper, 2 google eyes, thin strips of white or light colored paper, one small piece of white paper cut into a semi circle shape, glue, crayons/markers, scissors and glitter.
Instructions:
1. Cut out a piece of card stock in the shape of a rectangle from half of a letter sized sheet of card stock. The card stock should be a shade of blue or aqua. Cut a wavy design around the edges. This will be your water for the whale.
2. Cut out a long whale shape with the tail from a legal sized piece of a darker blue construction paper.
3. Fold over the very front tip of the whale to the back where the tail is and attach that part to the tail. You should now have a whale shape that is 3D.
4. Attach a white semi-circle shaped paper onto the very front of the whale and color in baleen bristles onto it. This will be the whale's mouth. The whale can now catch krill with the baleen bristles.
5. Attach 2 google eyes above the mouth.
6. Punch a hole into the top of the whale's head behind the eyes. This will be the whale's blowhole.
7. Cut out thin strips of white or light colored paper and place through the blowhole so that it looks as if there is water squirting out of the blowhole.
8. Draw a design with glue on the whale and sprinkle glitter on it. After a few minutes, shake off the excess glitter. Now the whale sparkles with a glitter design!
Enjoy watching the whales below created by the children at the library!


It's Father's Day! Let's stop at the card store on the way home and get a card for the father! There's a heart shaped tuxedo card that looks great!
Heart Shaped Tuxedo Father's Day Card!


Supplies: Card stock, white paper, scissors, glue/tape and stickers of your choice.
Instructions:
Follow the instructions on this web site listed below:
Paper Magic Father's Day Heart Craft - https://www.patreon.com/papermagicreny/memberships


Fathers enjoy taking families on trips using a camper.
Paper Camper!


Supplies: Card stock and construction paper, pieces of red, orange and yellow tissue paper, glue/tape, scissors and crayons/markers.
Instructions:
1. Fold a letter-sized sheet of card stock in half. Once it's folded in half, stand it up so that the folded side is on top and the other sides are on the bottom. You now have a camper. You can cut off the corners to create a more rounded camper shape.
2. Using scissors, cut a door and fold it out.
3. Cut out 4 circles and color them and attach them along the bottom of the camper on both sides. These are the tires.
4. Cut out rectangles and squares for windows and attach onto both sides of the camper.
5. Cut out a small rectangle and fold it and attach onto the camper. This can be a chair for the outside of the camper.
6. Cut out small white squares for marshmallows. Attach them onto the camper. Draw a stick for them under each marshmallow. Cut out a vase shape and attach underneath the sticks with marshmallows.
7. Attach crumpled pieces of tissue paper in the color of flames next to the marshmallows. Now you can roast the marshmallows.
8. Cut out an awning and attach onto the top of the camper.
Enjoy the paper campers below created by the children at the library!


I see some robin birds outside the camper! They are singing like rocking robins!
Rocking Robins! Tweet Tweet!


Supplies: Card stock, google eyes, scissors, glue/tape, crayons/markers and stickers.
Instructions: Instructions to follow later:


Let's enjoy the fair with the rides and the food!
Fair Food Craft!

Supplies: One sheet of light colored card stock, yellow and orange tissue paper, light pink or light blue tissue paper, strips of card stock with designs on them, a pop corn holder cut out and white paper that you can roll up into a cone for the cotton candy.
Instructions:
1. Place a letter-sized piece of card stock onto a flat surface. Make sure it is in a horizontal position so that there is more room for decorations.
2. Cut out 2 strips of card stock with designs. Place one strip horizontally at the top and one horizontally at the bottom. These are your borders.
3. Print out a popcorn holder container shape and cut it out with scissors. Color the patterns on it with crayons/markers.
4. Attach the paper popcorn holder onto the card stock sheet. Scrunch up small pieces of yellow tissue paper into little ball shapes and attach them onto the top of the popcorn holder so that it looks like the popcorn container has popcorn in it.
5. Take a piece of white paper and roll it into a cone shape. Attach the cone shape onto the card stock near the popcorn. Roll up small pieces of light colored tissue paper into small ball forms and attach onto the top of the cone. Or you can just twirl the pieces into curvy shapes if you wish. Now you have a cone of cotton candy.
6. Use stickers and anything else to decorate your popcorn and cotton candy.
Enjoy the fair snacks below created by the children at the library!


I see an aquarium by the food stands! Wow, there are jellyfish.
Jellyfish Puppets!


Supplies: One paper plate, card stock, yarn, 2 googly eyes, crayons/markers, glue/tape, one wooden ice cream stick, scissors and stickers.
Instructions:
1. Color in the center of a paper plate blue using a marker or crayon.
2. Using scissors, cut in a slit in the center of the plate and make sure the slit is long enough for the jellyfish puppet to fit through.
3. Cut out a jellyfish shape from card stock. Draw a design on the jelly fish or just draw a face on it. If you have googly eyes, attach them onto the jellyfish shape or else you can draw them in.
4. Attach pieces of yarn onto the bottom of the body of the jelly fish. These will be the tentacles or arms.
5. Attach the jellyfish onto the top of an ice cream stick or straw. You may need tape to fasten the jellyfish onto the stick.
6. Push the jellyfish puppet through the slit so that you can see the top of the jellyfish with the tentacles. Most of the stick should be hidden. You should be able to move the jellyfish puppet back and forth along the opening.
Enjoy the jellyfish puppets created below by the children at the library!


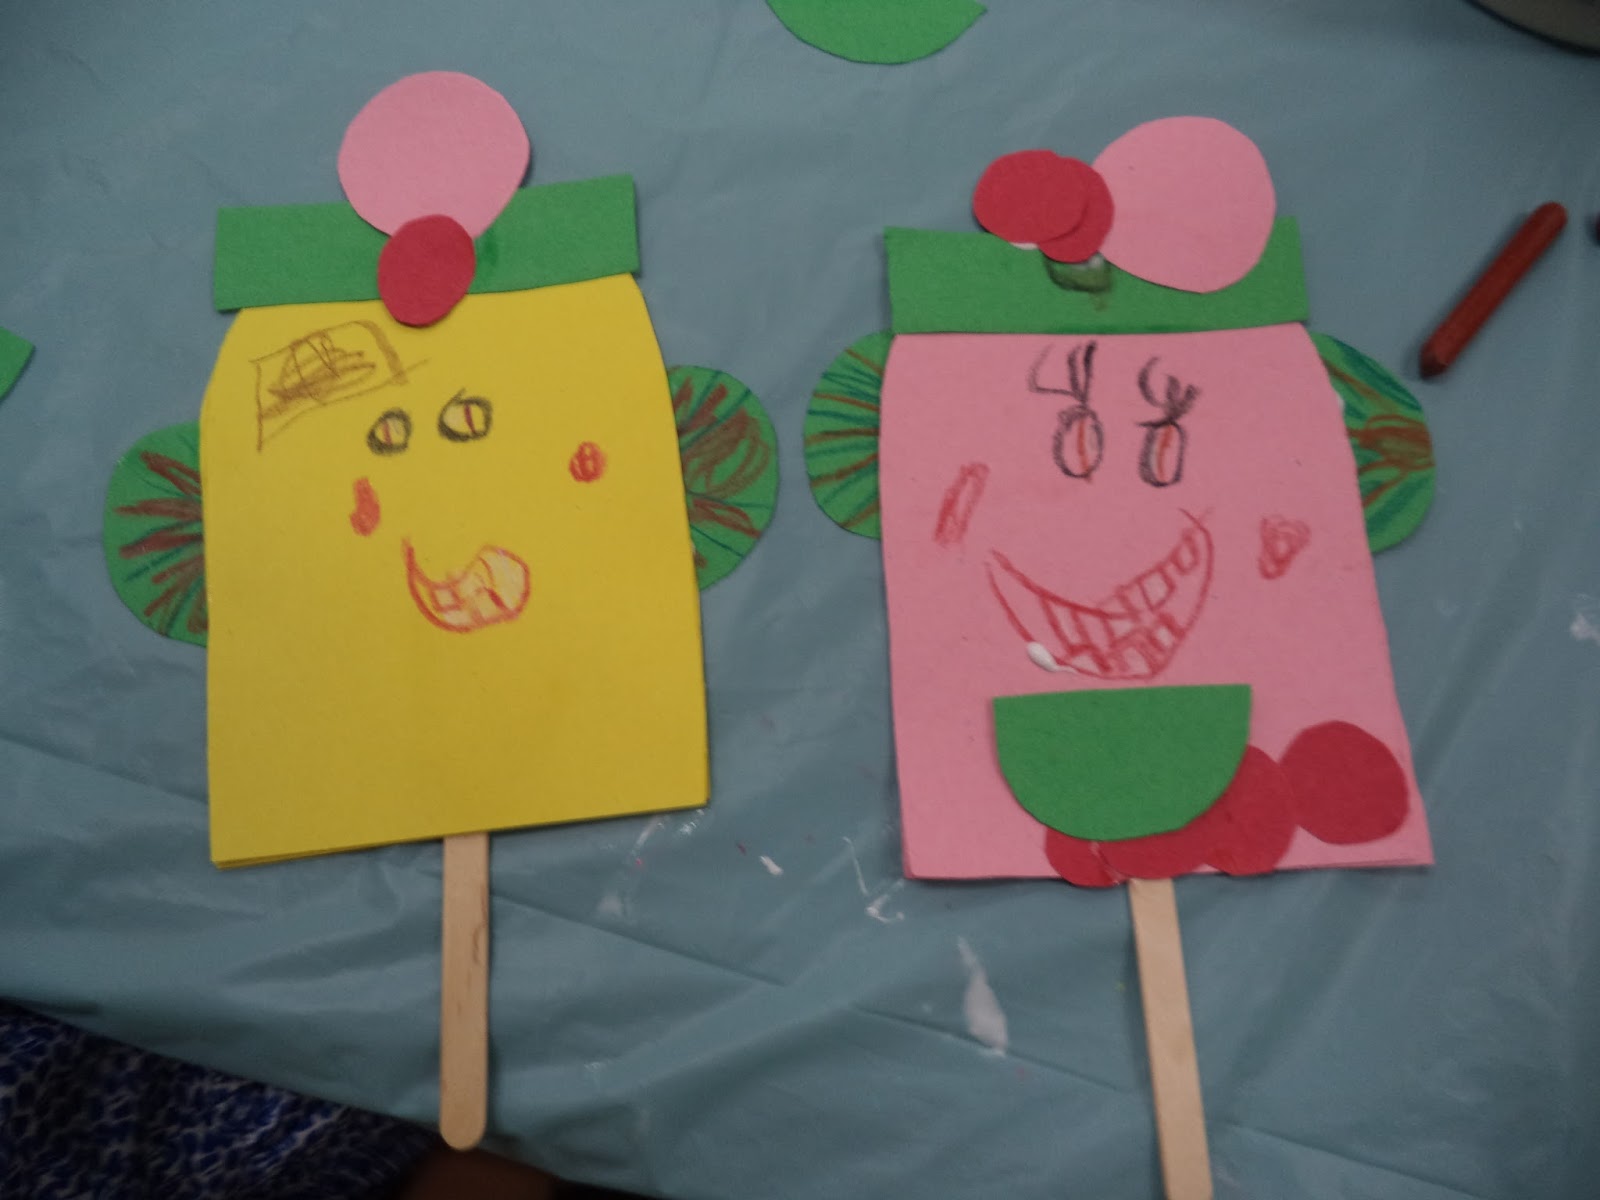
I see some souvenirs I can get for a father for Father's Day.
I'll make a card too!
Happy Father's Day!
I'll make a card too!
Happy Father's Day!

Supplies: One letter-sized sheet of white or light colored card stock, pieces of card stock in a bright color, fabric, stickers, glue/tape, piece of string/ribbon, crayons/markers and glitter glue.
Instructions:
1. Lay a white or light colored sheet of card stock on a flat surface in a vertical direction. This will be the shirt. If you wish, cut 2 slight angles at the top of the sheet to resemble the shoulder parts of the shirt.
2. Cut out a strip of card stock in any color and fold into a collar shape. Attach onto the top of the paper shirt so that the shirt has a collar.
3. Cut out a tie from bright colored card stock or construction paper. Attach the tie to the shirt and collar.
4. Cut out a pocket shape from card stock or construction paper and attach onto the side of the shirt near the tie. Cut out a strip of fabric and attach onto the top of the paper pocket to resemble a handkerchief sticking out of the pocket.
5. Draw designs onto the shirt, tie and pocket. Use stickers and glitter glue if you wish.
6. Cut out a bow tie shape from card stock of a bright color. Draw a design on it and decorate with glitter and stickers.
7. Attach the ends of the string/ribbon onto the back of the bow tie with glue or tape. Now you can hold the bow tie by the ribbon or string or wear it around the neck.
Enjoy the Father's Day shirts, ties and bow ties below designed by the children at the library.


That rocking submarine from the fair is a nice gift for dad.
Rocking Paper Plate Submarines!

Supplies: One paper plate, scissors, blue tissue paper, smaller pieces of paper cut in circles, sea creature foam stickers, glue/tape and crayons/markers.
Instructions:
Follow the instructions from the link below:
http://www.redtedart.com/paper-plate-submarine-craft/
Enjoy the rocking submarines below created by the children at the library!


Seeing those submarines makes me want to put on my swim suit and go for a swim!
Paper Swim Suits!

Supplies Used: Construction paper, scissors, glue/tape, crayons/markers, foam stickers and anything else of your preference.
Instructions:
1. Cut out a swim suit outline from construction paper. Draw a design on it.
2. If you wish, decorate the suit with stickers and paper shapes.
Enjoy the paper swim suits below designed by the children at the library!


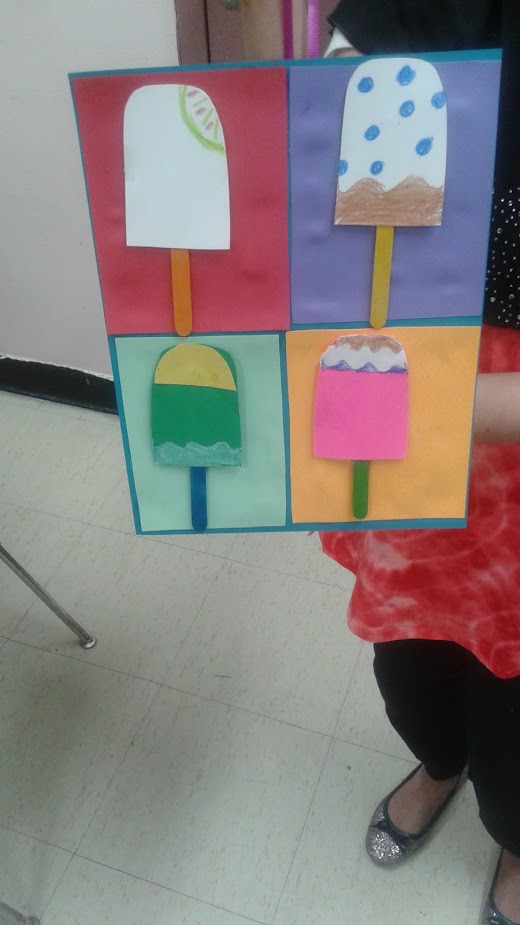
The ice cream man is here. Time for an ice pop! The selection resembles Andy Warhol pop art!
Andy Warhol Style Ice Pop Art

Supplies: One letter-sized sheet of card stock, 4 smaller square shaped pieces of card of different colors, 4 smaller pieces of card stock of different colors cut into ice pop shapes, 4 ice cream sticks or wooden sticks, crayons/markers, glue/tape, a piece of ribbon, smaller pieces of paper shaped into fruit slices and anything else you wish to use to decorate the ice pops.
Instructions:
1. Attach the squares onto the sheet of card stock so that they are next to each other and below each other. You should have 2 rows of 2 squares.
2. Color in and decorate the ice pop shapes and attach each one to a stick.
3. Attach each paper ice pop onto each square.
4. Attach a ribbon or string onto the back of the card stock with the ends attached together and a loop sticking out so that you can hang the ice pops sheet somewhere.
Enjoy the ice pop arts below created by the children at the library!


Let's build a playhouse!
Paper Playhouse!


Supplies Used: White construction paper, crayons/markers, smaller pieces of card stock, one piece of string, scissors, glue/tape, tissue paper, fabric and stickers.
Instructions:
1. Cut out 2 house shape outlines together from white construction paper. Make sure the house outlines are connected on one side so that they can open into a book format.
2. Using scissors, cut out a flap in the shape of a door on the front bottom of the house. Make sure the flap opens and closes like a door.
3. Using crayons/markers, stickers and pieces of tissue paper, draw in windows and decorate as you wish. The tissue paper pieces can be rolled into flowers or anything else.
4. Open up the house and attach a rectangular piece of fabric onto the bottom of the inside. This will be your carpet.
5. Cut out a circle from card stock and cut a hole in the middle. Tie a string through the hole and tie the ends of the string together. You now have a tire swing that you can attach onto the inside of the house or the outside of the house.
6. Cut out a chair shape or table shape from card stock and attach above the carpet. Cut out a toy or teddy bear shape and attach onto the table/chair.
7. Decorate the house with any other stickers or cut outs of your choice.
8. Try to stand the house up if you can.
Enjoy the paper playhouses below created by the children at the library!


After all the hard work of building the playhouse, I would like to walk along the water and cool off by the sea breeze!
Sea Wreathes!

Supplies Used: Paper plate edge, blue tissue paper, scissors, glue/tape, white construction paper, one googly eye, crayons/markers and a small piece of string.
Instructions:
1. Using scissors, cut out the center part of a paper plate. Discard the center of the plate or save for another craft.
2. Cover the remaining outer edge of the paper plate with blue tissue paper and using glue/tape to make sure the tissue paper sticks to the circle. This will be the sea wreathe.
3. Cut out a light house shape from white paper. Color in a design on it.
4. Cut out a fish shape from paper and color in a design on it. Attach a googly eye onto the front of the fish if you wish.
5. Cut out a small sailboat shape from white paper and color in the sails, flag and bottom of the boat.
6. Cut out a circle from white paper and punch a hole in the center so that the circle is like a doughnut. This will be a life preserver. Color in a design onto the life preserver and attach a piece of string onto the top of the preserver to make it seem as if there is a rope with the preserver.
7. Attach all of the colored in shapes (lighthouse, fish, boat, etc.) onto the wreathe.
8. Attach a string onto the top of the wreathe and make a loop so that you can hang the sea wreathe if you wish.
Enjoy the sea wreathes below created by the children at the library!


It's nice to spend time on the water, but let's be aware of sharks swimming around! It's a great time to learn about them! Shark week is here!
Shark Puppet


Supplies Used: Light blue construction paper (or grey), white construction paper, 2 googly eyes, glitter foam stickers, crayons/markers, glue/tape and scissors.
Instructions:
1. Using scissors, cut out a shark shape/outline from light blue or grey construction paper.
2. Cut out a circle shape from white paper. Using scissors, cut out triangle shapes along the edge of the circle. This will be the mouth and teeth of the shark.
3. Attach the mouth with teeth on the top center part of the shark outline. Leave enough room at the top for eyes.
4. Cut out 2 white circles and attach the 2 circles next to each other above the teeth. If you wish, attach a googly eye in the center of each circle. You may color in any designs on the eyes if you wish.
5. Draw designs on the shark using crayons/markers.
6. If you wish to add some sparkle to the fins and tail, cut out small triangle shapes from glitter foam sheets and attach a triangle onto a fin and tail.
7. Cut out a small fish shape from paper and color any design onto the fish. Attach the fish in the mouth with the teeth. Now the shark is eating a meal!
8. Cut out a strip of paper and bend it into a loop shape. Attach the loop onto the back of the shark in a horizontal direction. Now you can stick your fingers through the loop and hold the shark like a puppet.
Enjoy the shark puppets below created by the children at the library!


After learning about sharks from the exhibit, it's time to go outside and play in the bumper boats!
Bumper Boats!


Supplies Used: One paper plate, blue paper, white paper, card stock of different colors, tissue paper, glitter foam stickers, crayons/markers, scissors and glue/tape.
Instructions:
1. Using scissors, cut out a blue circle from construction paper and glue/tape in the middle of the plate. This will be your water for the bumper boats.
2. Cut out 4 boat shapes from white paper and color designs on them using crayons/markers. You may decorate the boats with stickers if you wish.
3. Attach the boat shapes along the inner edge of the blue water circle.
4. Cut out 4 paper doll shapes and draw a face on each doll. Color in hair as well.
5. Cut out bathing suit and shorts shapes from card stock of different colors. Attach a bathing suit or shorts shape onto each doll.
6. Attach each doll onto a boat shapes. Bend the dolls in a way so it looks as if they are each sitting up in a bumper boat.
7. Crumple up pieces of tissue paper and attach around the edge of the paper plate to make it seem as if there are flowers or bushes around the edge of the bumper boat enclosure.
8. Adorn the water or boats with more stickers if you wish!
Enjoy the bumper boat rides below created by the children at the library!


Wow, I see some rubber duckies racing along!
Duck Derby!

Supplies Used: 1 sheet of construction paper, yellow paper, strips of card stock, glue/tape, crayons/markers, stickers, scissors, blue paper and tissue paper.
Instructions:
1. Place a letter-sized piece of construction paper on a flat surface.
2. Cut out a circle from blue paper and attach the blue circle on the middle of the sheet of paper. This will be a small pond of water for the obstacle course. If you wish, adorn the edge of the paper pond with crumpled up pieces of tissue paper. These can be your flowers around the pond.
3. Using scissors, cut out 5 rubber duck shapes from yellow paper. You can use paper of other colors if you wish your ducks to be different colors.
4. Cut out strips of card stock. Attach them onto the sheet in any direction and in any way or form. You may bend some of them into loops or arcs. These will be part of the obstacle course for the duck derby.
5. Color faces and decorations on your paper ducks. You may adorn the ducks with stickers if you wish.
6. Attach the ducks onto the paper obstacle course. You may attach them leaning against an obstacle or you can attach them to a bent piece of paper standing up so that the ducks look as if they are standing up or moving.
Enjoy the duck derbies below created by the children at the library!


Life's a Beach!
Paper Plate Beach!

Supplies: One paper plate, blue tissue paper, sand, card stock, fabric, scissors, glue/tape, image or outline of a beach ball, images of children and crayons/markers.
Instructions:
1. Attach the blue tissue paper onto half of the plate with glue/tape. This will be the ocean/sea/lake.
2. Using scissors, cut out a small rectangle from card stock and color a design on it if you wish. Bend both ends of the rectangle in different directions so that the rectangle can resemble of folded beach chair or chaise.
3. Attach the beach chair/chaise onto the blank side of the plate.
4. Using scissors, cut out a rectangle or square shape from fabric. Attach onto the plate near the chair/chaise. This will be a beach towel.
5. Cut out a surf board shape from card stock and attach onto the blue tissue paper. This will be the surf board on the water.
6. Cut out a circle from paper or a picture of a beach ball and color it in as you wish. Attach is anywhere on the plate.
7. Cut out a fish shape from card stock and after coloring the fish, attach onto the blue tissue paper. This will be the fish swimming in water.
8. Cut out 3 images or stick figures of children/people. Color them in as you wish. Perhaps you can color bathing suits on them or summer outfits. If you wish to use pictures of real children/people in swimwear, that's fine too.
9. Attach the images of the people onto the plate. Perhaps, one person can be attached to the chair/chaise. Another can be attached onto the beach towel to make it seem as if that person is laying on a beach towel. Another person can be attached to the surfboard to make it seem as if there is a surfer in the water.
10. Place glue onto blank spaces on the plate around the chaise, people, towel, etc. Pour sand on the glue. After a minute, shake off the excessive sand and now you have some sand patterns on your paper plate beach!
Enjoy the paper plate beaches below created by the children at the library!


Ice cream is refreshing on a hot day at the beach! Let's get some ice cream at the ice cream stand!
Pop-Up Ice Cream Stands!

Supplies: A piece of cardboard box with flaps and a compartment that stands out, Construction paper, Card stock, Crayons/Markers, Glue/Tape, Scissors and Cut-Outs of Stick Figures.
Instructions:
1. Cover the card board with construction paper of a light color. If there are flaps, make sure they are on the bottom of the card board.
2. Cut out ice cream cones, popsicle shapes and other types of ice cream shapes and glue/tape them onto the cardboard side that is covered in paper. Using crayons/markers, draw designs on the ice cream shapes as you wish.
3. Color in stick figures of children and attach them onto the card board with the ice cream shapes.
4. Color in or attach any other designs to make the card board resemble an ice cream stand.
5. Try to stand up the card board by folding in the flaps. If the paper ice cream stand doesn't stand up, then lean it against something.
Enjoy the pop-up ice cream stands below created by the children at the library!


I would love to snack on some popsicles! The watermelon one and the orange/coconut ones both look delicious!
Paper Popsicles!

Supplies: Construction Paper, Popsicle Sticks, Glue/Tape, Scissors and Crayons/Markers.
Instructions:
1. Cut out a Popsicle shape from construction paper. You may want to cut out 2 shapes at once and attach them together to make the paper Popsicle thicker in texture.
2. Using crayons/markers, color in designs of your choice. (For example, if you wish to make a watermelon Popsicle, perhaps you can use pink paper and then draw black or brown dots on the paper).
3. Cut out smaller shapes from construction paper, decorate them as you wish and attach them onto the Popsicle. (For example, if you wish to make a Popsicle with an orange flavor, perhaps you can cut out small orange slice shapes and attach them onto the Popsicle shapes.
4. Attach a Popsicle stick onto the Popsicle shape at the bottom.
Enjoy your paper ice pops!


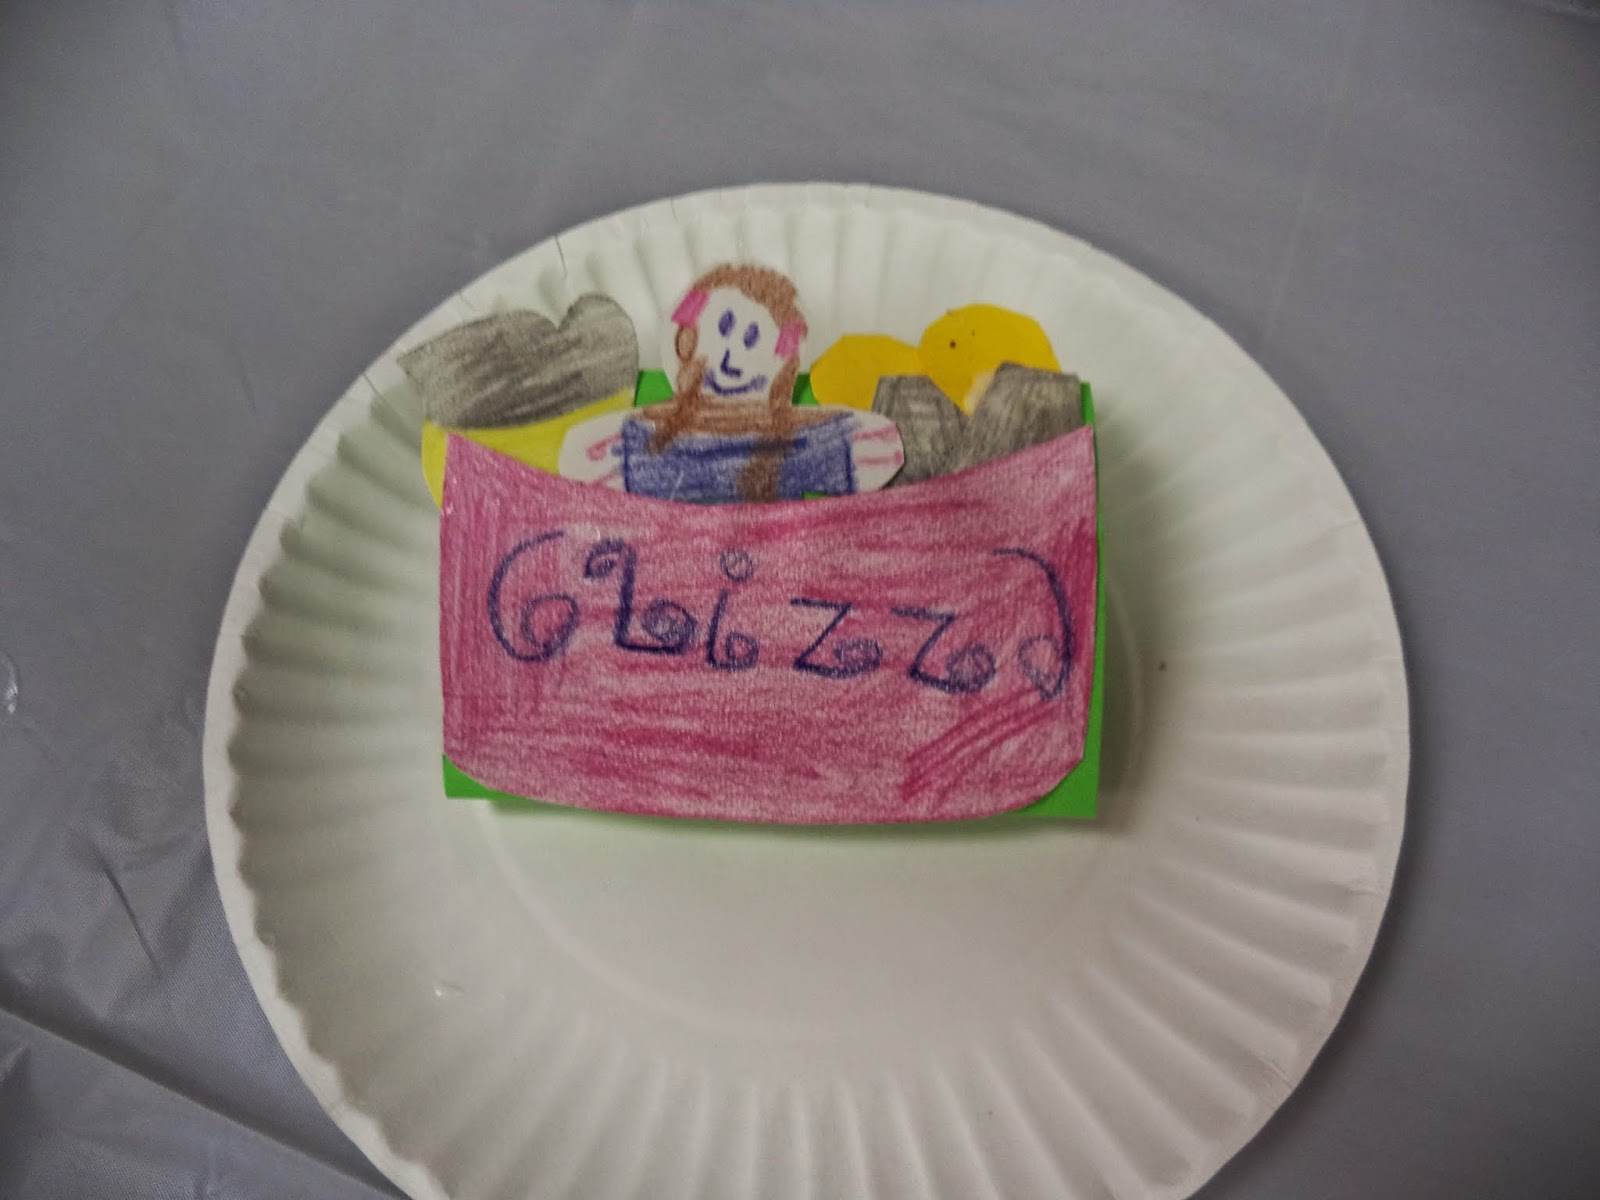
Supplies Needed: One paper plate, card stock, crayons/markers, glue/tape and anything else you wish to use to embellish the lemonade stand.
Directions:
1. Take a square shaped piece of card stock and fold one side down. The side folded down should be an inch thick.
2. Attach the card stock onto the center of a paper plate with the folded side down and the rest of the card stock standing up. (This will be the lemonade stand).
3. Decorate the stand using markers, crayons, stickers and other pieces of card stock.
4. Cut out lemon shapes, cup shapes and a shape of a pitcher from card stock. Attach them onto the stand. Perhaps the pitcher and cup shapes can be attached to the top of the stand.
5. Cut out a human figure from paper and draw a face, hair and clothes onto the human figure.
6 Attach the human figure onto the top of the stand with the cups and pitcher to make it seem as if the human figure is selling and serving lemonade.
Enjoy the paper lemonade stands below created by the children at the library!


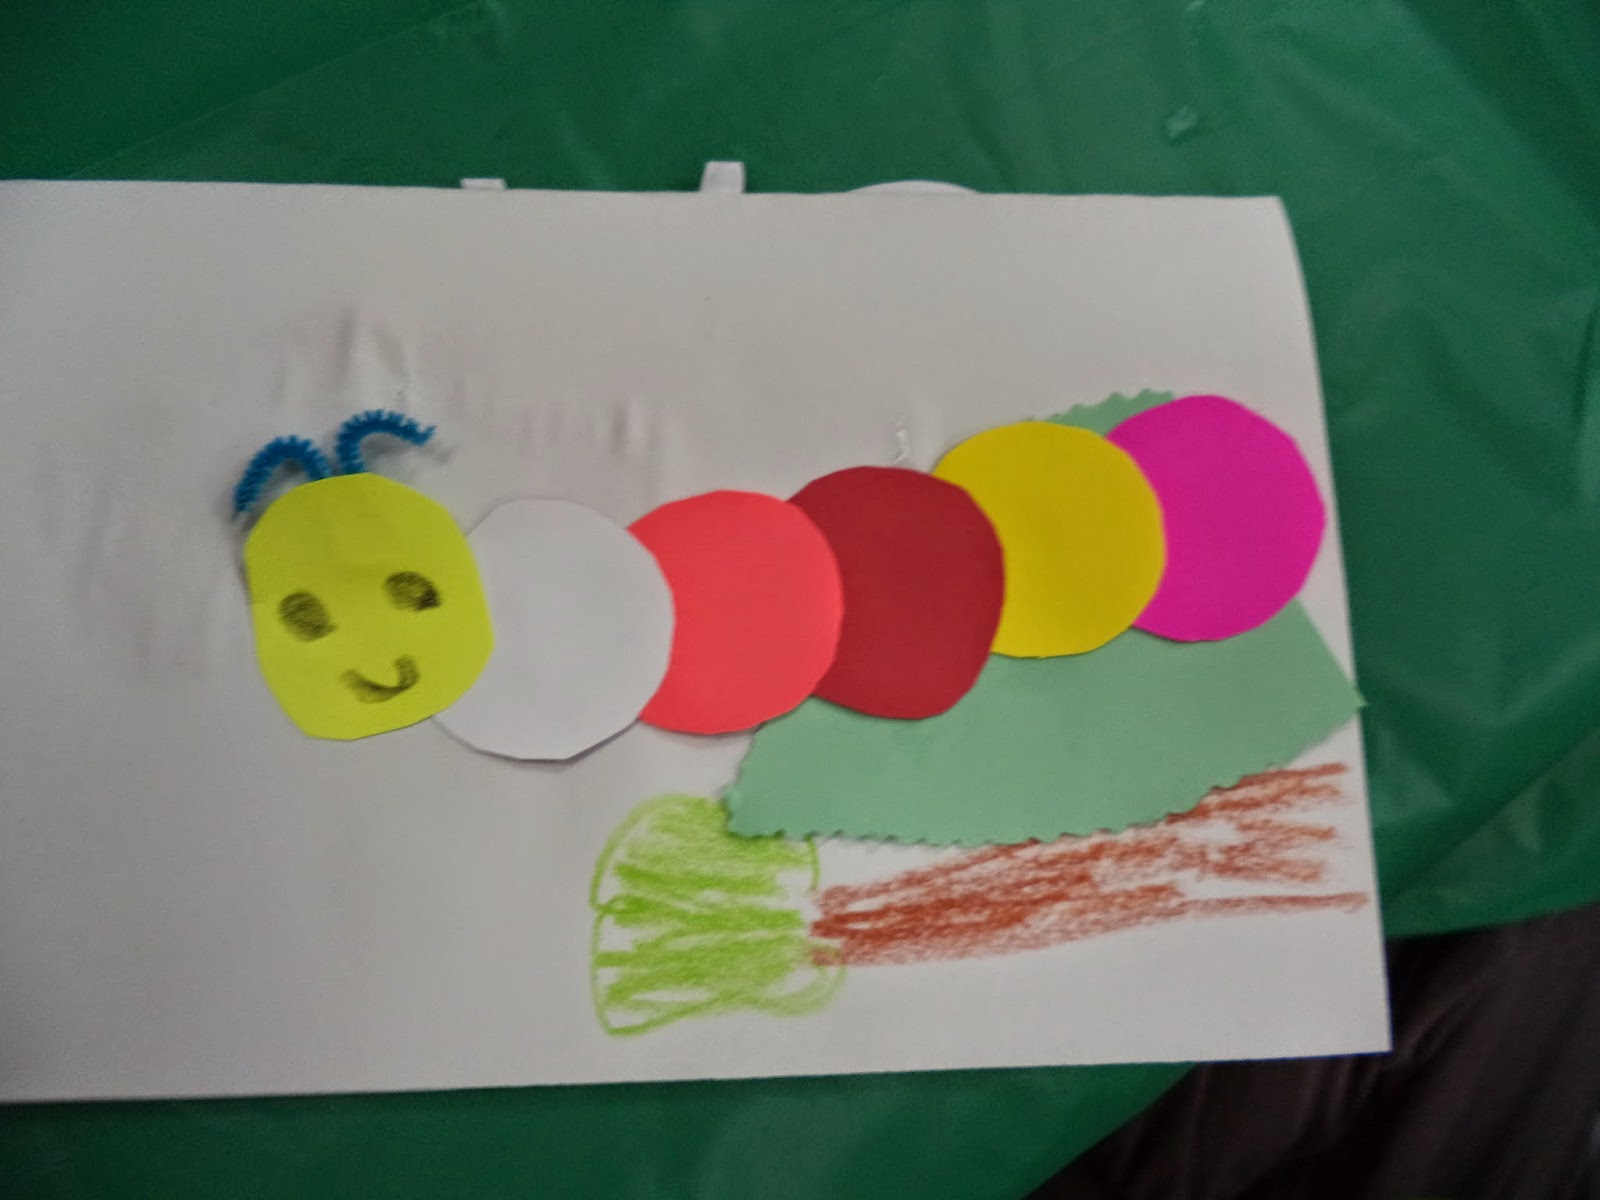
While we drink our lemonade, let's watch some caterpillars and butterflies in the backyard!


Supplies Needed: Construction Paper, Card Stock, Pipe Cleaners, Scissors, Zigzag scissors, Glue/Tape, Crayons/Markers.
Directions:
1. Fold a big piece of construction paper in half.
2. Cut out a leaf shape from green paper and 6-7 small circles from card stock. Attach the leaf on one side of the folded construction paper. Attach the circles in a curvy, horizontal line on top of the leaf. (This will be the caterpillar on the leaf stage).
3. Draw a face on one of the circles on either end of the line. Bend a small piece of pipe cleaner into the shape of antennas and attach it onto the top of the same circle that has the face. Draw 2 lines each sticking out at the bottom of each circle to represent the legs.
4. Draw a sun and anything else on or around the caterpillar.
5. Cut out a cocoon shape from orange paper and draw lines on it. Attach the cocoon onto the next section of the folded paper.
6. If you wish, draw a twig or branch under the cocoon as well as stars, the moon or anything else of your choice.
7. Cut out an outline of a butterfly or print out an outline of a butterfly and color in and decorate the butterfly.
8. Attach the butterfly onto the last empty section of the folded construction paper.
Enjoy the life cycle of the butterflies below created by the children at the library!


Let's hop on a ferris wheel. First we have to build it!
Paper Ferris Wheel Design

Supplies Needed: One paper plate, colorful card stock, construction paper, a strip of cardboard, glue/tape, scissors, some medium sized pieces of pipe cleaner and crayons/markers.
Instructions:
1. Using crayons or markers, draw a design on your paper plate to resemble that of a ferris wheel, such as circles, lines, spokes, etc. You may want to use pipe cleaners to enhance some of the lines.
2. Cut out ferris wheel car shapes out of card stock and decorate them if you wish using crayons/markers or stickers.
3. If you wish, cut out a star shape or any other shape of your liking, such as a circle, heart, etc. and decorate it and then glue/tape it to the center of the plate for decoration.
4. Cut out little people figures out of construction paper, draw faces, hair and outfits on them and then attach one or two of them to each car using glue/tape.
5. Once all of your cars are filled with one or two little people and decorated, attach each car around the rim of the plate to make it resemble people riding a ferris wheel.
6. Fold a strip of cardboard and tape it onto the back of the ferris wheel and make sure the other half of the cardboard strip is flat on the table. Try to make the ferris wheel stand up with the cardboard support attached to the back of it.
7. Enjoy the ride.
Below are ferris wheels created by the children at the library!


After you dismount from the ferris wheel, you may now enjoy a visit to Sea World!

Sea World Diorama

Welcome to Sea World!
Supplies Needed: One paper plate folded in half, card stock, tissue paper, cut outs of aquatic animals downloaded from online or drawn my hand (depending on your preference), crayons/markers, glue/tape and scissors.
Instructions:
1. Fold a paper plate in half and then position the plate in a standing position so that one half will be the floor and the other half will be the background.
2. Using crayons/markers, color the plate according to how you would like the background of your Sea World to appear. You may use tissue paper as well for the floor or anywhere on the background if you wish.
3. Download from online or draw aquatic animals, such as penguins, orca whales, seals and other creatures of your choosing that you may find at Sea World.
4. Once the animals are downloaded and cut out, draw or decorate if you wish to embellish the animals, such as coloring in the eyes, feet and other features.
5. Glue or tape the animal cut outs along the background and floor of the plate in any position of your choosing.
6. If you wish to make an animal stand up, glue/tape a small piece of folded card stock for support to the back of the creature and then glue/tape the bottom folded down part of the card stock on the floor of the plate to make the animal appear to stand up.
7. Cut out 2 circles from card stock (preferably blue, green, aqua, teal, etc.). Make one circle bigger than the other.
8. Draw pictures of fish, star fish, crabs, algae or any other marine organisms of your choice onto the bigger circle. Take a small strip of card stock and roll it and tape it into a little tube. After you are done coloring in the big circle, attach it to the tube using glue/tape.
9. Attach the little tube with the big circle on top to the floor of your Sea World to simulate a touch tank of sea creatures. The little card stock tube under the touch tank will elevate the tank so that it is not flat and has a dimension to it.
10. Using a crayon/marker, write in the words "Sea World" on the little card stock circle and glue/tape it onto the top of the scenery of the diorama to make it resemble a sign welcoming people to your Sea World.
Have fun at Sea World and enjoy the Sea Worlds below created by the children at the library!


After visiting Sea World, please make your way into Candy Land!
Candy Land Poster!

Supplies Needed: One large piece of card stock (any bright color), white construction paper, tin foil, small pieces of card stock or construction paper of different colors, crayons/markers, glue/tape and scissors.
Instructions:
1. Cut out a long "S" type shape out of white construction paper.
2. Cut out 2 "V" or "U" type shapes out of construction paper.
3. Using crayons/markers, color different squares onto the curvy white shapes and then paste them onto the large sheet of card stock.
4. Cut out candy shapes out of small pieces of card stock or construction paper and tin foil as well. (The Hershey Kiss shape was cut from tin foil. )
5. Color the candy shapes and glue/tape them on or around the curvy stripes of paper to resemble the game "Candy Land".
6. Write the words "Candy Land" to label the game. (You can use this craft as a real game or for decoration).
Enjoy!


Wow, the summer is off to a fun start! Let's continue the fun into July and August!